Configure UC Service on CUCM
(The UC Service window in Cisco Unified Communications Manager Administration allows you to add, search, display, and maintain information about UC services. You can group UC services into service profiles that you associated with end users. After end users have a service profile, their clients can download this profile for seamless integration with the configured UC services.)
- Login to Cisco Unified Communications Manager
- Go to User Management > User Settings > UC Service > Click on Add New
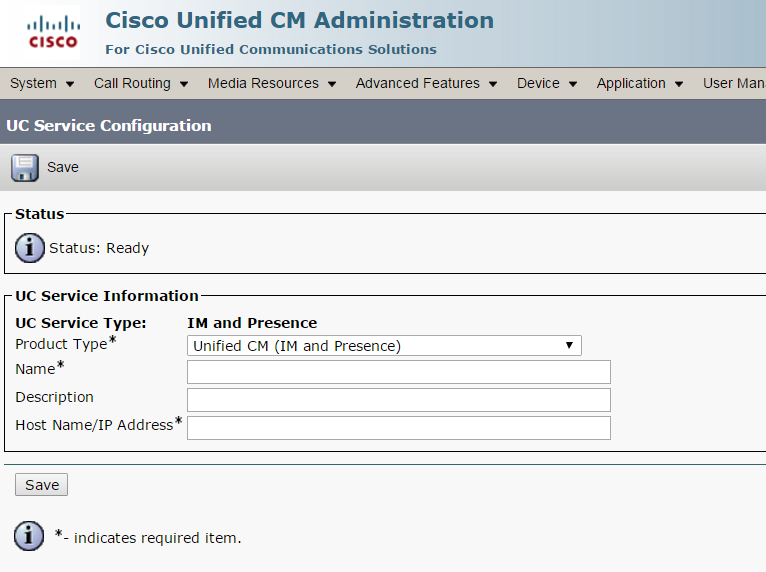
- Product Type > Select Unified CM (IM and Presence) from drop down menu
- Name > Enter a Name – For example > Jabber Presence
- Description > Enter a description > For example > UC Service for Jabber Presence
- Host Name / IP Address > Enter IM & Presence IP Address
- Click on Save
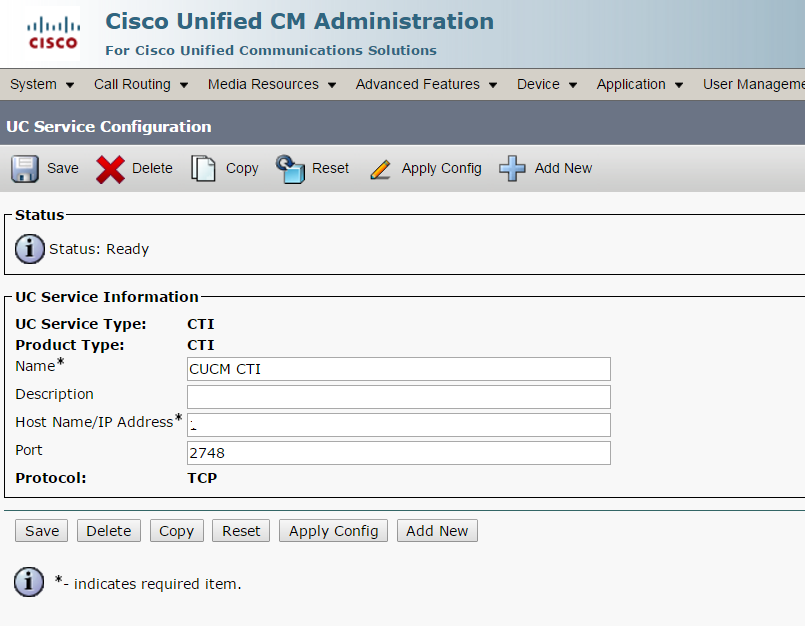
- Go to User Management > User Settings > UC Service > Click on Add New (Soft clients use the CTI service for deskphone control)
- Product Type > Select CTI from drop down menu
- Name > Enter a Name – For example > Jabber CTI
- Description > Enter a description > For example > UC Service for CTI
- Host Name / IP Address > Enter CUCM IP Address
- Click on Save
Configure Service Profile on CUCM
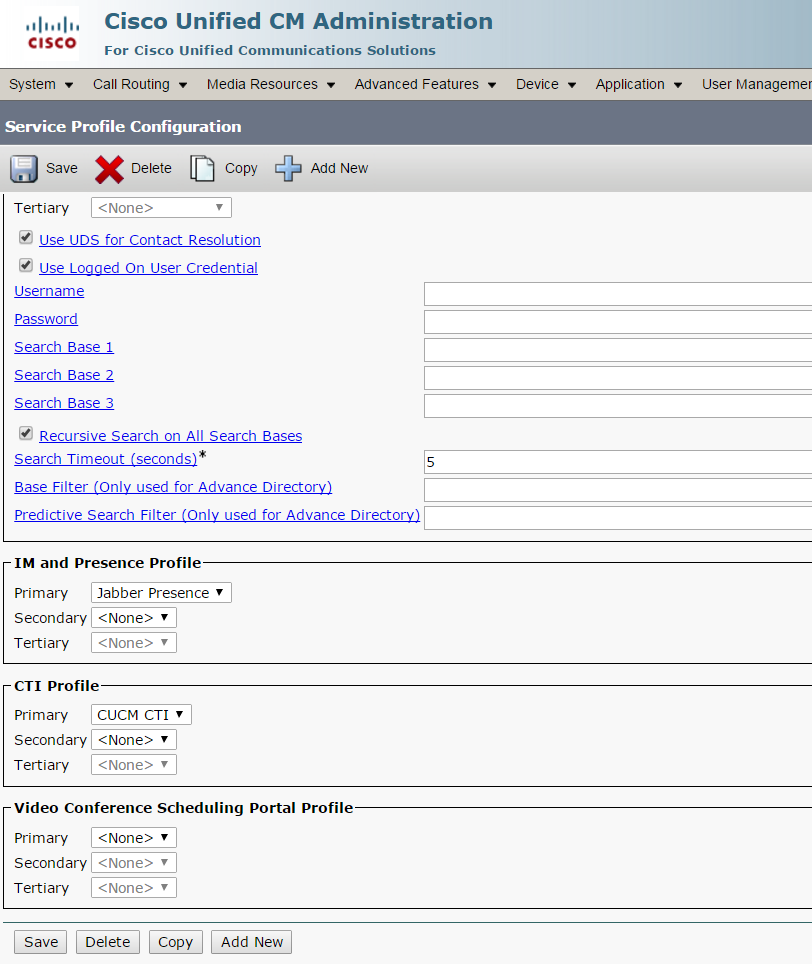
- Go to User Management > User Settings > Service Profile > Click on Add New
- Name > Service Profile for Jabber
- Description > Enter a small description
- Locate IM and Presence Profile >
- Select the UC Service from drop down as created in the previous step. In our example we used “Jabber Presence”.
- Locate CTI Profile >
- Select the UC Service from drop down as created in the previous step. In our example we used, “Jabber CTI”.
- Click on Save
Configure Cisco Unified Client Services Framework on CUCM
- Go to Device > Phone > Click on Add New
- Phone Type > Select Cisco Unified Client Services Framework
- Click on Next
- Device Name > Enter a Device Name
- Description > Enter a Description
- Device Pool > Select a Device Pool
- Phone Button Template > Standard Client Services Framework
- Common Phone Profile > Standard Common Phone Profile
- Calling Search Space > Select a Calling Search Space
- Location > Select a Location
- Owner > Radio Check User
- Owner User ID > Select the User ID that you would like to associate with this device. The same user id will be used to login into Jabber
- Primary Phone > Select Primary Phone Mac Address from drop down. The primary phone that you would like to link with Jabber
- Device Security Profile > Select Cisco Unified Client Services Framework – Standard from drop down menu
- SIP Profile > Select Standard SIP Profile from drop down menu
- Click on Save
- Click on Line 1 >
- Now configure rest all parameters in Line 1 like you do on Cisco IP Phone Lines.
Configure a Cisco IP Phone for above Cisco Unified Client Services Framework on CUCM
- IP Phone configuration will remain same like you do configure for Cisco IP Phones in your network.
End User Configuration on CUCM
- Go to User Management > End User > (If you don’t have an End User for above user, then create one – else select an end user you wish to use for logging into jabber)
- Service Settings > Check Mark > Enable User for Unified CM IM and Presence (Configure IM and Presence in the associated UC Service Profile)
- UC Service Profile > Select Service Profile for Jabber from Drop Down Menu
- Controlled Devices > Select the Cisco Unified Client Services Framework and Cisco IP Phone and associate with controlled devices
- Click Add to Access Control Group
- Assign the following roles :
- Standard CTI Allow Control of Phones supporting Connected Xfer and conf
- Standard CTI Allow Control of Phones supporting Rollover Mode
- Standard CCM End Users
- Standard CTI Enabled
- Click on Save

Download and Install Jabber on your Windows Machine
- Download Jabber executable file
- Install Jabber on your Windows
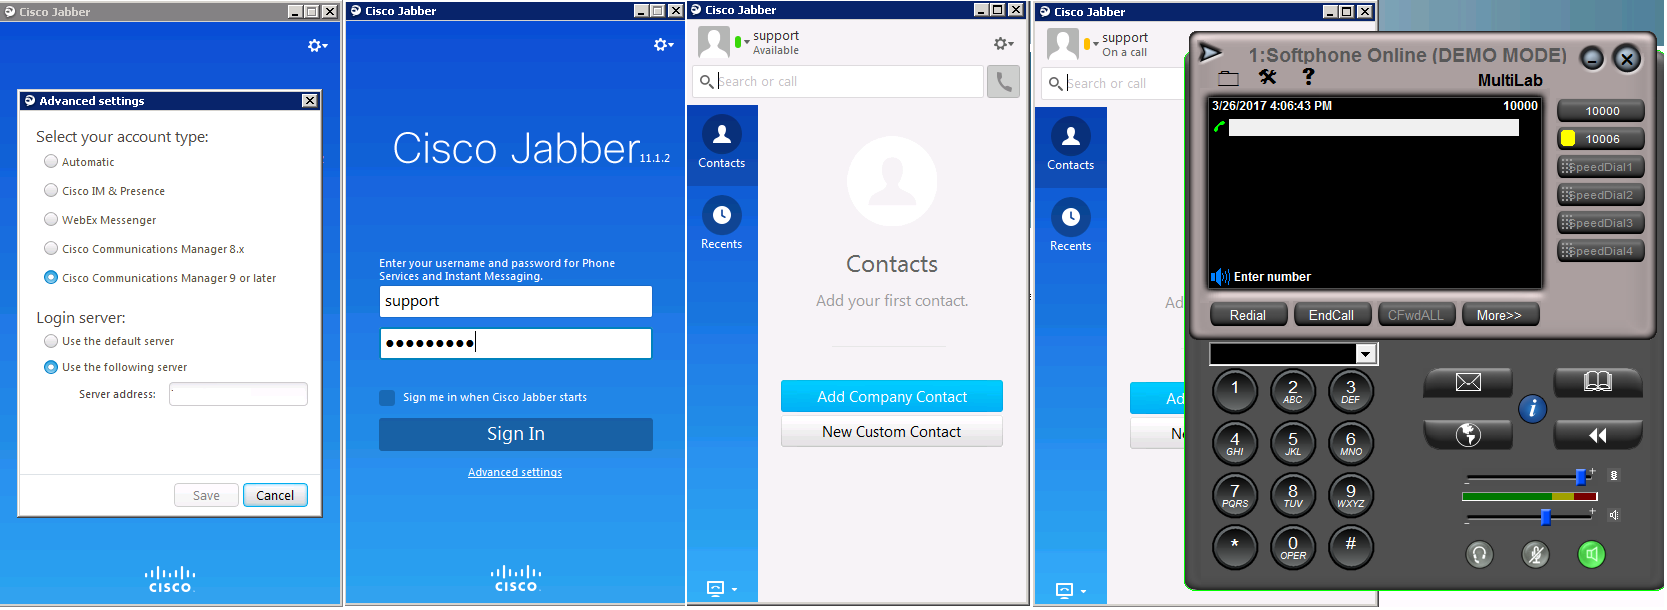
- Click on Advanced Settings
- Radio Check > Cisco Communications Manager 9 or later (If you have 9x or later version of CUCM) else select Cisco Communications Manager 8.x)
- Radio Check > Use the following server >
- Server Address > Enter CUCM IP Address
- Click on Save
- Enter Username >
- Enter Password
- Click on Sign In
- You should be able to logged into Jabber
- When you are on call – your presence status should show as “On a call”, if you are available, it should show as “Available”.
Hope this helps!
Pages: 1 2

Pingback: Installation & Configuration of MRA Expressway C & E
thanks for all you do. much appreciate.
i have issue to deploy presence server. when i launch jabber, after putting password jabber cannot communicate with server.
What if your “userpriclename” is 123456789121002@mil and when you pull the user up, is says this IM Scheme is 123456789121002@mil@default domain? I cannot change my userprinclename settings, is there a way to strip the @mil and make the IP Scheme 123456789121002@defaultdomain?
Hello, this page with these blogs seems excellent to me, I hope they continue to make more content,
Regarding the issue of jabber when you enter the user as you show it in images, only the support user in my case tells me the wrong format, use [email protected], you can upload the configuration that is done with the Domains.
Dear Friend,
Although your contents are very informative and useful, I need help in two things…
How I creat a Jabber profile for an existing user added through Device Profile.
How do I change the Mac address of an existing user’s phone.
Sorry I am new to CUCM.
Thanks in advance,