Configure Teams Direct Routing with CUCM using Audiocodes SBC
In this article, we are going to see how to configure Teams Direct Routing with Audiocodes SBC. This article will focus on the configuration done on Audiocodes and CUCM.
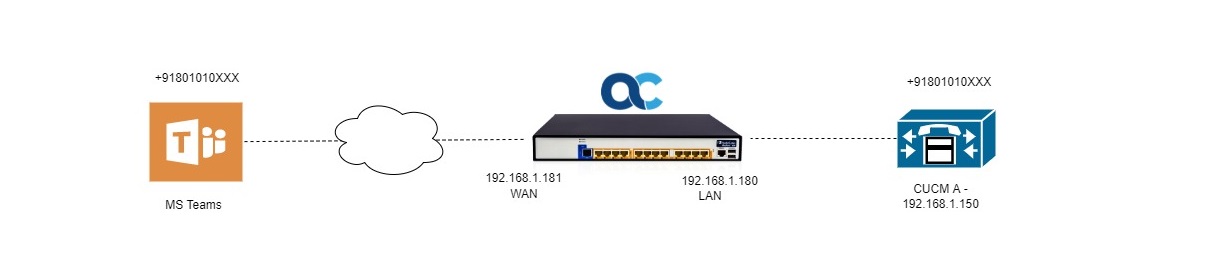
Setting up the Interface
Initially the teams will not be having any IP Address assigned until and unless DHCP is enabled and you get the IP Address from DHCP. In order to assign a static IP address to the Audicodes, you need to login to the CLI and enter the following commands:
configure network

network-dev 0
   underlying-if "GROUP_1"
   name "LAN"
   tagging untagged
   activate
  exit
  network-dev 1
   underlying-if "GROUP_2"
   name "WAN"
   tagging untagged
   activate
  exit

interface network-if 0
   application-type media-control
   ip-address 192.168.1.180
   prefix-length 24
   gateway 192.168.1.1
   name "LAN IP Interface"
   primary-dns 192.168.1.1
   secondary-dns 4.2.2.2
   underlying-dev "LAN"
   activate
  exit

interface network-if 1
   application-type media-control
   ip-address 192.168.1.181
   prefix-length 24
   gateway 192.168.1.1
   name "WAN IP Interface"
   primary-dns 192.168.1.1
   secondary-dns 4.2.2.2
   underlying-dev "WAN"
   activate
  exit
Accessing the Audiocodes SBC Webpage
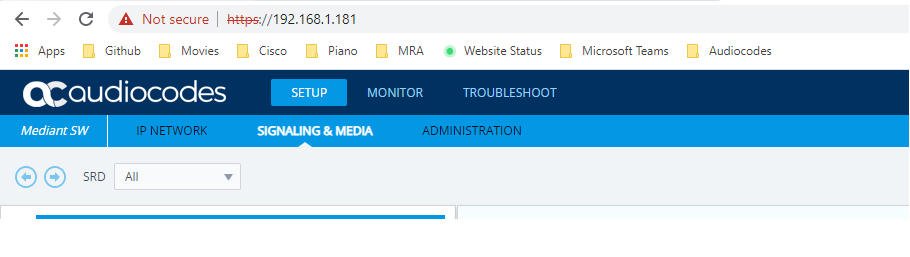
- As per our scenario and with the above commands executed, we have associated “application-type oamp-media-control” with network-inf 1 and that is associated to an IP Address 192.168.1.181
- In order to browse the URL, enter the IP Address on your browser as “https://OAMPURL“, in our case, “https://192.168.1.181” and you should be able to access the webpage.
Signing the SSL Certificate
- Navigate to IP Network > Security > TLS Context
- Click on Change Certificate
- Complete the Certificate Signing Request and create a CSR
- Get the CSR signed from one of the below SSL providers.
AffirmTrust
AddTrust External CA Root
Baltimore CyberTrust Root
Buypass
Cybertrust
Class 3 Public Primary Certification Authority
Deutsche Telekom
DigiCert Global Root CA
Entrust
GlobalSign
Go Daddy
GeoTrust
Verisign, Inc.
Starfield
Symantec Enterprise Mobile Root for Microsoft
SwissSign
Thawte Timestamping CA
Trustwave
TeliaSonera
T-Systems International GmbH (Deutsche Telekom)
QuoVadis
- Upload the signed certificate and root certificate.
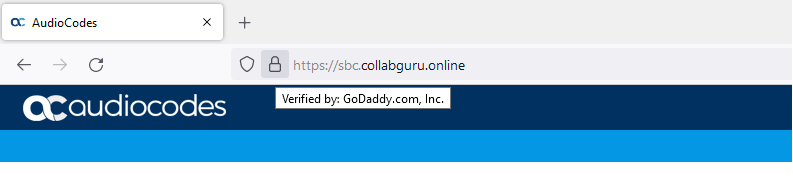
- It is also important to upload Baltimore Certificate as we are going to enable MTLS (Mutual TLS).
- Once the certificate are signed and installed properly, the browser looks as follows:
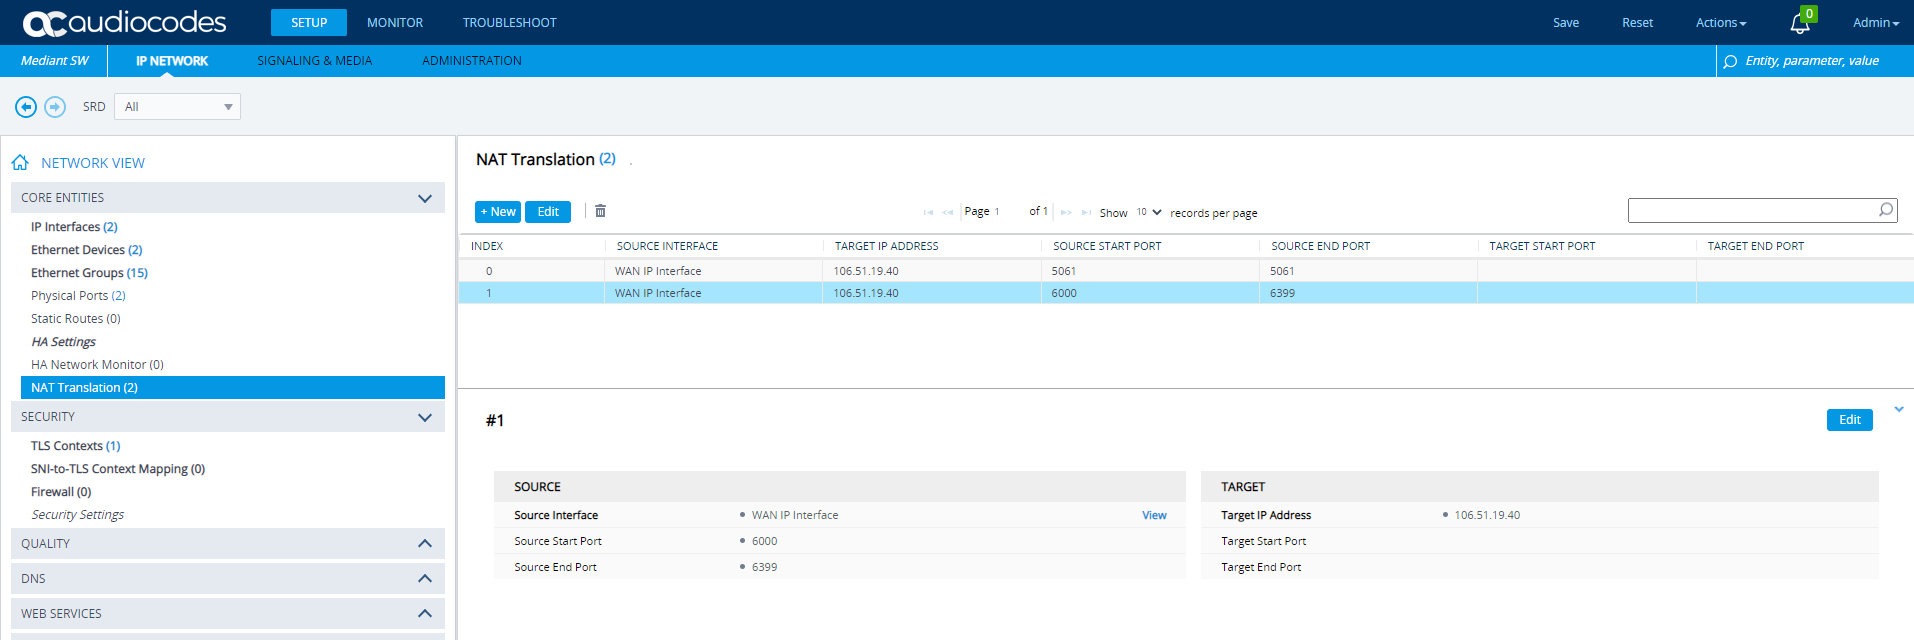
NAT Translations
- Navigate to IP Network > Core Entities> NAT Translation
- Click on Add new
- Select the Source Interface as WAN
- Source Start Port – 5061
- Source End Port – 5061
- Target IP Address – Public IP Address of your Internet
- Click on Apply
- Click on Add new
- Select the Source Interface as WAN
- Source Start Port – 6000
- Source End Port – 6399
- Target IP Address – Public IP Address of your Internet
- Click on Apply
SIP Interfaces
- Navigate to Signaling & Media > Core Entities> SIP Interfaces
- Click on Add New
- Name > Teams IP Interface
- Replicate the configuration as per below.

- Click on Apply
- Click on Add New
- Name > CUCM IP Interface
- Replicate the configuration as per below.
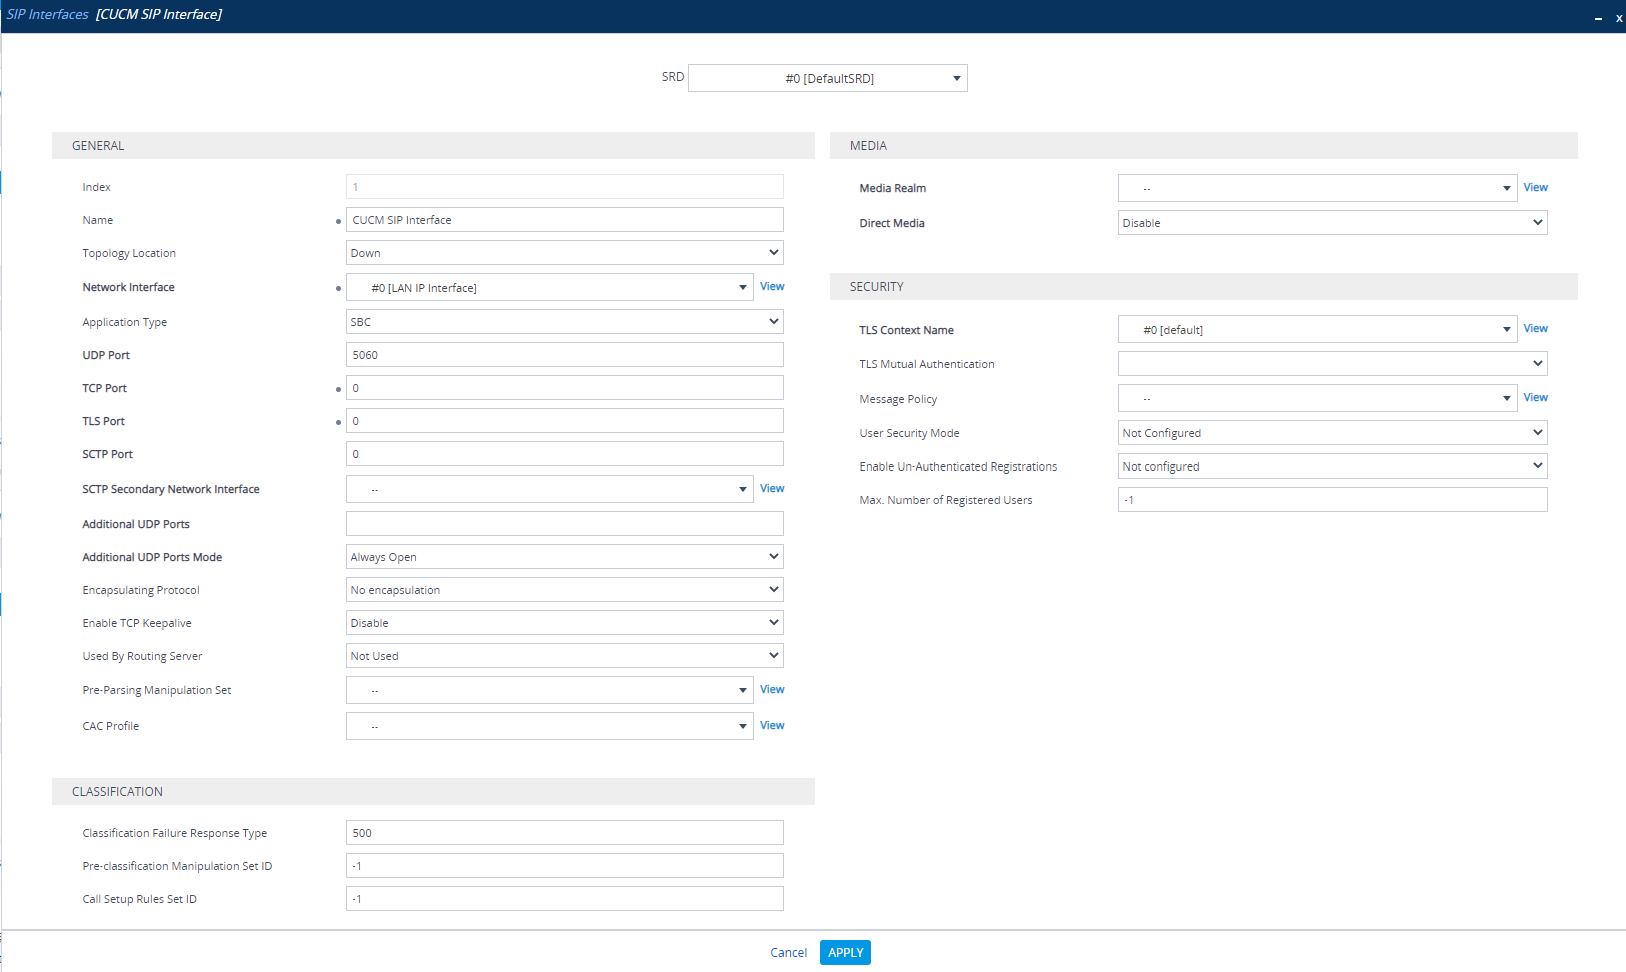
- Click on Apply
Media Realms
- Navigate to Signaling & Media > Core Entities> Media Realms
- Click on Add New
- Name > Teams Media Realms
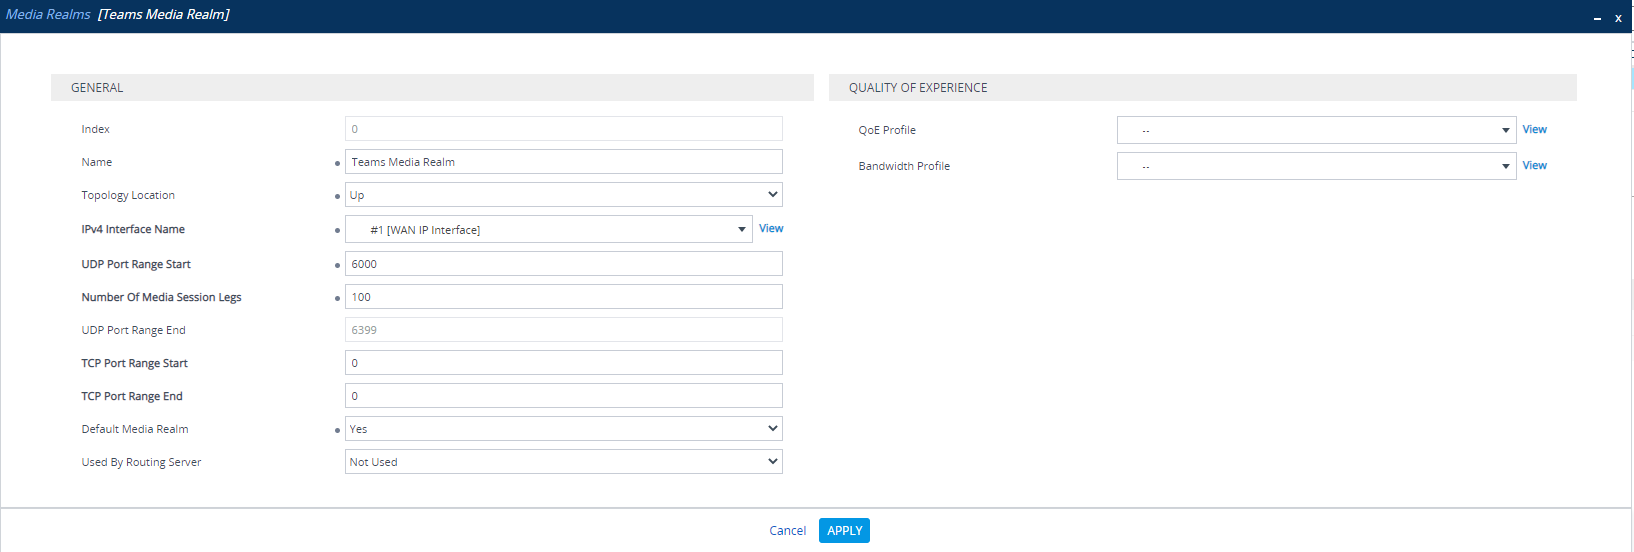
- Click on Apply
- Click on Add New
- Name > CUCM Media Realms
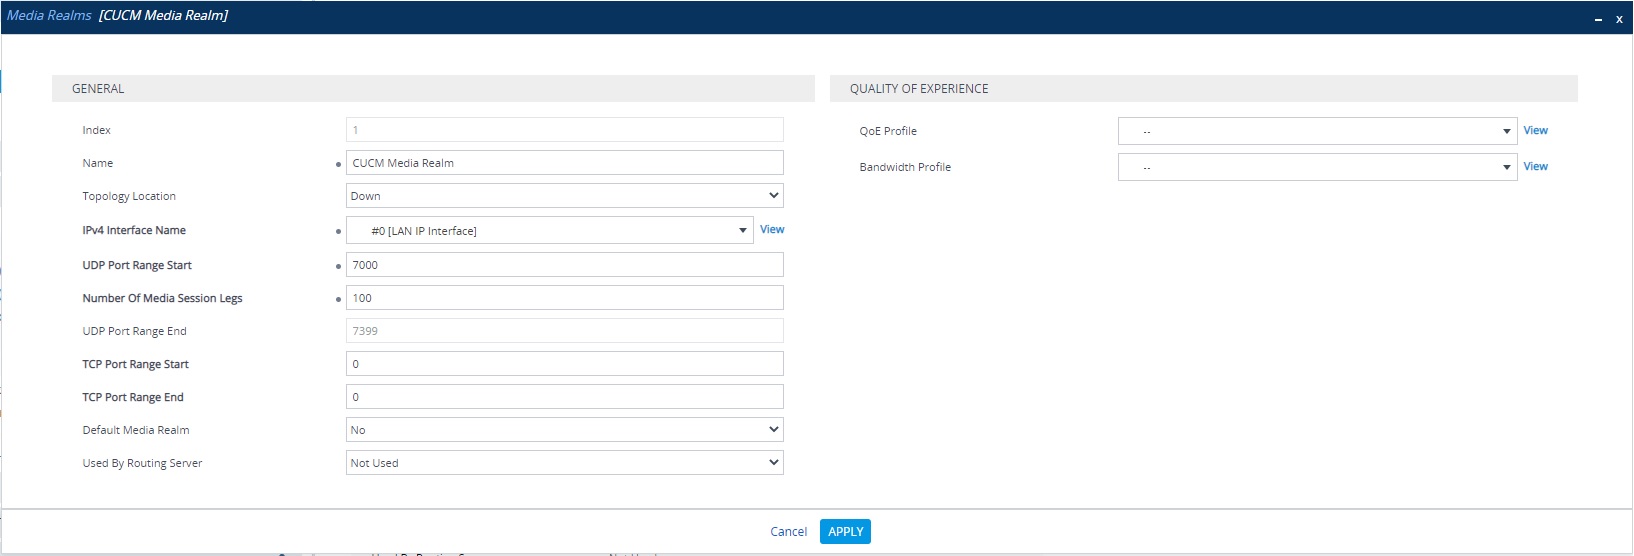
- Click on Apply
Proxy Sets
- Navigate to Signaling & Media > Core Entities> Proxy Sets
- Click on Add New
- Name > Teams Proxy Sets
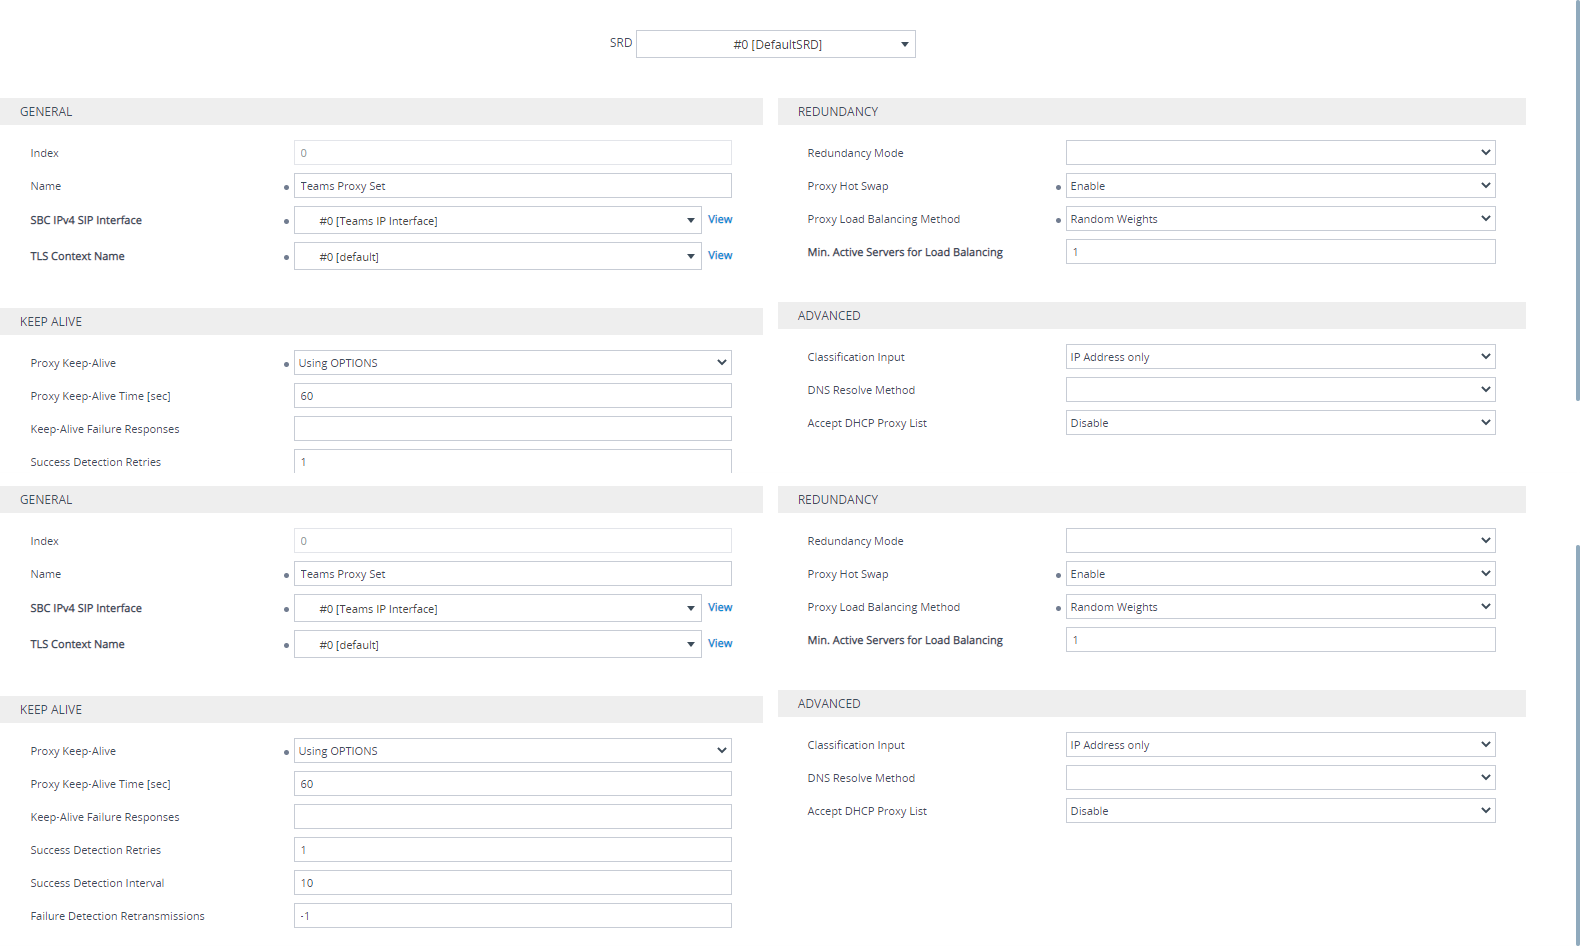
- Click on Apply
- Click on Proxy Address 0 items
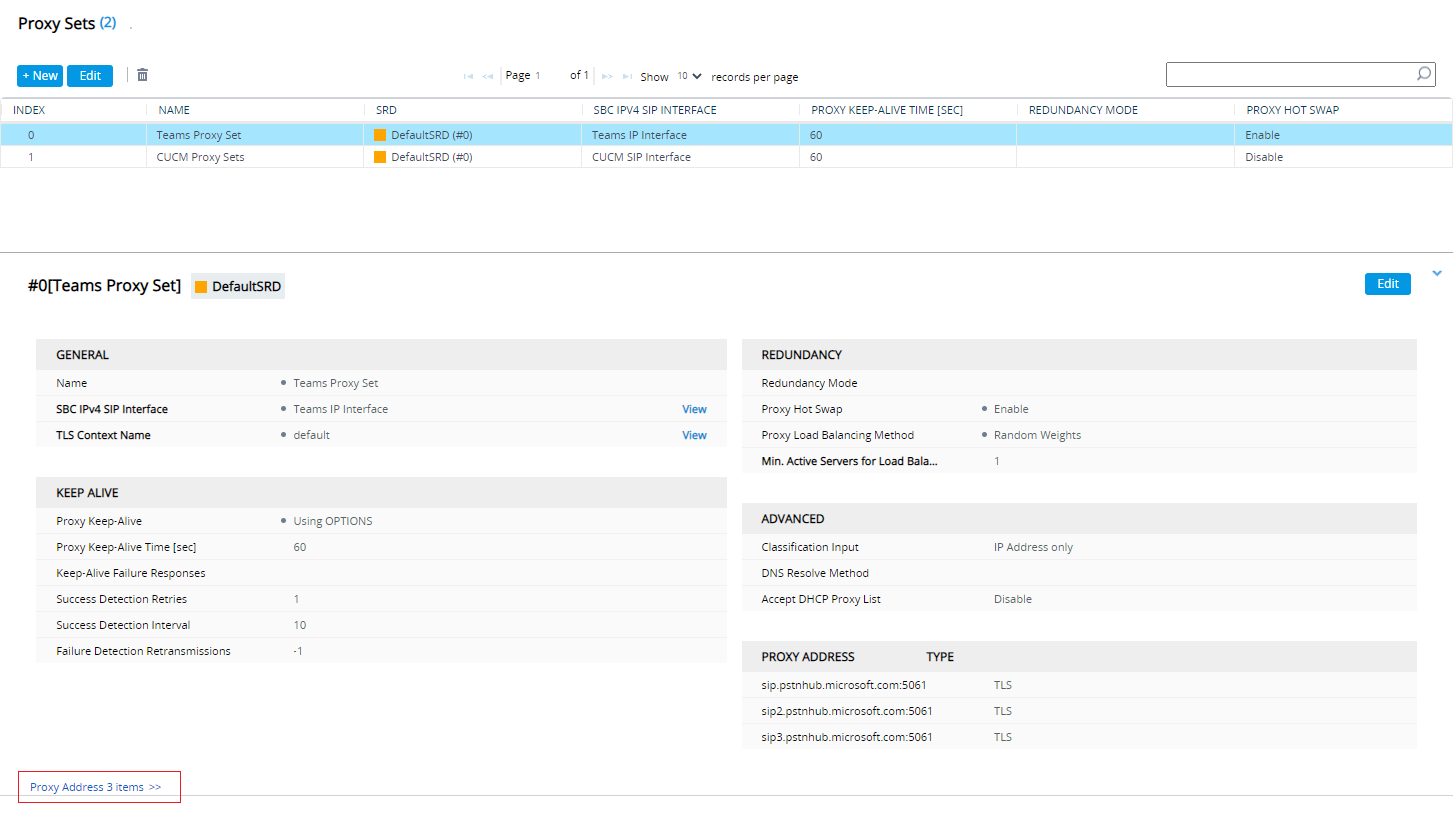
- Click on New
- Proxy Address > sip.pstnhub.microsoft.com:5061
- Transport Type > TLS
- Proxy Priority > 1
- Proxy Random Weight > 1
- Click on Apply
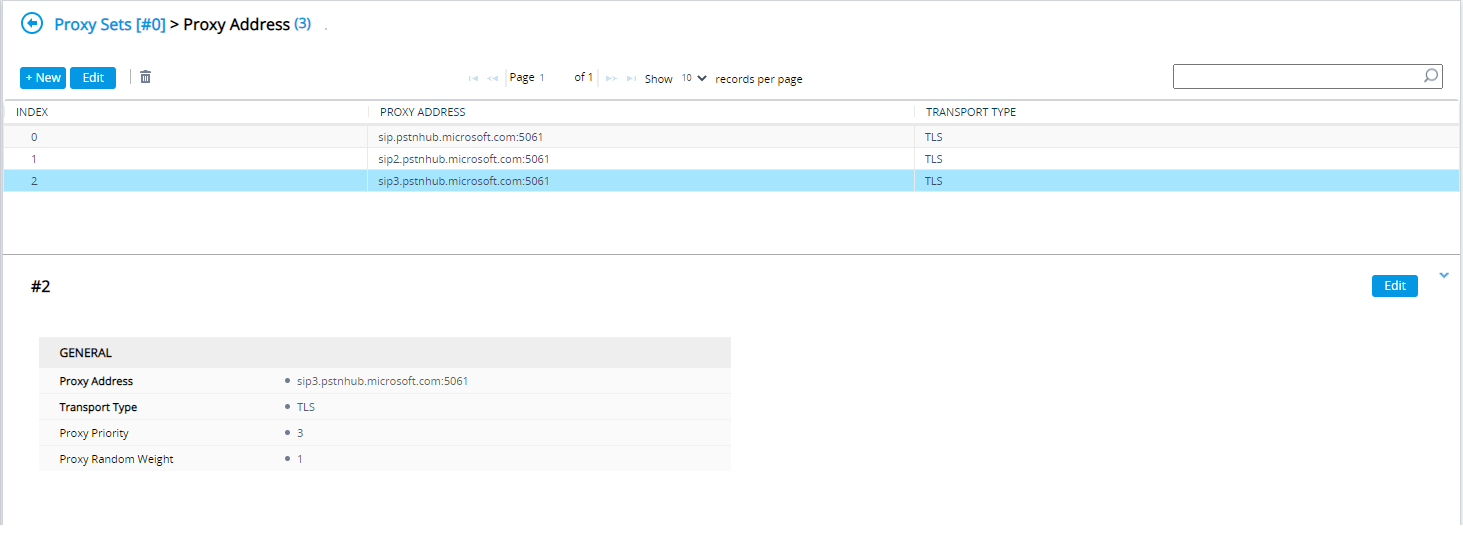
- Click on New
- Proxy Address > sip2.pstnhub.microsoft.com:5061
- Transport Type > TLS
- Proxy Priority > 2
- Proxy Random Weight > 1
- Click on Apply
- Click on New
- Proxy Address > sip3.pstnhub.microsoft.com:5061
- Transport Type > TLS
- Proxy Priority > 3
- Proxy Random Weight > 1
- Click on Apply
- Navigate to Signaling & Media > Core Entities> Proxy Sets
- Click on Add New
- CUCM Proxy Sets
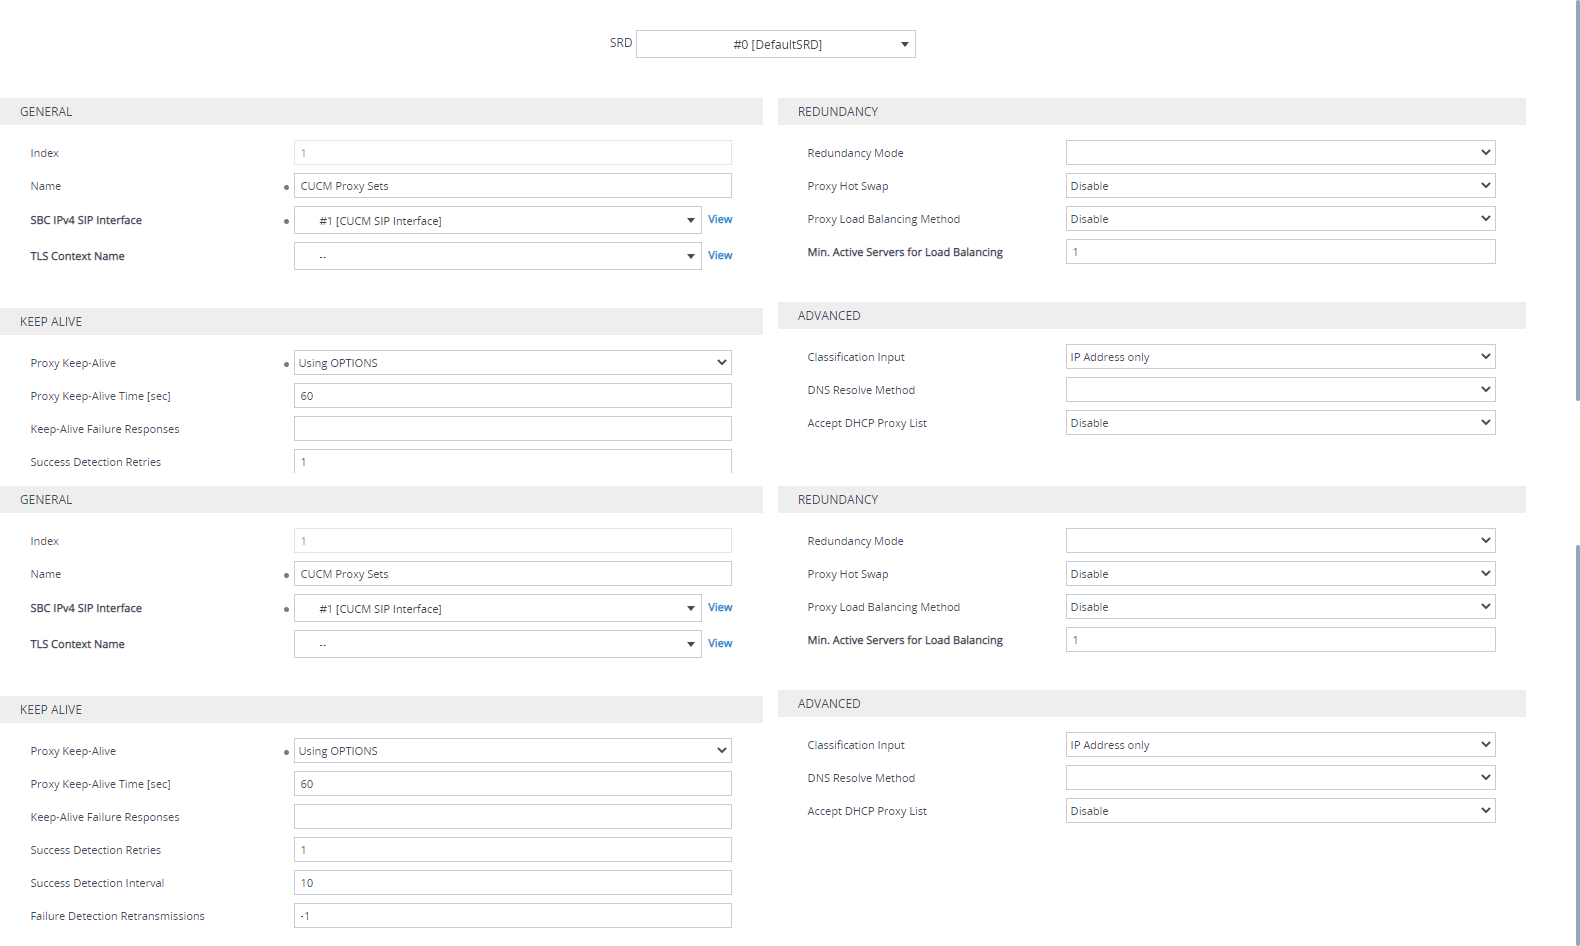
- Click on Apply
- Click on Proxy Address 0 items
- Click on New
- Proxy Address > IP_ADDRESS_OF_CUCM
- Transport Type > UDP
- Click on Apply

IP Profile
- Navigate to Signaling & Media > Coders and Profiles > IP Profiles
- Click on Add New
- Name > Teams IP Profile
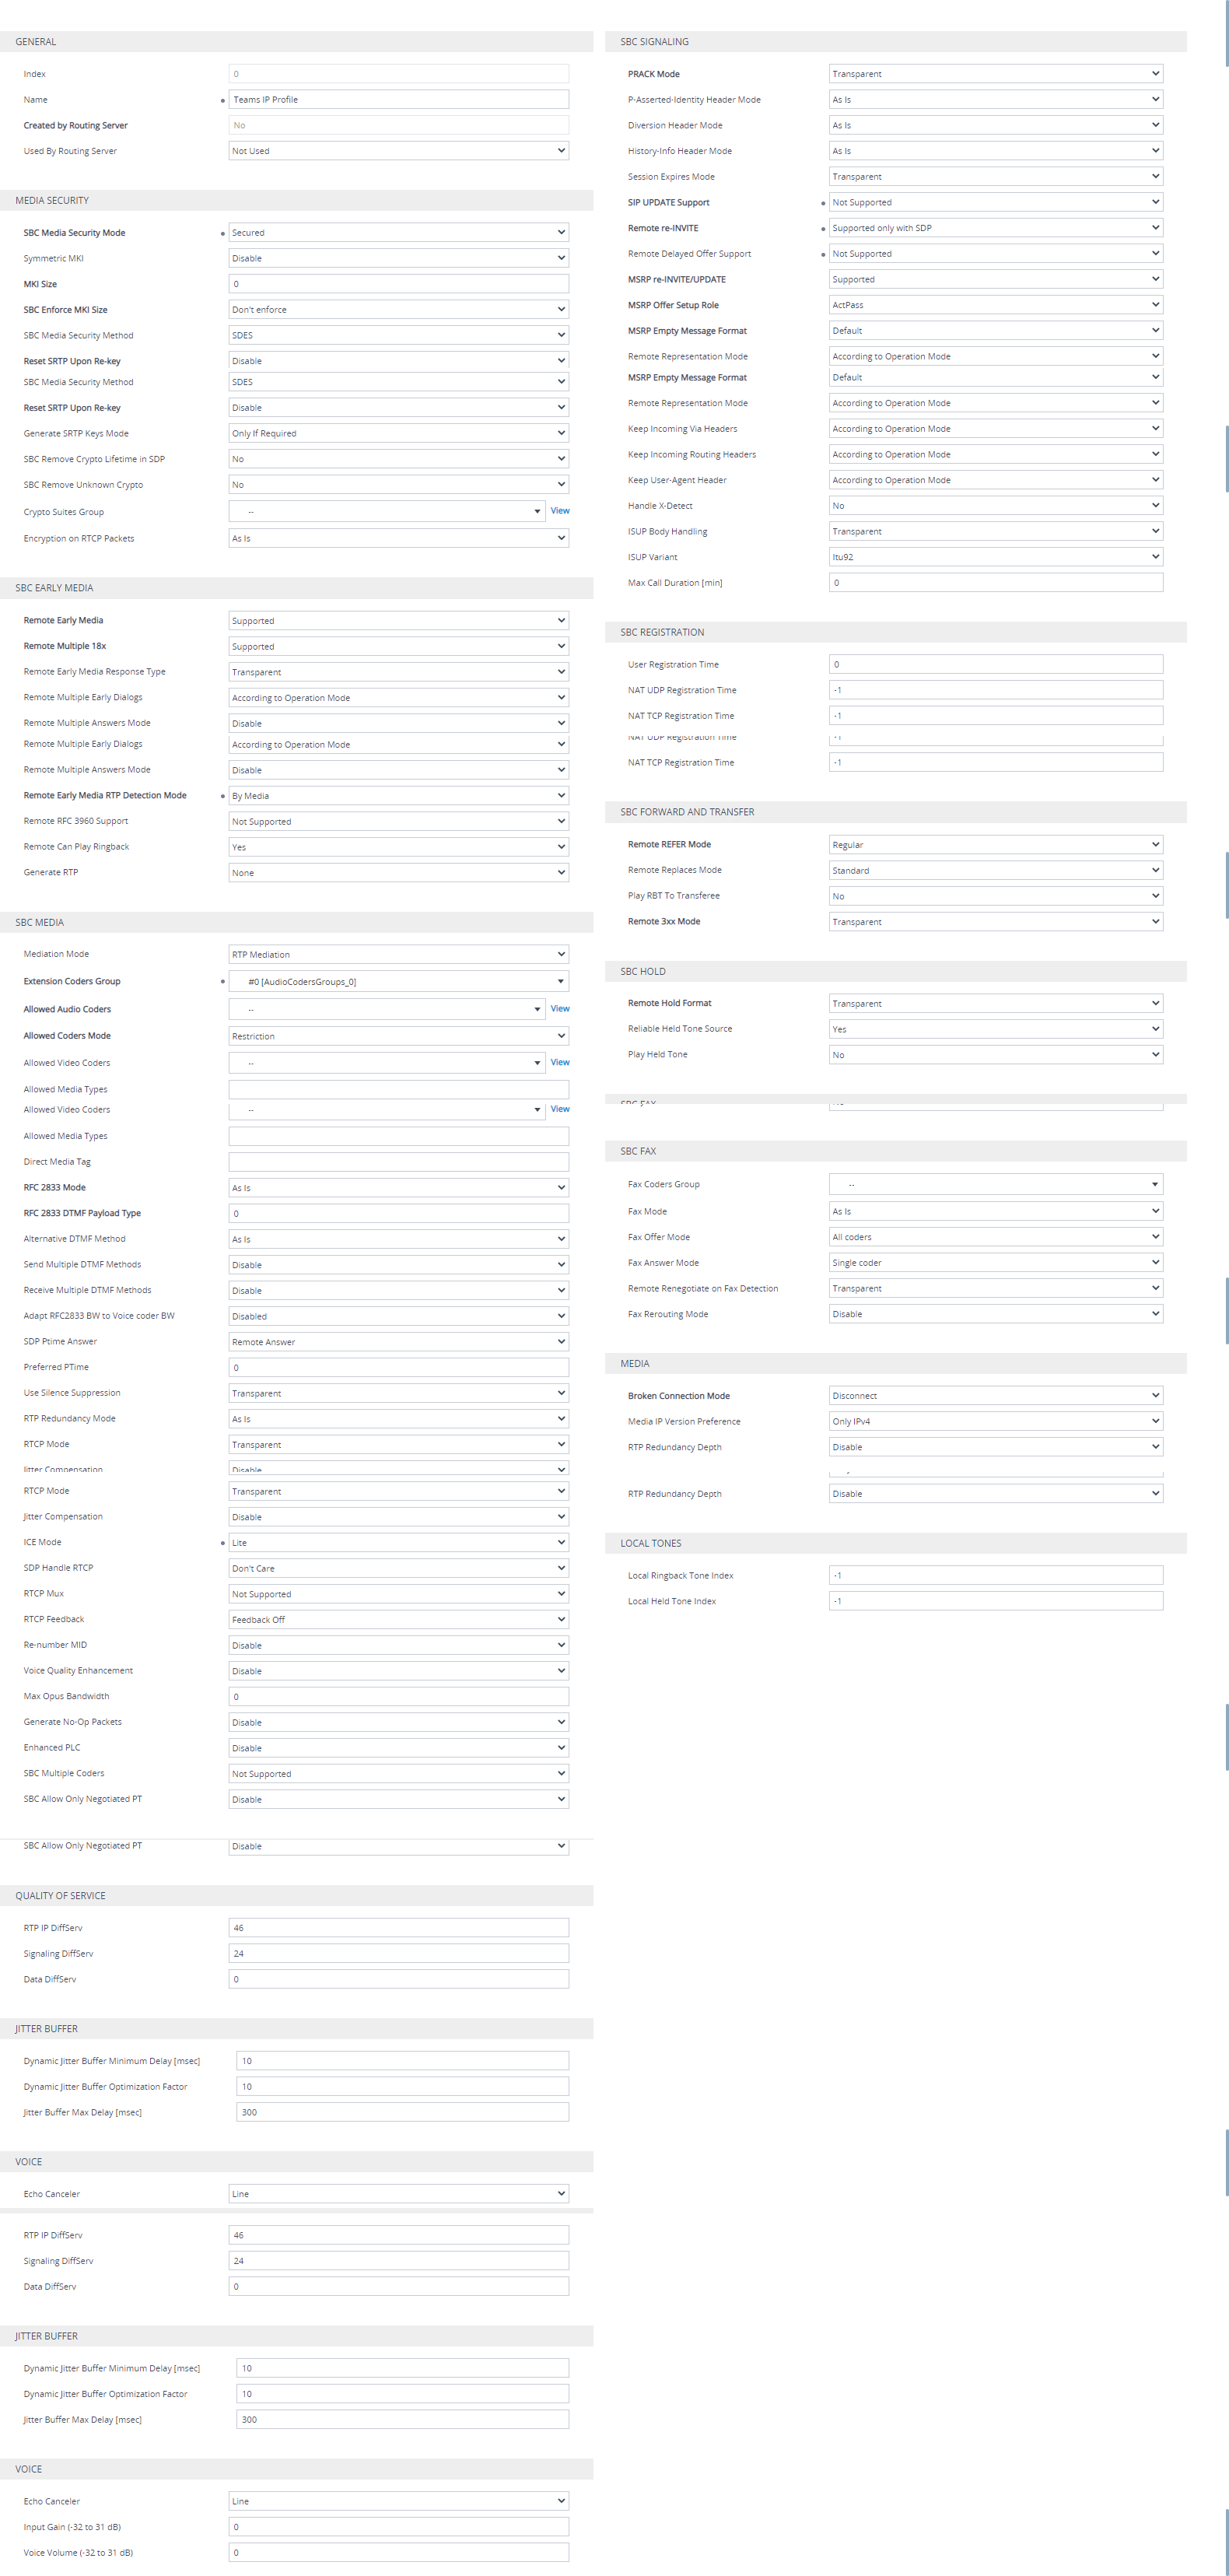
- Click on Apply
- Click on Add New
- Name > CUCM IP Profile
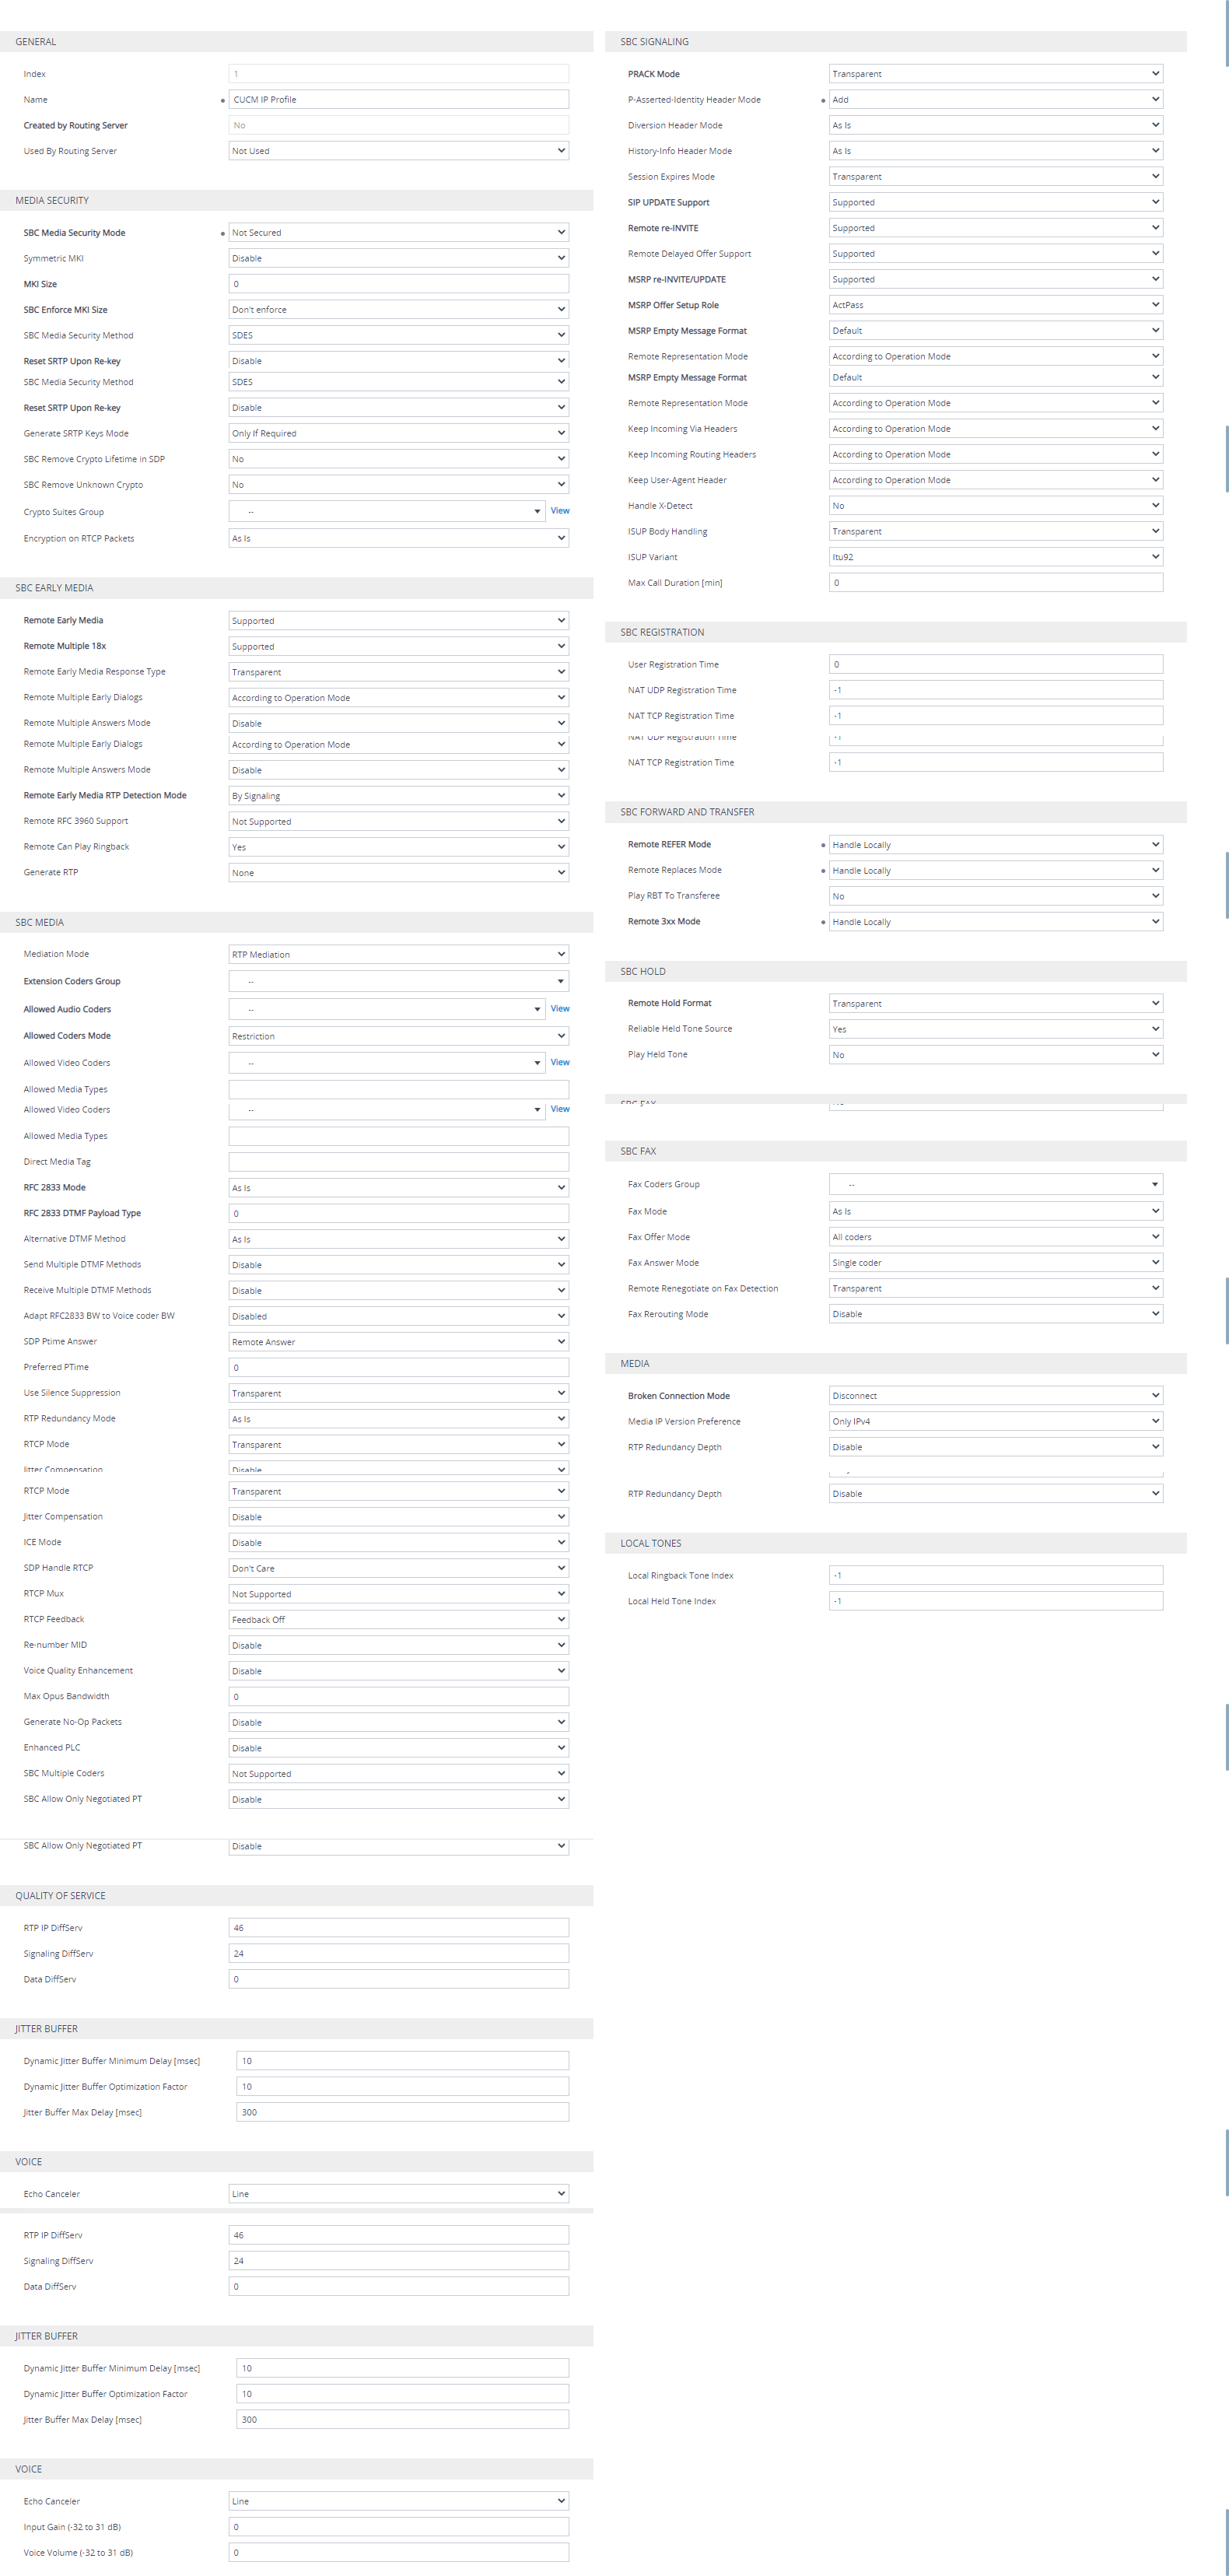
- Click on Apply
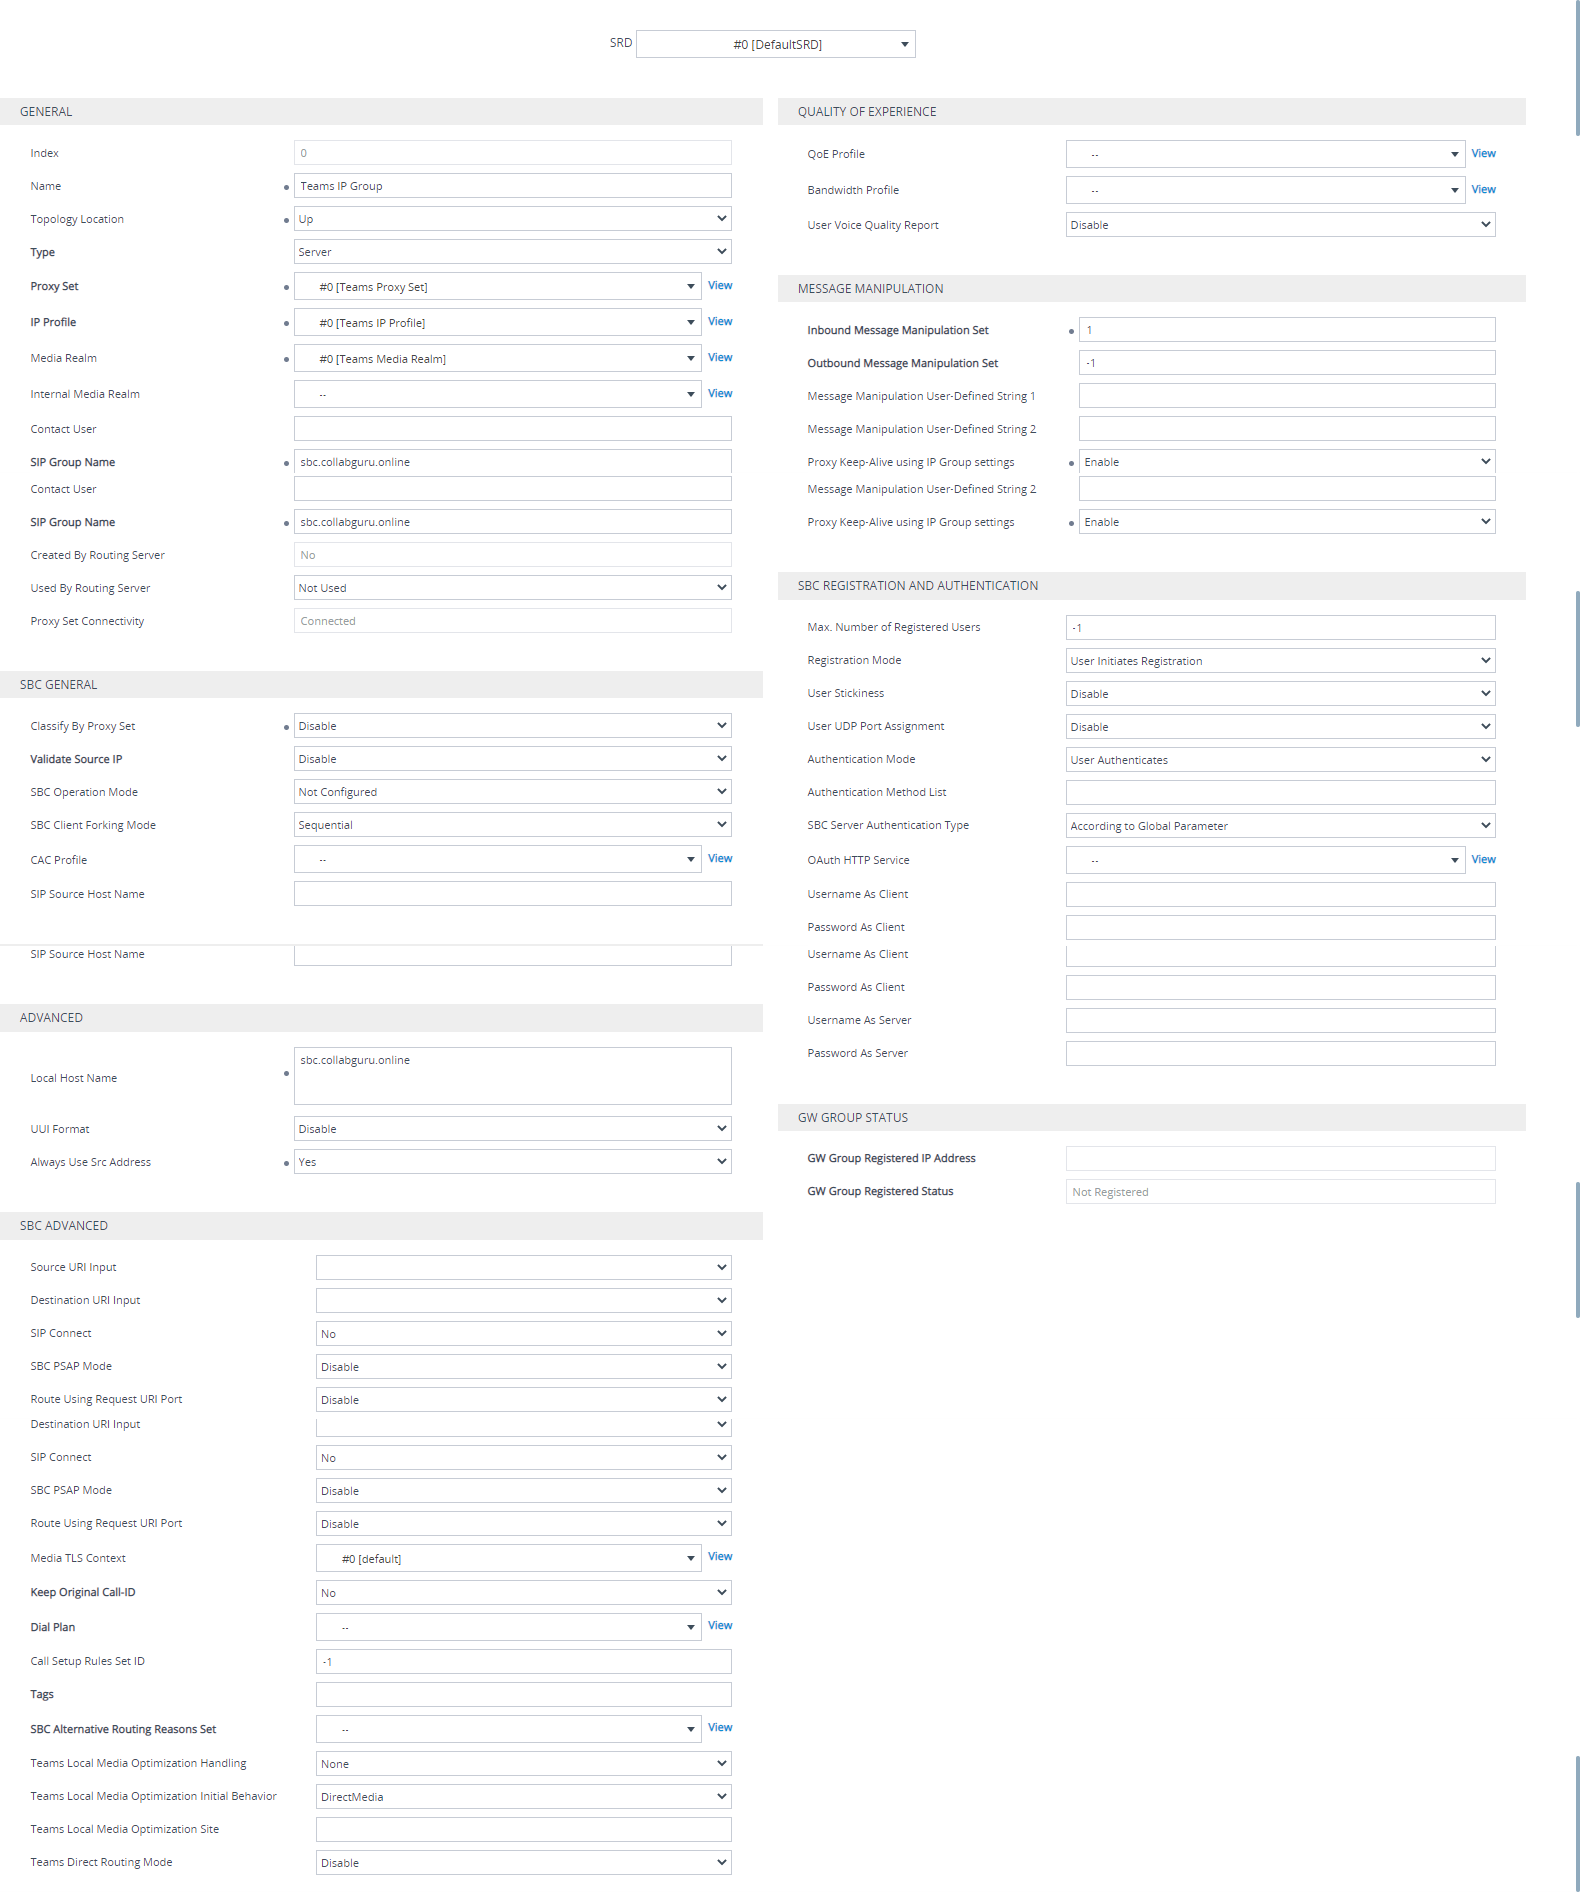
IP Profile
- Navigate to Signaling & Media > Core Entities > IP Groups
- Click on Add New
- Name > Teams IP Group
- Click on Add New
- Name > CUCM IP Group
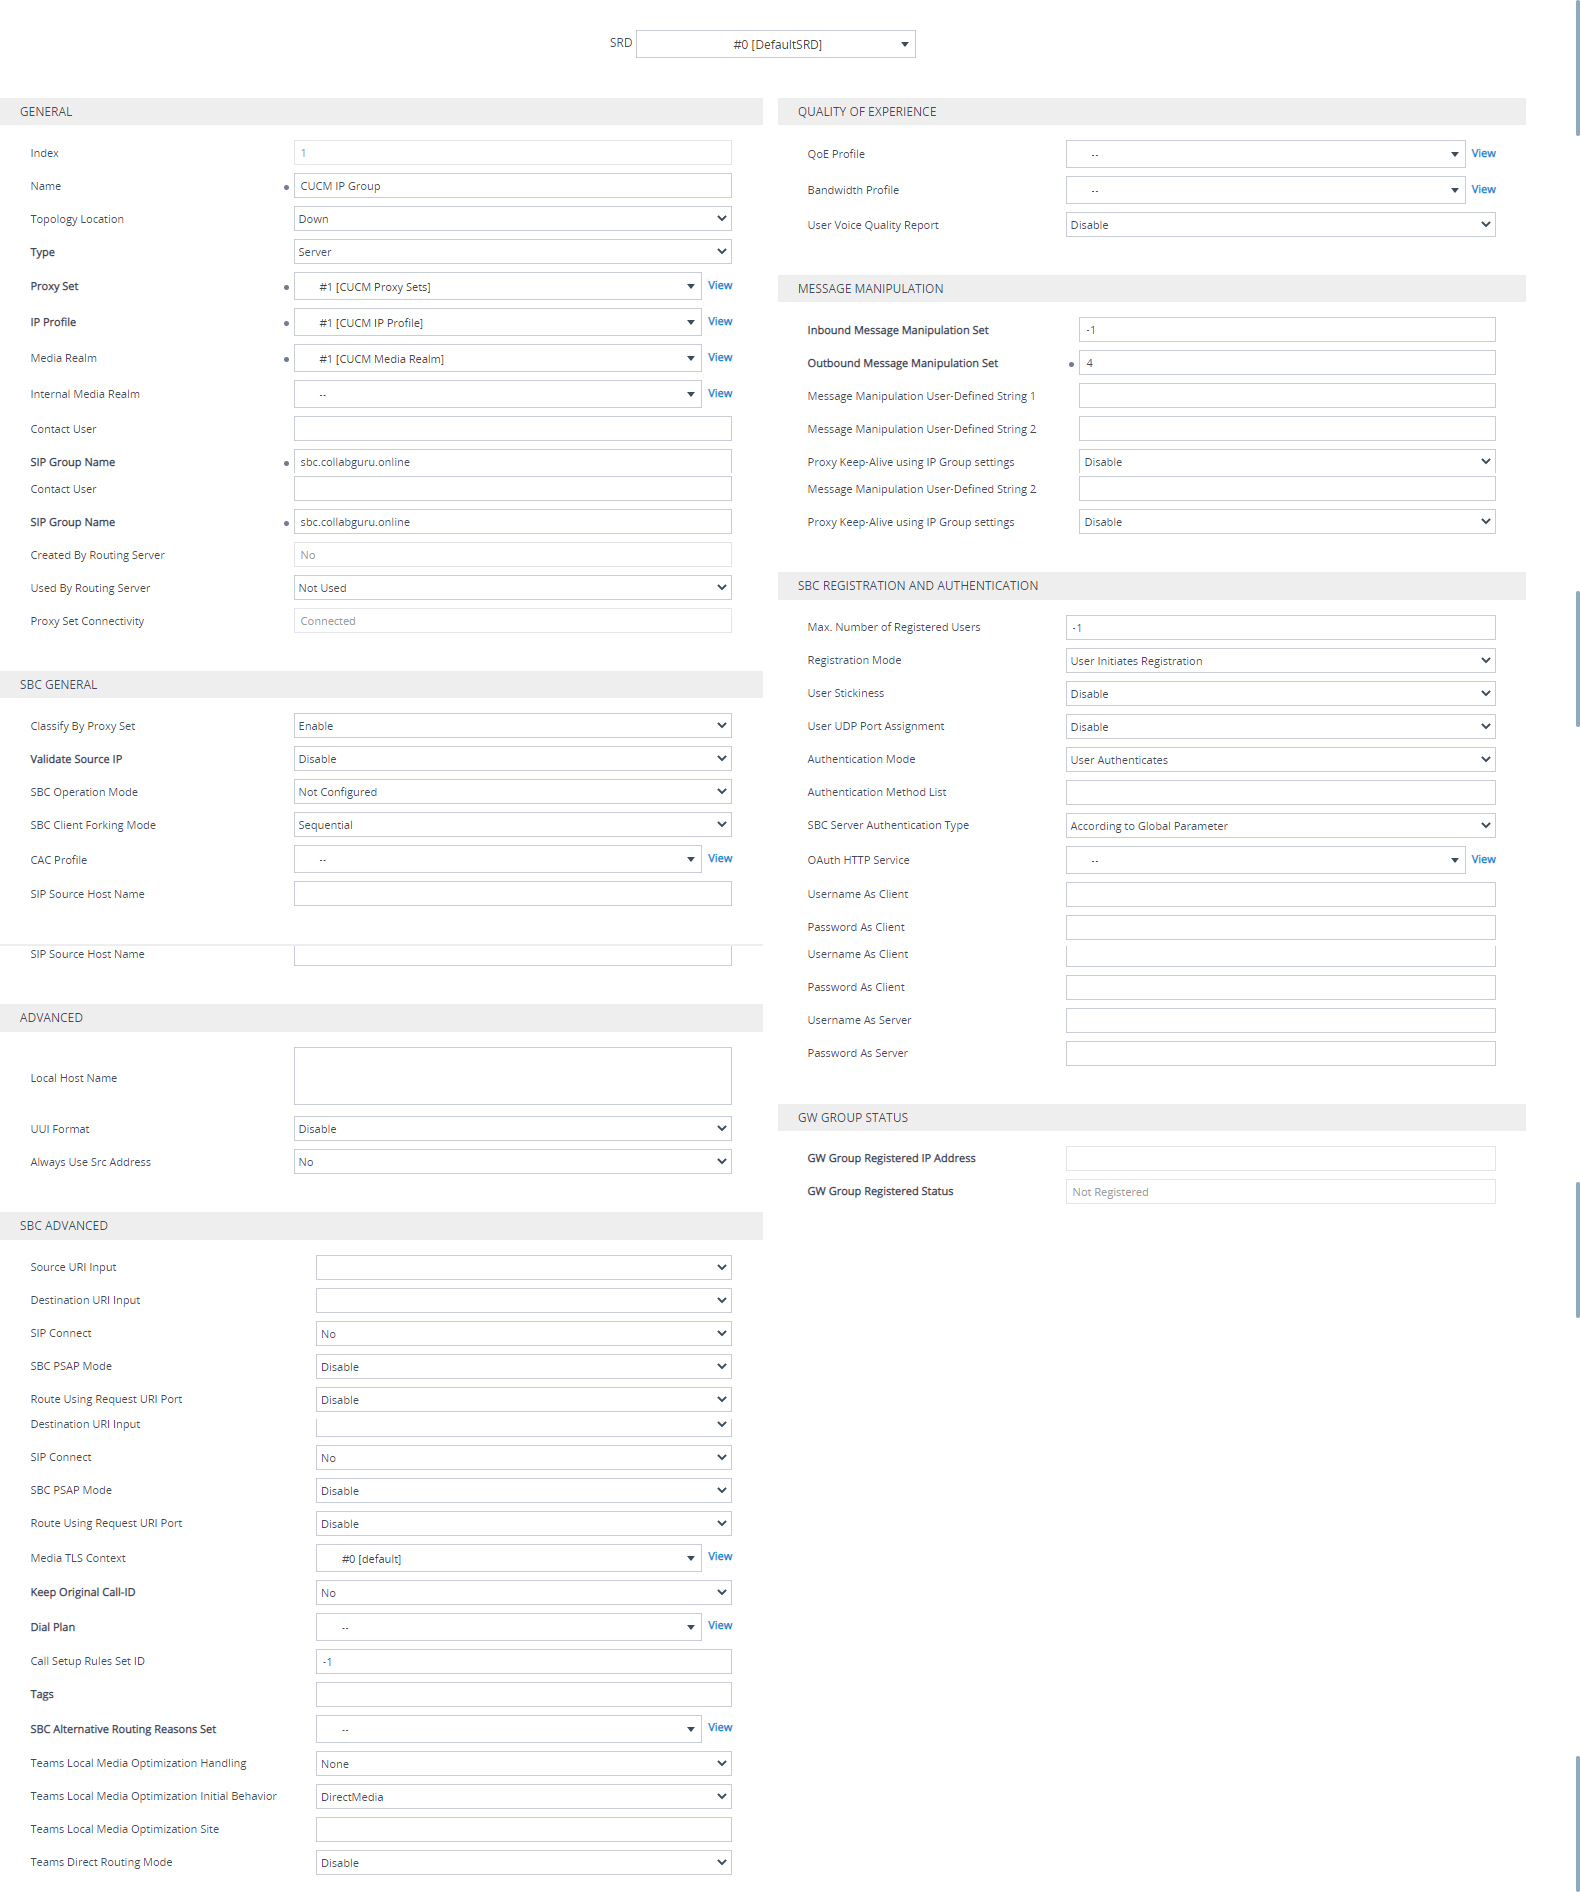
- Click on Apply
Coder Groups
- Navigate to Signaling & Media > Coders and Profiles > Coder Groups
- Modify the Codecs as following
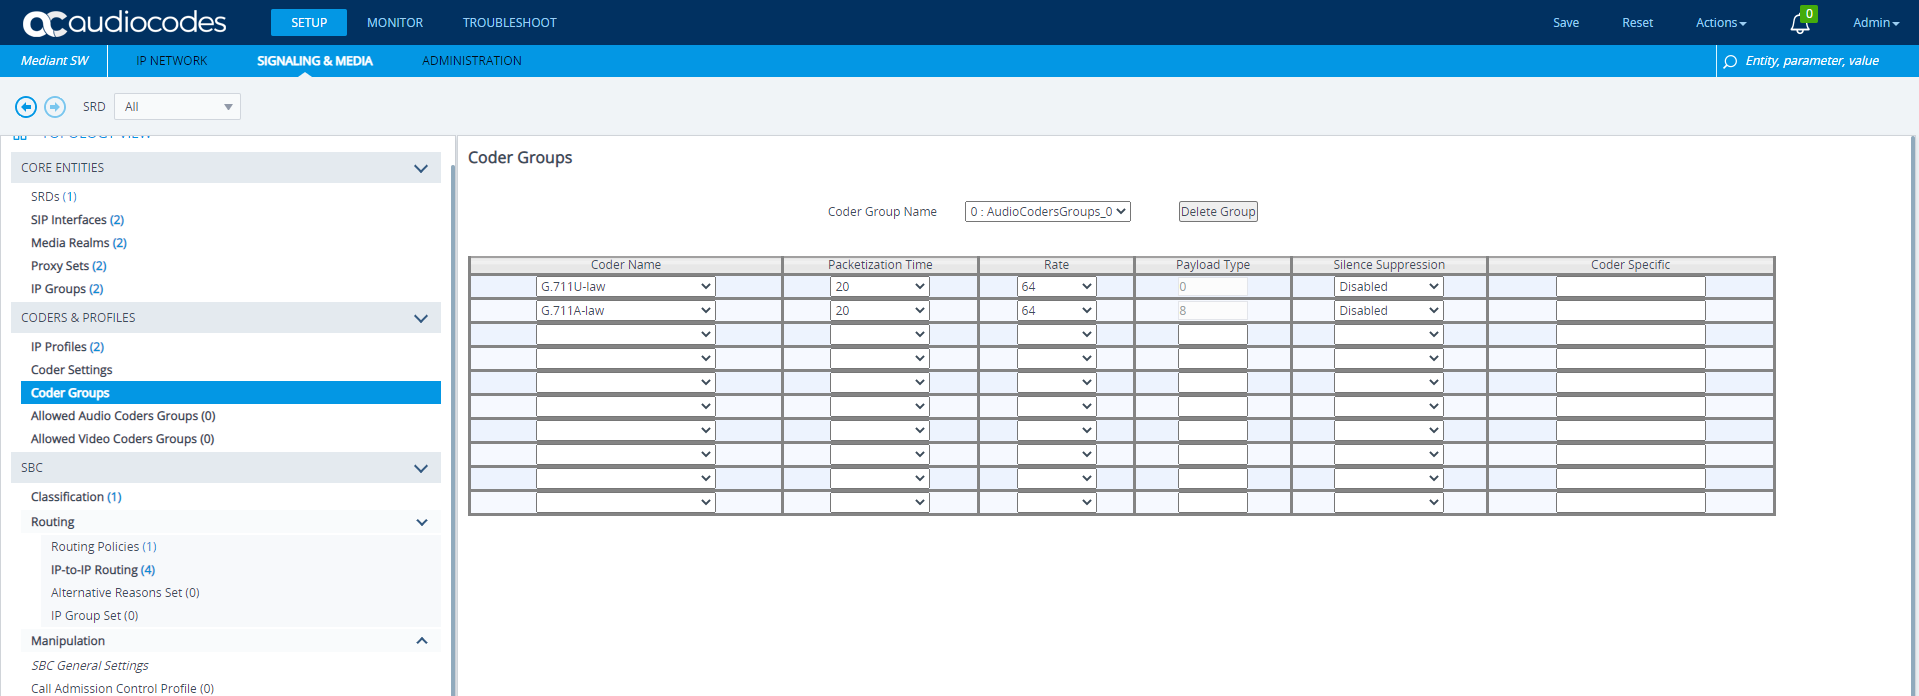
- Click on Apply
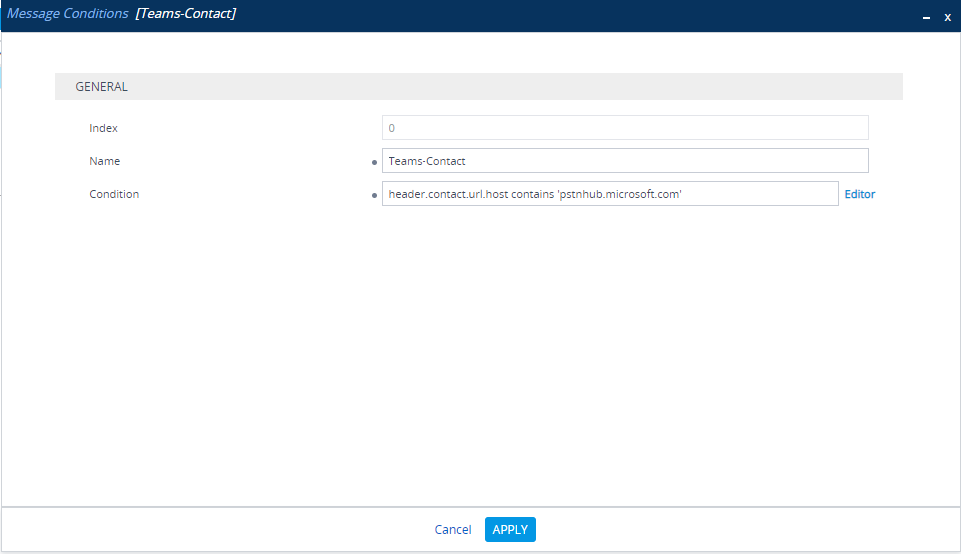
Message Manipulation
- Navigate to Signaling & Media > Message Manipulation > Message Conditions
- Click on Add New
- Name > Teams-Contact
- Condition > header.contact.url.host contains ‘pstnhub.microsoft.com’
- Click on Apply
Classification
- Navigate to Signaling & Media > SBC > Classification
- Click on Add New
- Name > Teams Classification
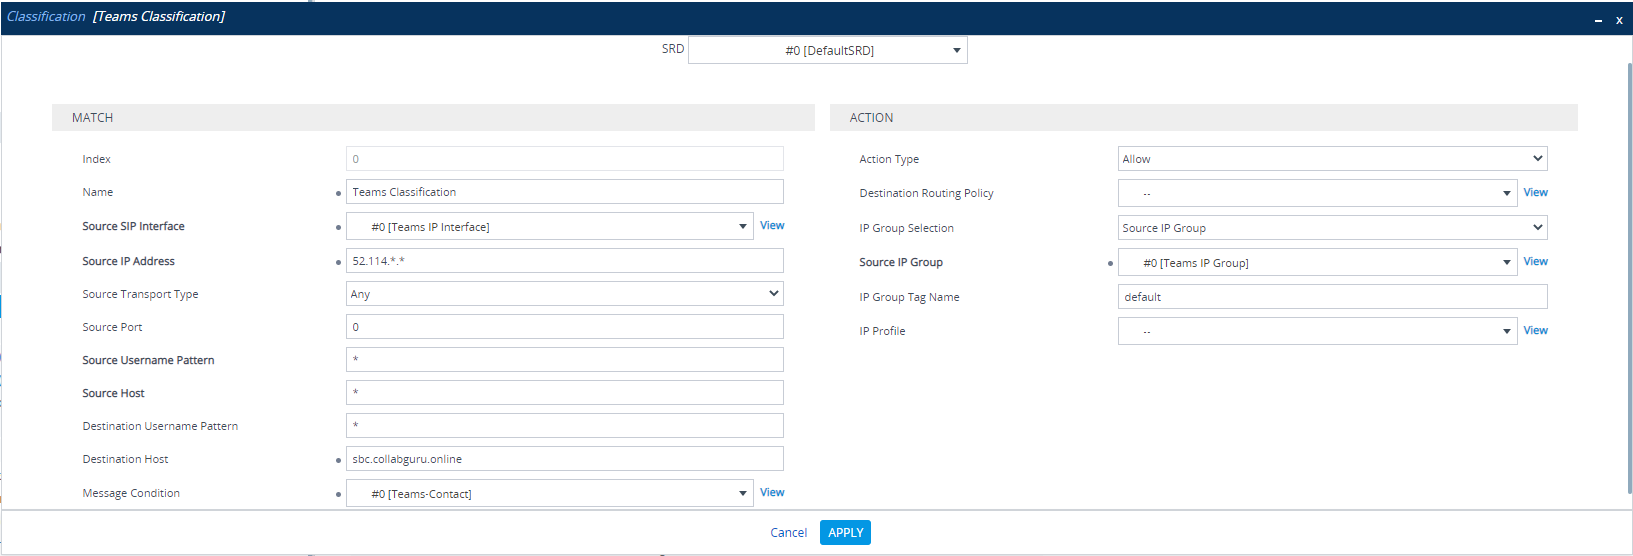
- Click on Apply
IP-to-IP-Routing
- Navigate to Signaling & Media > SBC > IP-to-IP Routing
- Click on Add New
- Name > Terminate Options
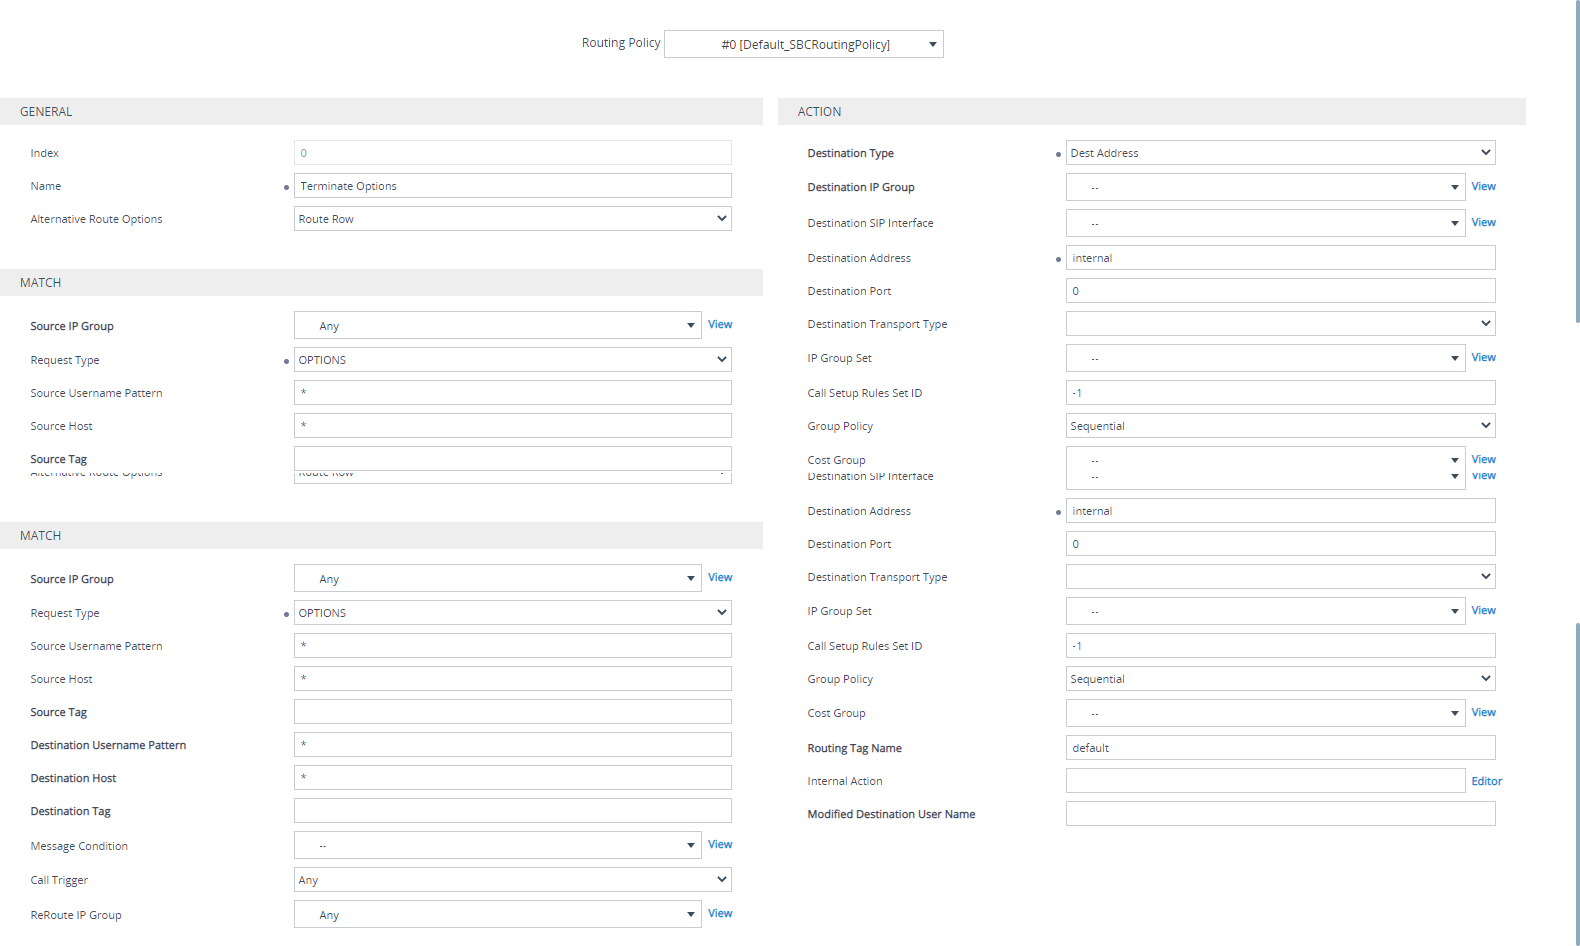
- Click on Apply
- Click on Add New
- Name > Teams Refer
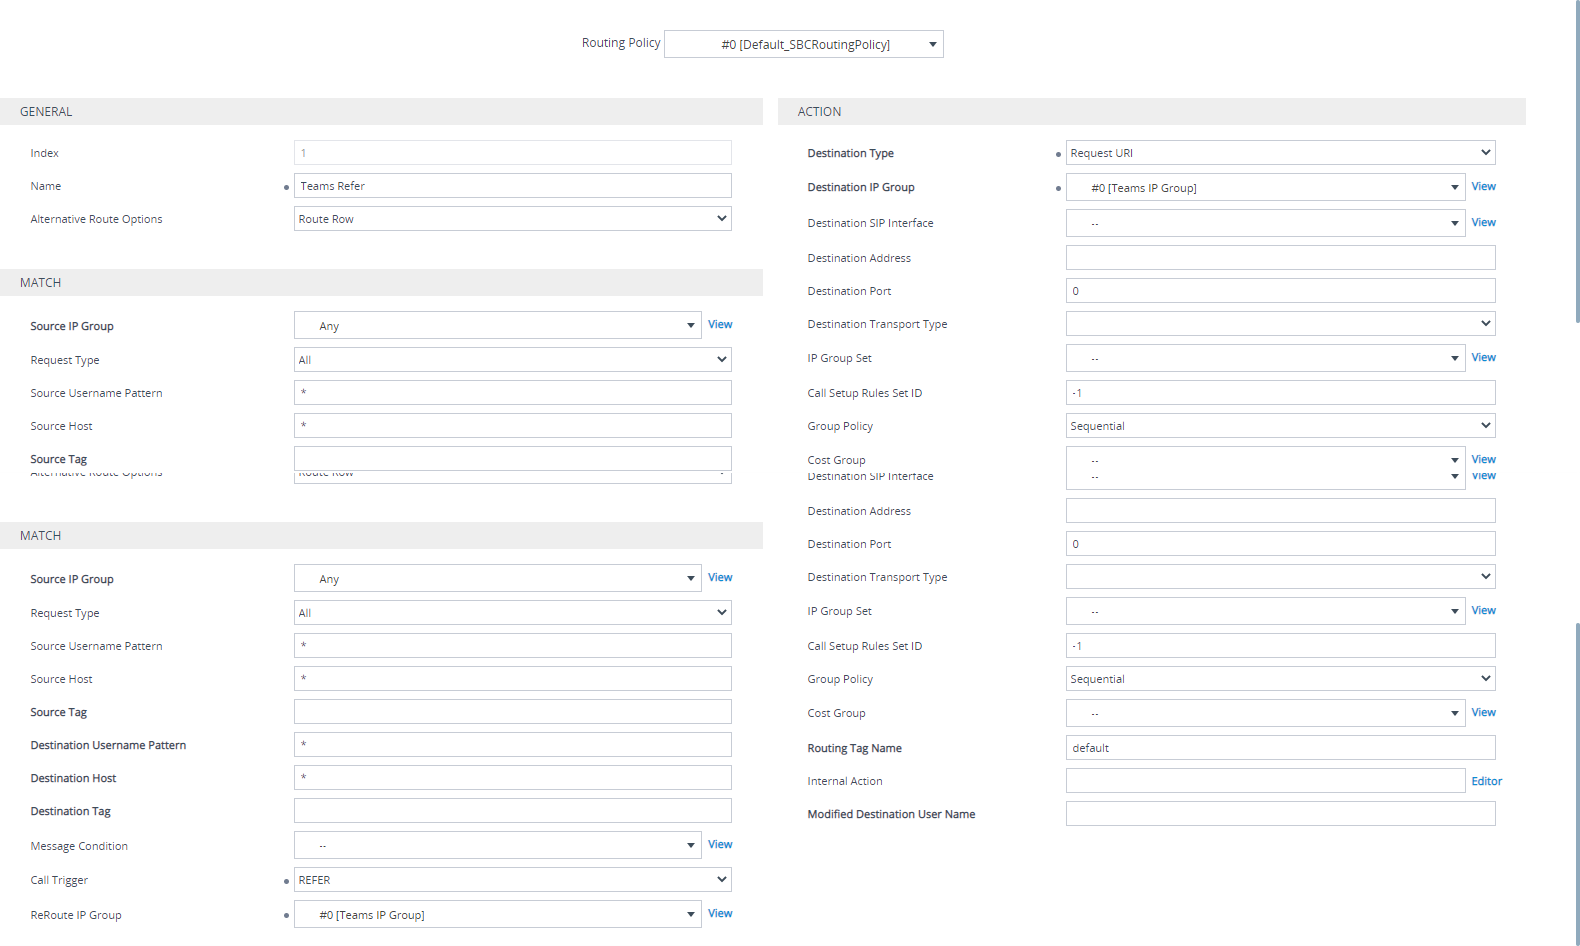
- Click on Apply
- Click on Add New
- Name > Teams to CUCM
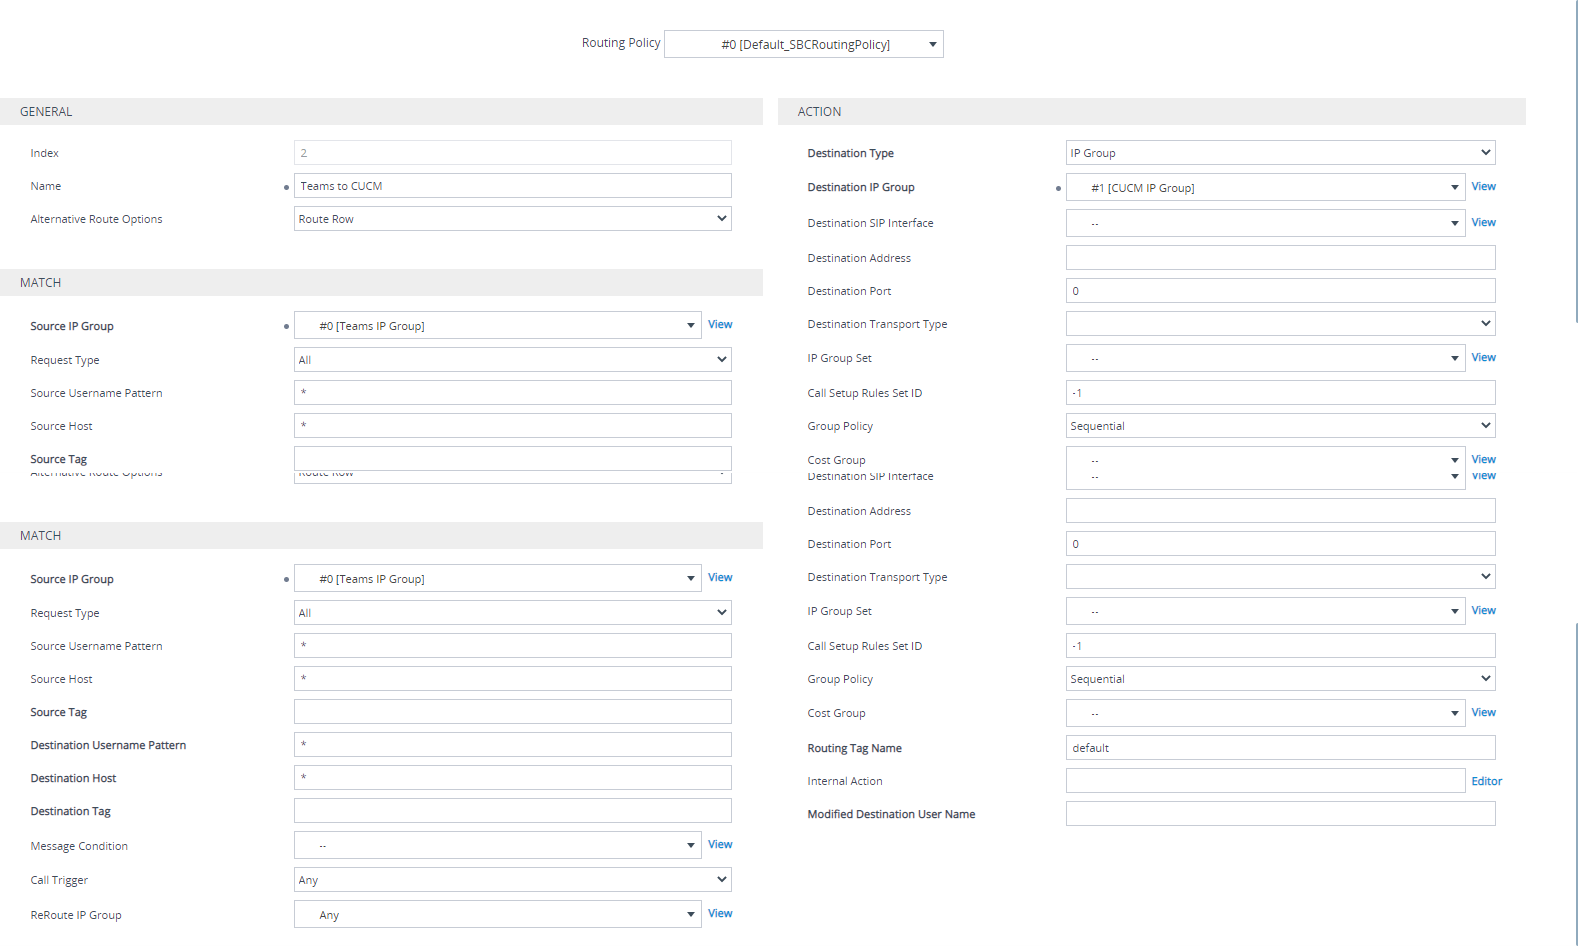
- Click on Apply
- Click on Add New
- Name > CUCM to Teams
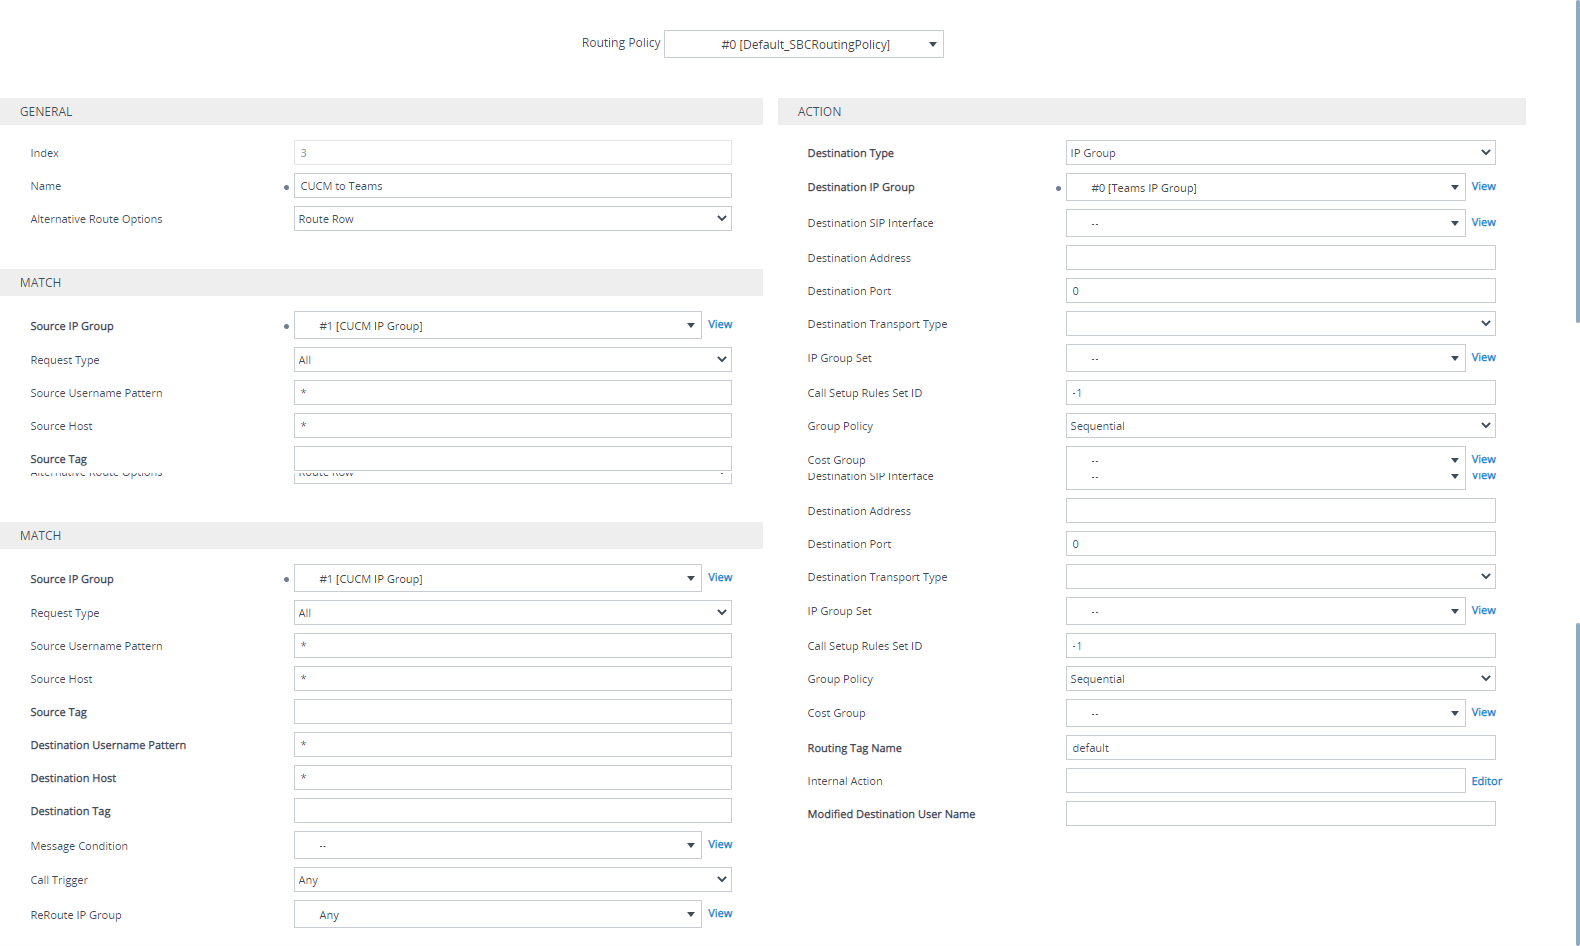
- Click on Apply
IP-to-IP-Routing
- Navigate to Signaling & Media > Message Manipulations > Message Manipulations
- Click on Add New
- Name > Remove PAI
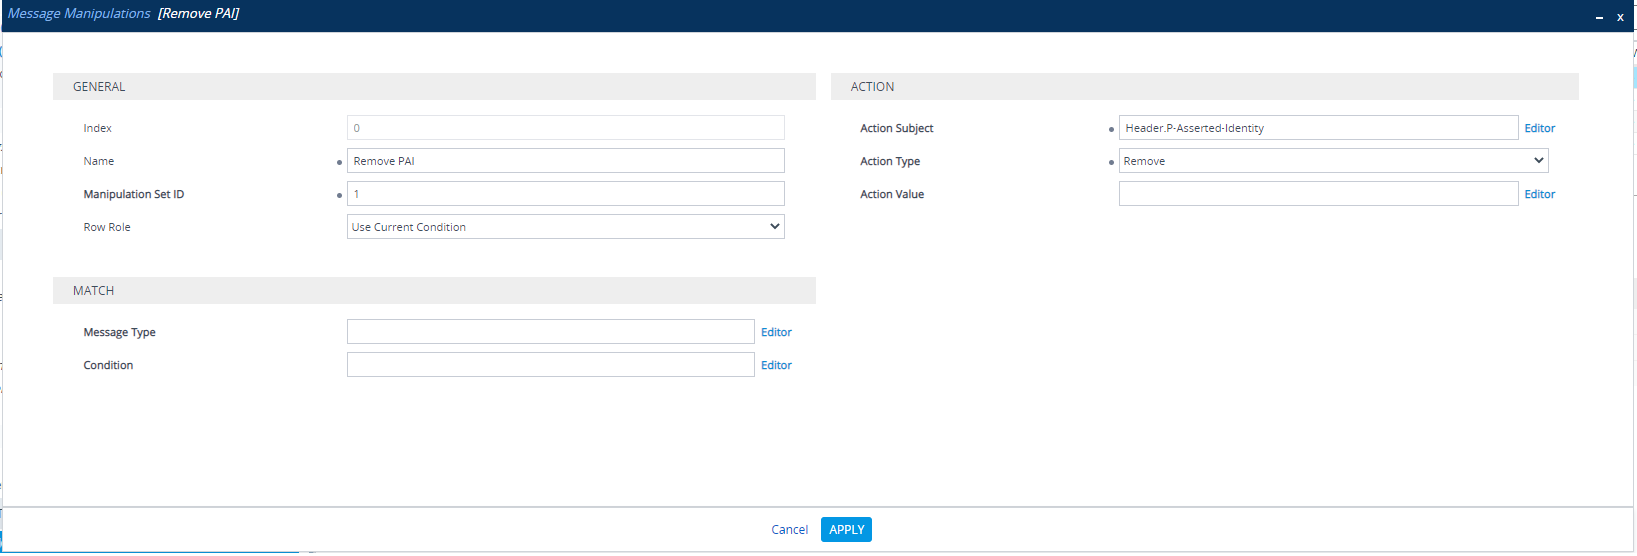
- Click on Apply
- Click on Add New
- Name > Change RURI host to CUCM
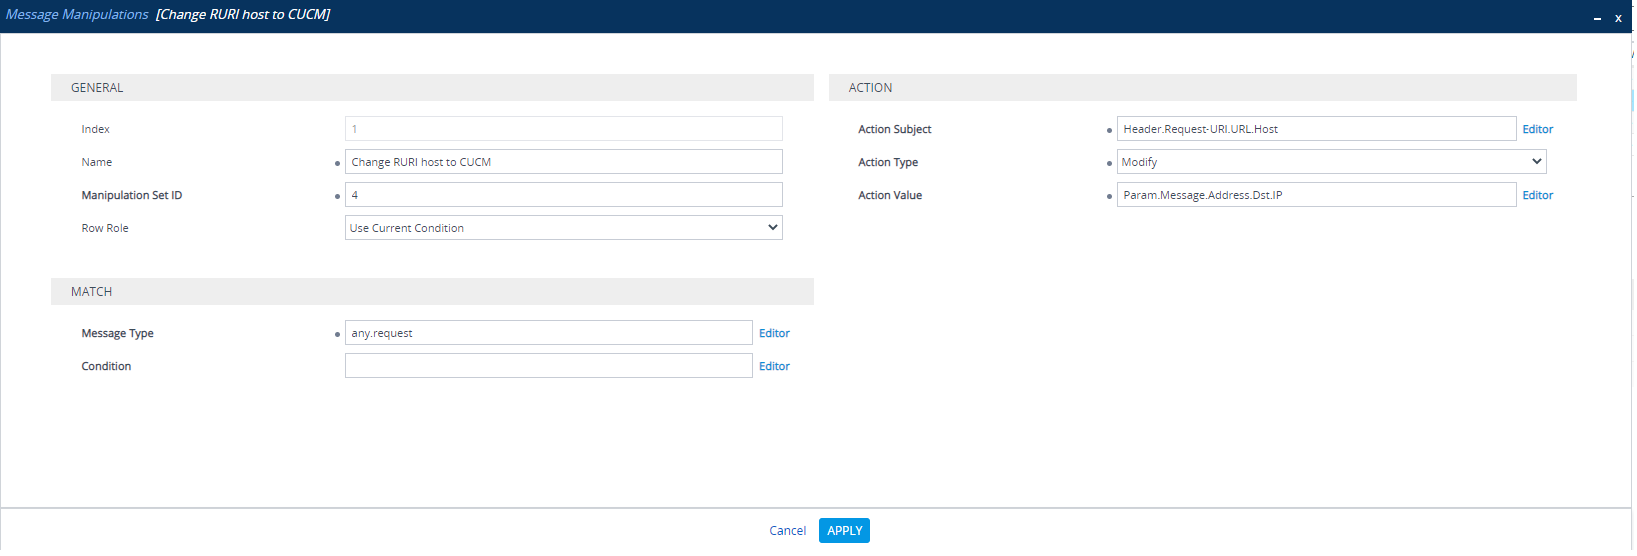
- Click on Apply
- Click on Add New
- Name > Remove Privacy Header
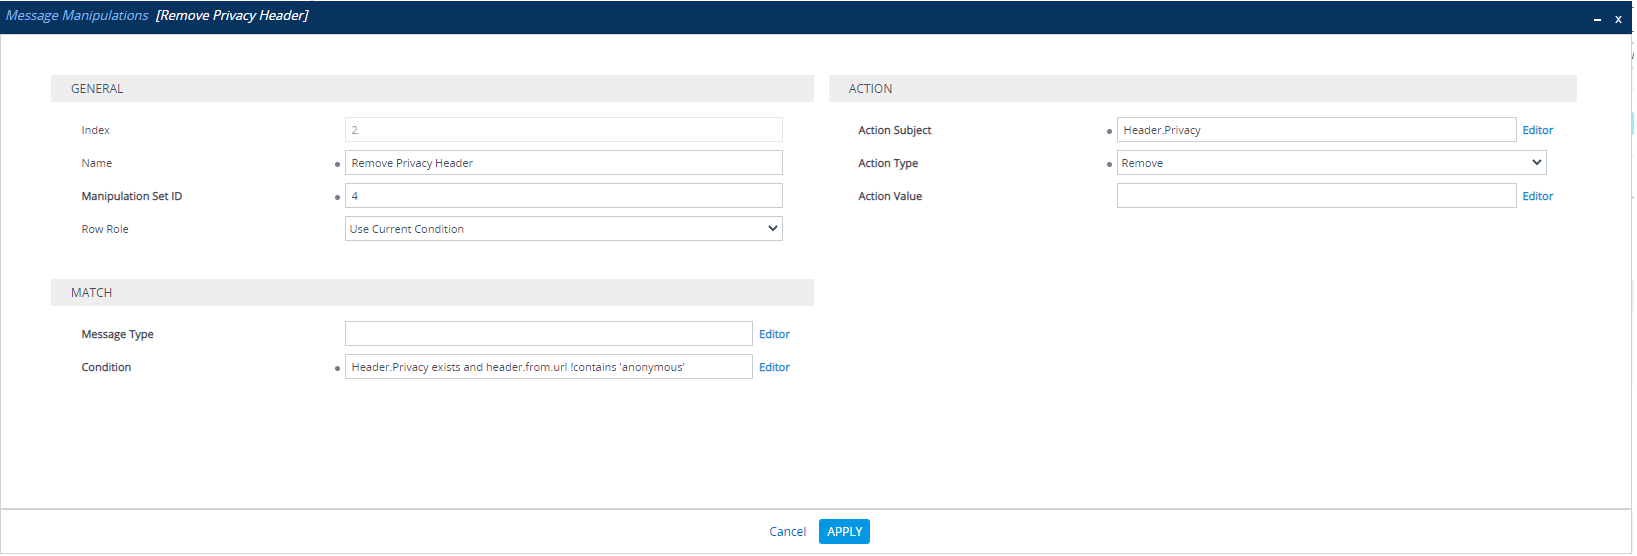
- Click on Apply
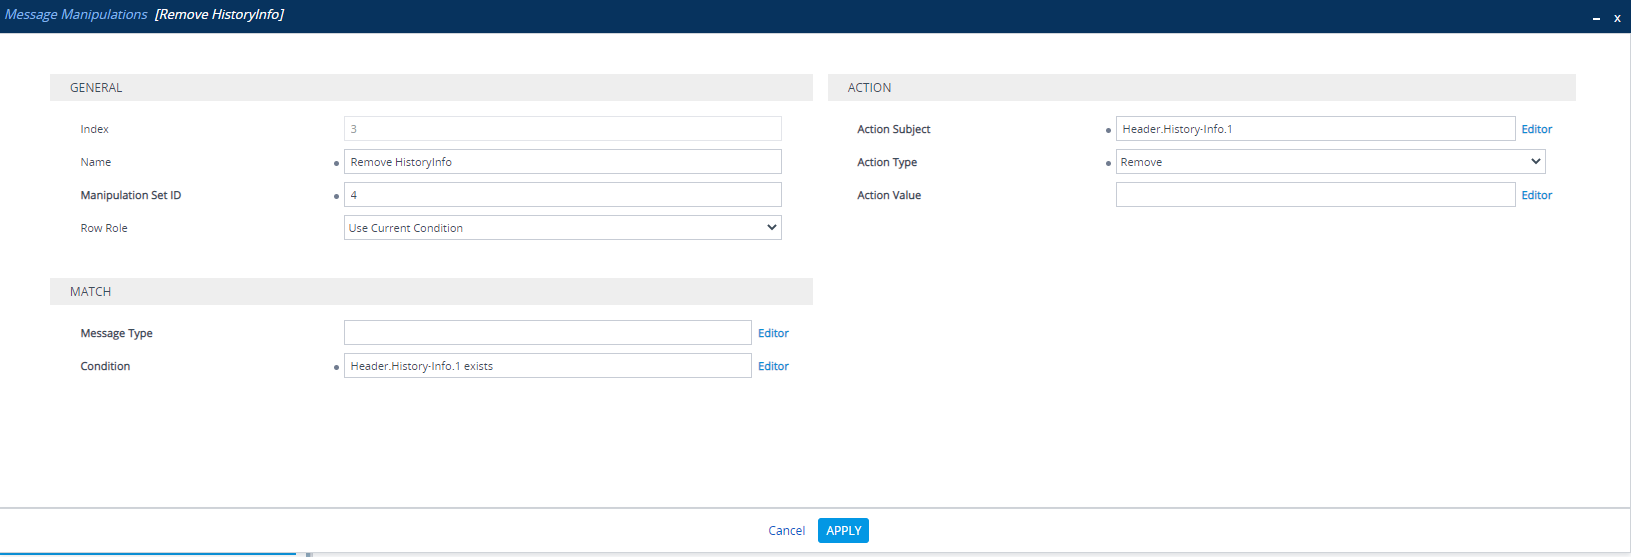
- Click on Add New
- Name > Remove HistoryInfo
Media Security
- Navigate to Signaling & Media >Media > Media Security
- Media Security > Select Enable from drop down menu
- Click on Apply

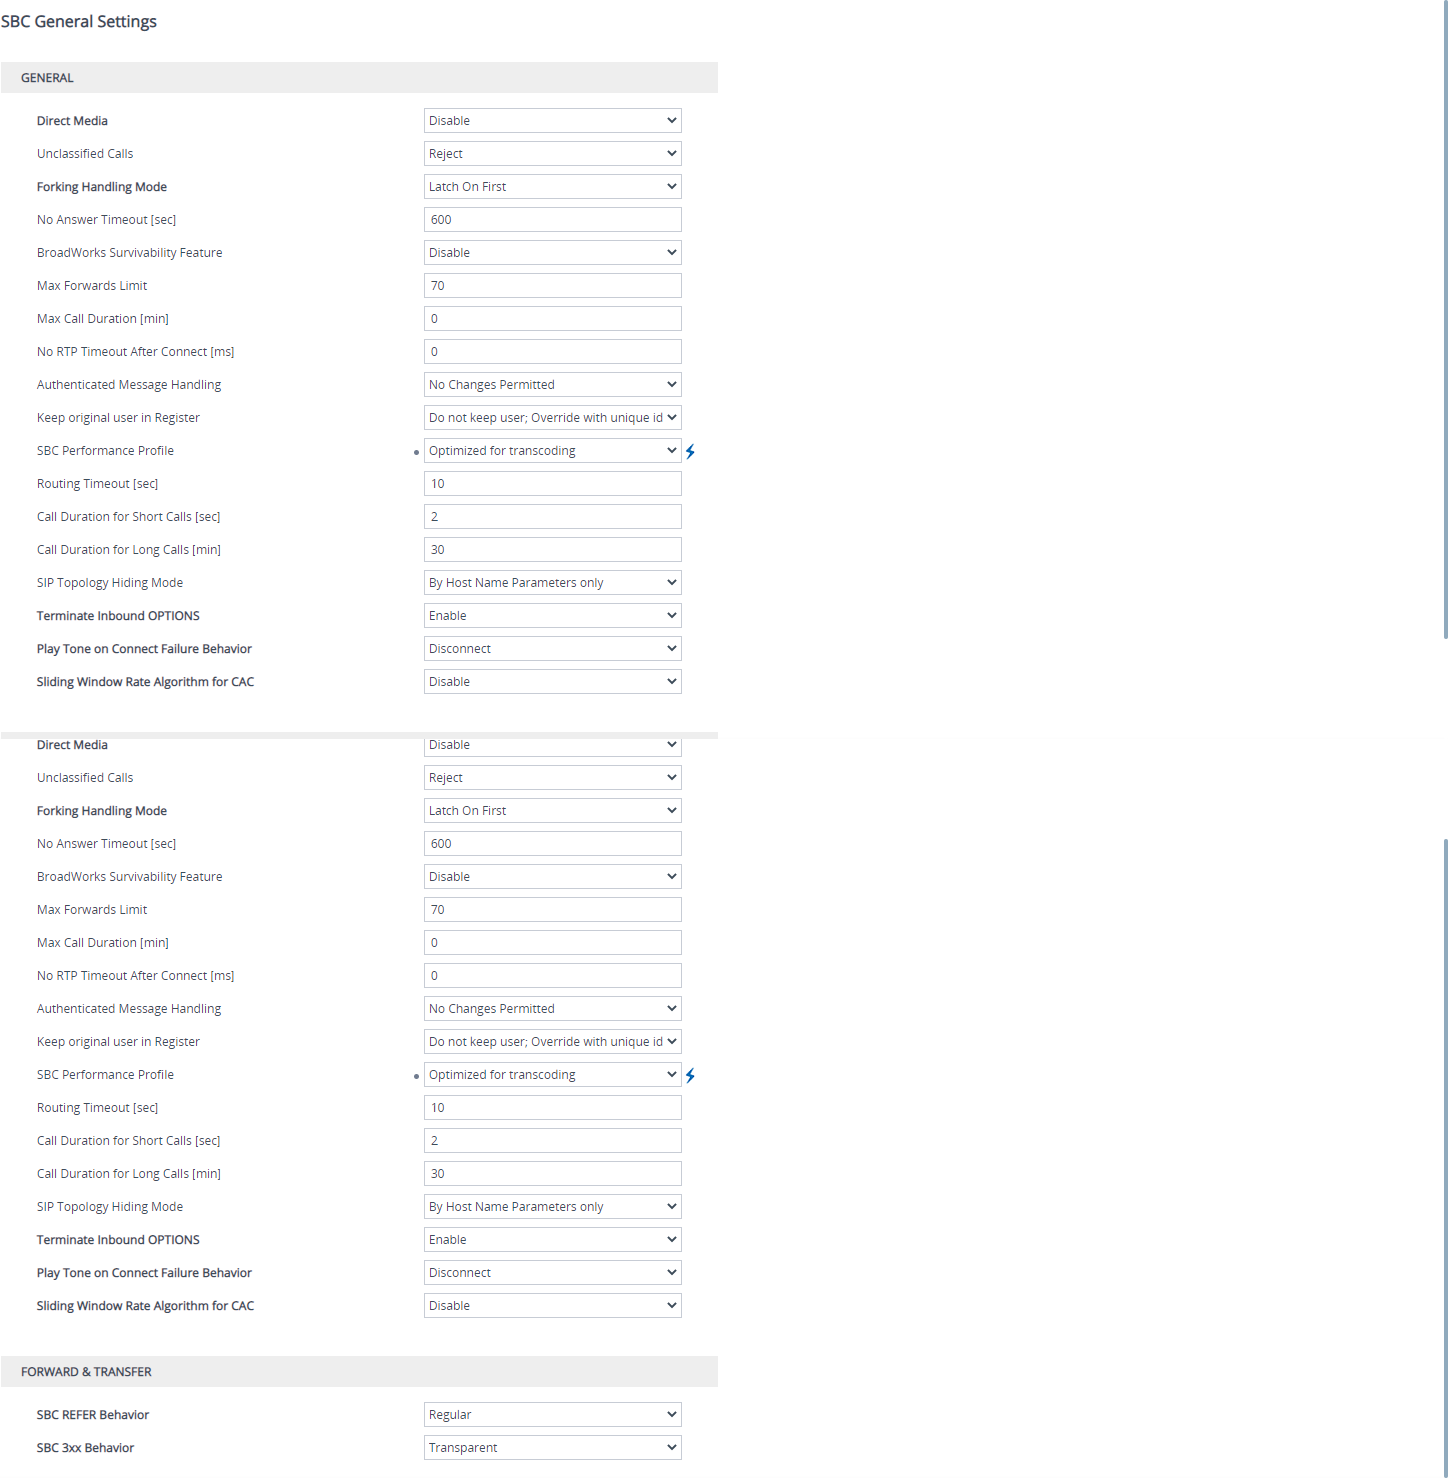
SBC General Settings
- Navigate to Signaling & Media >SBC > SBC General Settings
- SBC Performance Profile > Select Optimized for transcoding from drop down menu
- Click on Apply
Save Configuration
- Click on Save

Reset SBC
- Click on Reset
- Navigate to Maintenance > Maintenance Actions
- Click on Reset
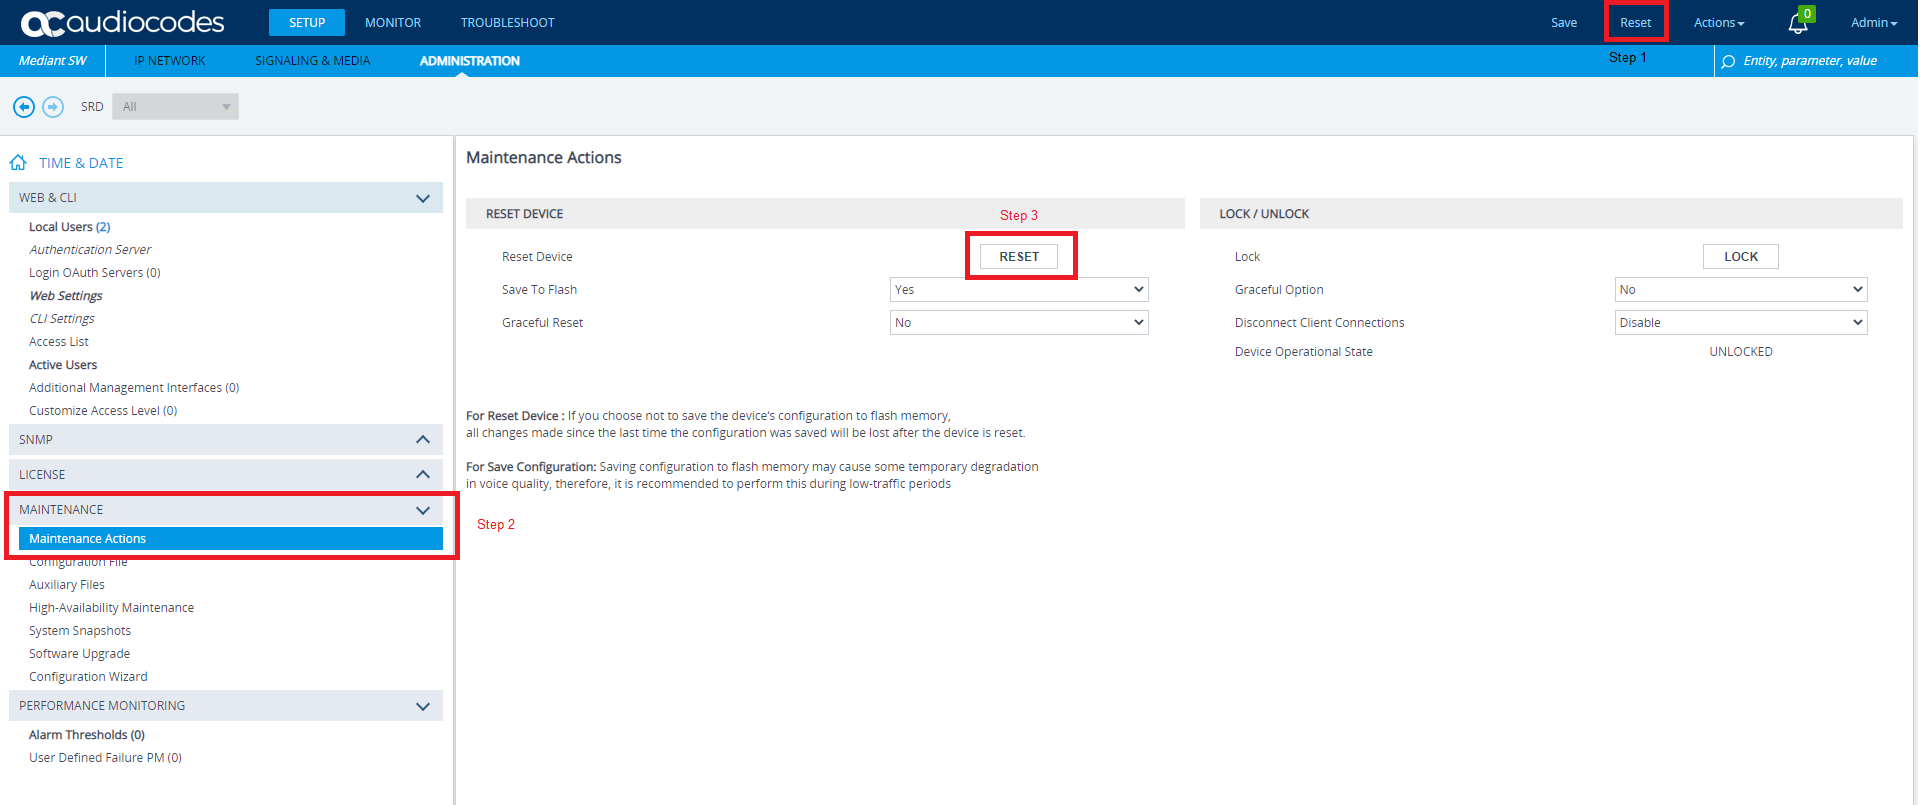
- The Audiocodes SBC will reboot and will be up in 5 minutes.
Test Call
Here is a test call made from SIP IP Phone registered to CUCM to Teams


Hello
I would like to know where do you create the call id(number ) +91801010003 and +918010100031
Is that from Ms team admin center—Phone menu?
Do you have a video on a direct routing on Teams and to SBS connected to legacy PBX or IPBX?
Hi Avinash Karnani,
Do you have tutorial for integration between MS Team with Cisco Router VG for connect to PSTN ?