Route Inbound or Outbound GSM or PSTN calls using Asterisk on Raspberry Pi
Recently we learned how to install Asterisk on a Raspberry Pi. In case you missed to read the article, click here to read it.
Now in this article, we will learn how to route inbound or outbound calls in Asterisk using Raspberry Pi. The solution which i will provide in this tutorial will be cheaper than buying a GSM Module. Under 10$-15$ you can make or receive outbound and inbound GSM/PSTN calls.
So, what do you need? All you need is a GSM USB Dongle. Yes, you heard it right. There are few dongle available which are compatible with Asterisk. You can turn your Asterisk to make or receive GSM / PSTN calls by just plugging the dongle into Raspberry Pi board.
Now the question is which brand or model dongle you need to buy in order to make or receive GSM / PSTN calls. Here is the list:
- E153
- E1550
- E1552
- E156G
- E160
- EG162
- E166
- E169
- E171
- E173 (some types of E173 seem to not work, only E173 with Qualcomm chipsets do work)
- E1750
- E180
- E303
- K3520 (not to confuse with K3520-z)
- K3715
- K3765a
You can purchase the dongle from Ebay/Amazon etc or offline as well. In our tutorial, we are going to use Huawei Mobile Broadband E1550 Dongle.

Plugging the dongle into Raspberry Pi
- Insert GSM SIM into this dongle.
- Plug this dongle into Raspberry Pi USB module.
Chan_Dongle configuration in Asterisk Raspberry Pi
- SSH to your Raspberry PI Asterisk IP Address
- Enter username and password (root and raspberry)
- Enter the following command in order to install Chan Dongle
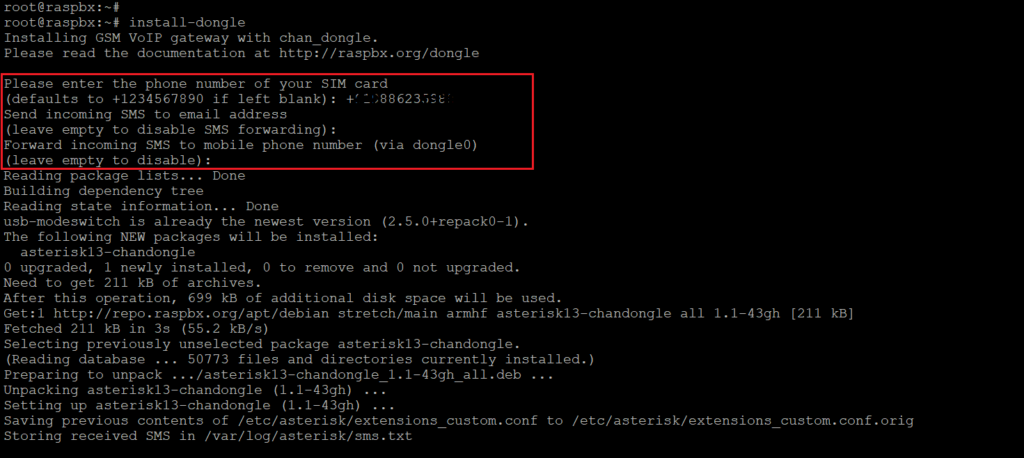
install-dongle- Once you execute the above command, it will ask for the following
- Enter default phone number of your sim card: Enter your SIM card number including country code.
- Forward incoming SMS to email address: Leave this as blank unless you want to forward the SMS to any email address.
- Forward incoming SMS to mobile phone number: Leave this as blank unless you want to forward the SMS to mobile phone number.
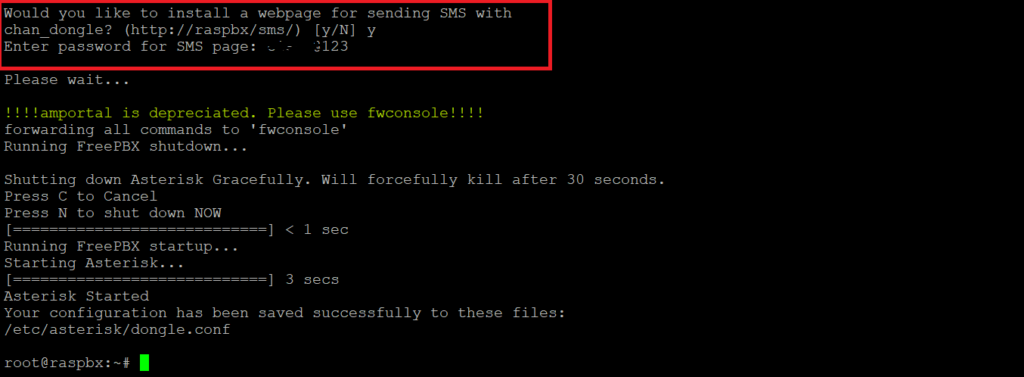
- You will be asked if you would like to install a webpage for sending SMS with chan_dongle. Press Y if you would like to install the webpage and Press N to skip.
- If you Press Y, you will be asked to enter password for SMS page: Enter a password. SMS page will be available at http://ASTERISKIP/sms
To verify it, enter the following command and the output should be similar to the below:
root@raspbx:~# ls -l /dev/tty*
crw-rw-rw- 1 root tty       5,  0 Mar 24 12:33 /dev/tty
crw--w---- 1 root tty       4,  0 Mar 24 12:33 /dev/tty0
crw--w---- 1 root tty       4,  1 Mar 24 12:33 /dev/tty1
crw--w---- 1 root tty       4, 10 Mar 24 12:33 /dev/tty10
crw--w---- 1 root tty       4, 11 Mar 24 12:33 /dev/tty11
crw--w---- 1 root tty       4, 12 Mar 24 12:33 /dev/tty12
crw--w---- 1 root tty       4, 13 Mar 24 12:33 /dev/tty13
crw--w---- 1 root tty       4, 14 Mar 24 12:33 /dev/tty14
crw--w---- 1 root tty       4, 15 Mar 24 12:33 /dev/tty15
crw--w---- 1 root tty       4, 16 Mar 24 12:33 /dev/tty16
crw--w---- 1 root tty       4, 17 Mar 24 12:33 /dev/tty17
crw--w---- 1 root tty       4, 18 Mar 24 12:33 /dev/tty18
crw--w---- 1 root tty       4, 19 Mar 24 12:33 /dev/tty19
crw--w---- 1 root tty       4,  2 Mar 24 12:33 /dev/tty2
crw--w---- 1 root tty       4, 20 Mar 24 12:33 /dev/tty20
crw--w---- 1 root tty       4, 21 Mar 24 12:33 /dev/tty21
crw--w---- 1 root tty       4, 22 Mar 24 12:33 /dev/tty22
crw--w---- 1 root tty       4, 23 Mar 24 12:33 /dev/tty23
crw--w---- 1 root tty       4, 24 Mar 24 12:33 /dev/tty24
crw--w---- 1 root tty       4, 25 Mar 24 12:33 /dev/tty25
crw--w---- 1 root tty       4, 26 Mar 24 12:33 /dev/tty26
crw--w---- 1 root tty       4, 27 Mar 24 12:33 /dev/tty27
crw--w---- 1 root tty       4, 28 Mar 24 12:33 /dev/tty28
crw--w---- 1 root tty       4, 29 Mar 24 12:33 /dev/tty29
crw--w---- 1 root tty       4,  3 Mar 24 12:33 /dev/tty3
crw--w---- 1 root tty       4, 30 Mar 24 12:33 /dev/tty30
crw--w---- 1 root tty       4, 31 Mar 24 12:33 /dev/tty31
crw--w---- 1 root tty       4, 32 Mar 24 12:33 /dev/tty32
crw--w---- 1 root tty       4, 33 Mar 24 12:33 /dev/tty33
crw--w---- 1 root tty       4, 34 Mar 24 12:33 /dev/tty34
crw--w---- 1 root tty       4, 35 Mar 24 12:33 /dev/tty35
crw--w---- 1 root tty       4, 36 Mar 24 12:33 /dev/tty36
crw--w---- 1 root tty       4, 37 Mar 24 12:33 /dev/tty37
crw--w---- 1 root tty       4, 38 Mar 24 12:33 /dev/tty38
crw--w---- 1 root tty       4, 39 Mar 24 12:33 /dev/tty39
crw--w---- 1 root tty       4,  4 Mar 24 12:33 /dev/tty4
crw--w---- 1 root tty       4, 40 Mar 24 12:33 /dev/tty40
crw--w---- 1 root tty       4, 41 Mar 24 12:33 /dev/tty41
crw--w---- 1 root tty       4, 42 Mar 24 12:33 /dev/tty42
crw--w---- 1 root tty       4, 43 Mar 24 12:33 /dev/tty43
crw--w---- 1 root tty       4, 44 Mar 24 12:33 /dev/tty44
crw--w---- 1 root tty       4, 45 Mar 24 12:33 /dev/tty45
crw--w---- 1 root tty       4, 46 Mar 24 12:33 /dev/tty46
crw--w---- 1 root tty       4, 47 Mar 24 12:33 /dev/tty47
crw--w---- 1 root tty       4, 48 Mar 24 12:33 /dev/tty48
crw--w---- 1 root tty       4, 49 Mar 24 12:33 /dev/tty49
crw--w---- 1 root tty       4,  5 Mar 24 12:33 /dev/tty5
crw--w---- 1 root tty       4, 50 Mar 24 12:33 /dev/tty50
crw--w---- 1 root tty       4, 51 Mar 24 12:33 /dev/tty51
crw--w---- 1 root tty       4, 52 Mar 24 12:33 /dev/tty52
crw--w---- 1 root tty       4, 53 Mar 24 12:33 /dev/tty53
crw--w---- 1 root tty       4, 54 Mar 24 12:33 /dev/tty54
crw--w---- 1 root tty       4, 55 Mar 24 12:33 /dev/tty55
crw--w---- 1 root tty       4, 56 Mar 24 12:33 /dev/tty56
crw--w---- 1 root tty       4, 57 Mar 24 12:33 /dev/tty57
crw--w---- 1 root tty       4, 58 Mar 24 12:33 /dev/tty58
crw--w---- 1 root tty       4, 59 Mar 24 12:33 /dev/tty59
crw--w---- 1 root tty       4,  6 Mar 24 12:33 /dev/tty6
crw--w---- 1 root tty       4, 60 Mar 24 12:33 /dev/tty60
crw--w---- 1 root tty       4, 61 Mar 24 12:33 /dev/tty61
crw--w---- 1 root tty       4, 62 Mar 24 12:33 /dev/tty62
crw--w---- 1 root tty       4, 63 Mar 24 12:33 /dev/tty63
crw--w---- 1 root tty       4,  7 Mar 24 12:33 /dev/tty7
crw--w---- 1 root tty       4,  8 Mar 24 12:33 /dev/tty8
crw--w---- 1 root tty       4,  9 Mar 24 12:35 /dev/tty9
crw-rw---- 1 root dialout 204, 64 Mar 24 12:33 /dev/ttyAMA0
crw------- 1 root root      5,  3 Mar 24 12:33 /dev/ttyprintk
crw-rw-rw- 1 root dialout 188,  0 Mar 24 12:33 /dev/ttyUSB0
crw-rw-rw- 1 root dialout 188,  1 Mar 24 12:33 /dev/ttyUSB1
crw-rw-rw- 1 root dialout 188,  2 Mar 24 13:17 /dev/ttyUSB2
root@raspbx:~#
- Two devices, ttyUSB1 and ttyUSB2 should show up in the list. If the numbers are different, something like ttyUSB0 and ttyUSB1, edit /etc/asterisk/dongle.conf and change the values below [dongle0] accordingly.
- You can also verify if the dongle has been successfully registered or not by typing the below command:
asterisk -r
dongle show devices
- Congratulations! You have successfully install Chan_Dongle.
Configuring Trunks in Asterisk (Raspberry Pi)
- It’s time to configure Trunks in Asterisk.
- Navigate to Connectivity > Trunks
- Add Trunks > Add Custom Trunks
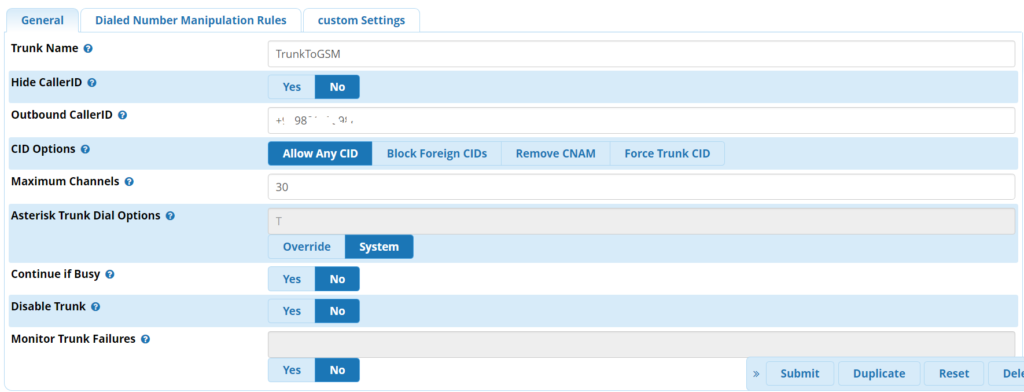
- Enter a Trunk Name > TrunkToGSM
- Outbound Caller ID > Enter the DID number of your GSM SIM Card with Country Code
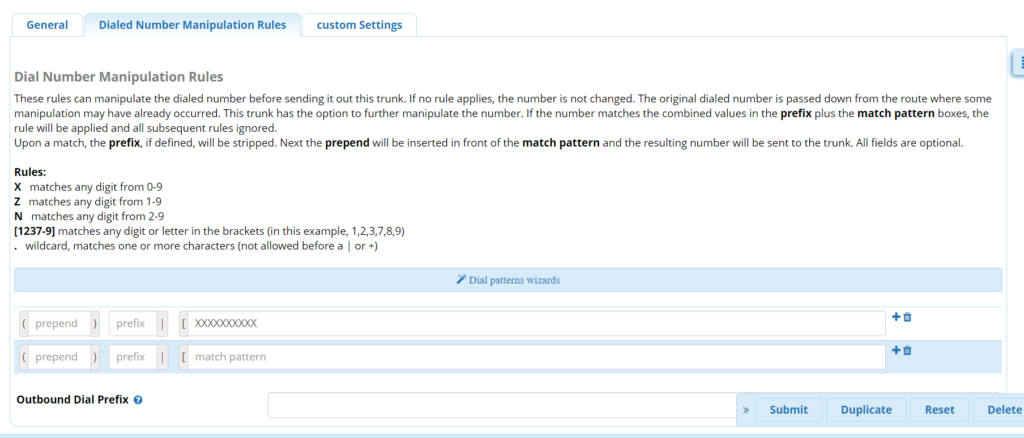
- Click on Dialed Number Manipulation Rules
- Match Pattern > Enter the pattern you wish to be routed. In my country we have 10 digit dialing and hence i have put it as XXXXXXXXXX
- Click on Custom Settings
- Enter dongle/dongle0/$OUTNUM$ as Custom Dial String
- Click on Submit

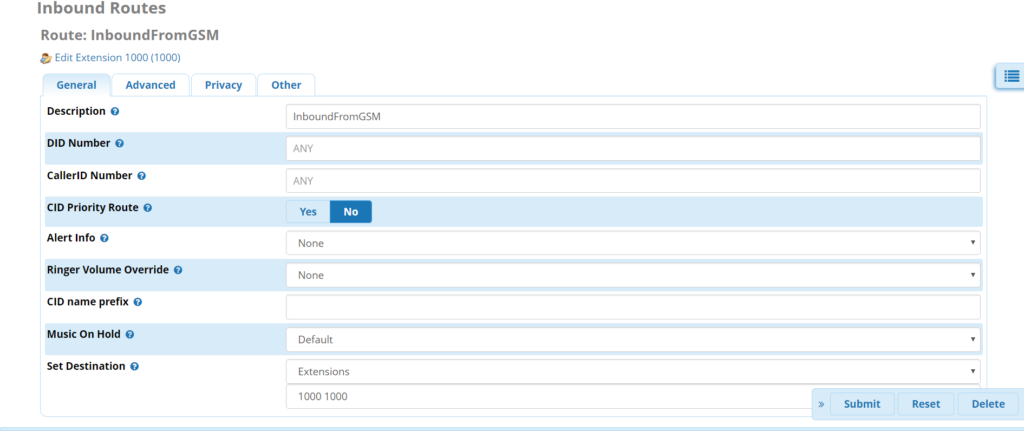
- Navigate to Inbound Routes
- Click on Add Inbound Route
- Enter a Description : InboundFromGSM
- DID Number : Leave it blank
- CallerID Number : Leave it blank
- Set Destination : Select from Drop Down Menu if you would like the call to be handled by IVR / Announcement / Extension etc. In our example we are routing inbound calls to Extension.
- Click on Submit
- Navigate to Outbound Routes
- Click on Add Outbound Route
- Route Name : RouteToGSM
- Route CID : Enter the DID number of your GSM number including country code.
- Trunk Sequence for Matched Routes > Select TrunkToGSM from drop down menu.
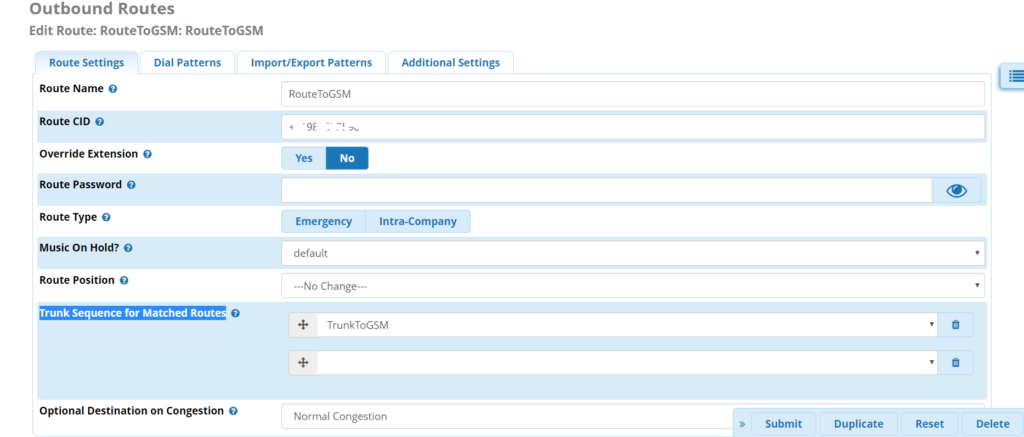
- Click on Dial Patterns
- Match Pattern > Enter the pattern you wish to be routed. In my country we have 10 digit dialing and hence i have put it as XXXXXXXXXX
- Click on Submit
- Click on Apply Config

That’s All! You are set to make or receive GSM/PSTN calls.
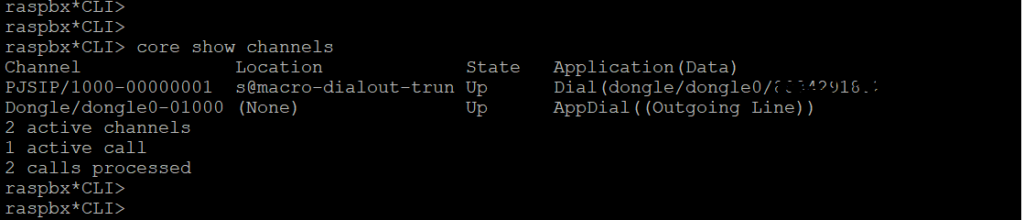
Testing inbound and outbound calls:
I made an inbound call (from PSTN to GSM) and outbound call (GSM to PSTN) and here is the test result:

Please comment if you liked this post or you have any questions!
Hope this helps!

I am working in an IT company and having 10+ years of experience into Cisco IP Telephony and Contact Center. I have worked on products like CUCM, CUC, UCCX, CME/CUE, IM&P, Voice Gateways, VG224, Gatekeepers, Attendant Console, Expressway, Mediasense, Asterisk, Microsoft Teams, Zoom etc. I am not an expert but i keep exploring whenever and wherever i can and share whatever i know. You can visit my LinkedIn profile by clicking on the icon below.
“Everyone you will ever meet knows something you don’t.” ― Bill Nye

Thanks for the publishing the info, could you do a post on setting up the trunk and extension and setting up threivr to forward the number to external number.
Hello, very good tutorial, just wanted to add with the new FreePBX setting up port forwarding on the router is necessary even in a local test.
Thank you for this very clear article.
I also use raspberry pi 3B and Huawei e1550.
The trouble is case of outgoing calls the GSM party for about 10-12 secs hears the silence.
Have you faced with similar issue?
Thank you for this article.
But I also use the Raspberry pi 3b with raspbx and Huawei e1550.
The problem is that when I call from SIP party to GSM party there is a silence on the GSM party for about 10-13 seconds, then sound on GSM party appears.
Do you also face this problem or everything is OK?
Dear Karnani, If I were to connect to mobiles via Bluetooth, what kind of usb Bluetooth I will need to buy?