Planning to Install Asterisk on Raspberry PI?
Have you every thought of installing Asterisk on a small portable box rather than a PC or Server or VMs? The box is so small that it can go into your pocket. Yes, you heard it right! We are going to talk about Raspberry PI.
The Raspberry Pi is a low cost, credit-card sized computer that plugs into a computer monitor or TV, and uses a standard keyboard and mouse. It is a capable little device that enables people of all ages to explore computing, and to learn how to program in languages like Scratch and Python.
There are various variants of Raspberry PI. Few examples below:
- Raspberry Pi 3 – Model A+
- Raspberry Pi 3 – B+
- Raspberry Pi 3
- Raspberry Pi 2
- Raspberry Pi Zero
If you would like to see the differences in these models, you can follow the link below:
https://www.raspberrypi.org/products/
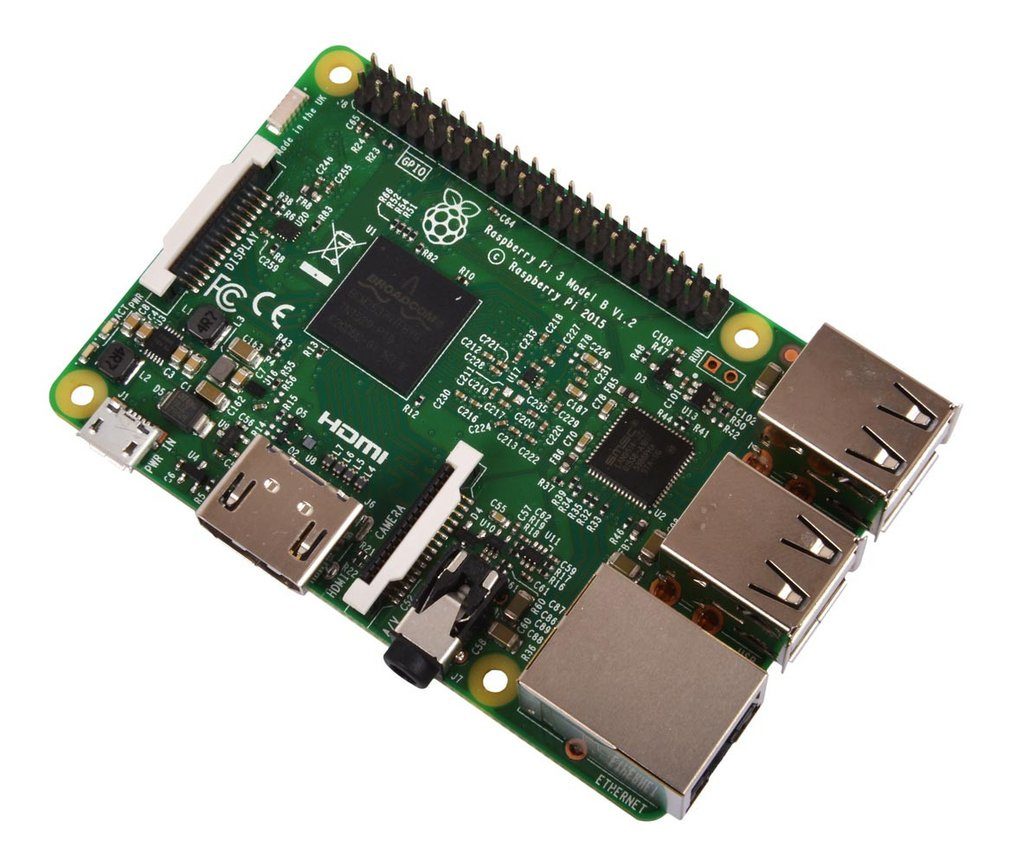
In this tutorial, we are going to use Raspberry Pi 3B board which has the following specification:
SPECIFICATION
Microprocessor: 1.3 GHz ARM Cortex-v8 Quad Core
Chipset: Broadcom BCM2837
RAM: 1 GB SDRAM
USB: 4 ports (USB 2.0)
HDMI: Full size connector (video output at 1080p)
SD Card: Micro SD
Power Supply: Up to 5V 2.5A
Input Voltage: DC 5V
Dimensions: 85mm x 56mm x 21mm
Requirements: Hardware and Software
- 1 Raspberry Pi 3B or any compatible board which has got LAN/WiFi.
- SD Memory Card – Minimum 8GB
- 1 SD Memory Card Reader
- 1 HDMI Cable
- 1 USB Keyboard
- 1 Mobile Charger
- Asterisk Image Software
- SD Card Formatter Software
- Win32 Disk Imager Software
Download the software(s) from the below link:
- First and the foremost is you need to download Asterisk Image file and make sure you extract .img file from the zip file. Click here to go to the official website.
- Next you need to download and install SD Card Formatter Software. Click here to go to the download page.
- Next you need to download and install Win32 Disk Imager Software. Click here to go to the download page.
Let’s get started:
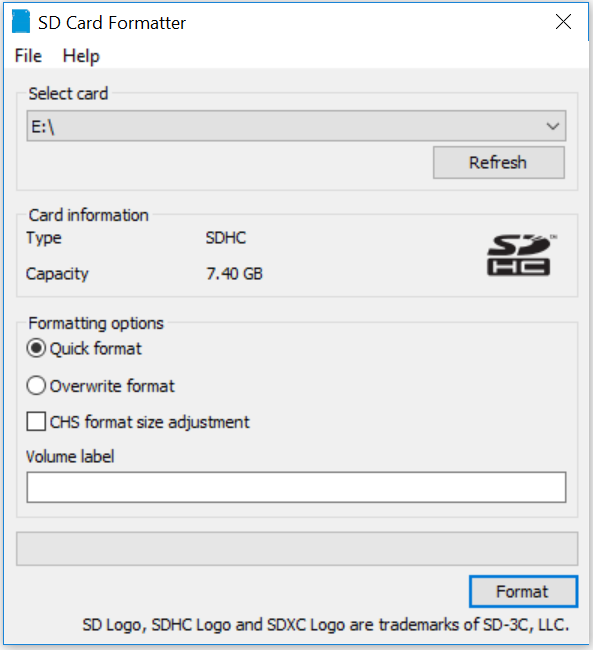
Insert SD Card in SD Card Reader and Format it
- Insert the SD Card in the SD Card Reader
- Launch SD Card Formatter application
- Select the SD Card drive from the drop down menu
- Radio Check Quick Format
- Click on Format
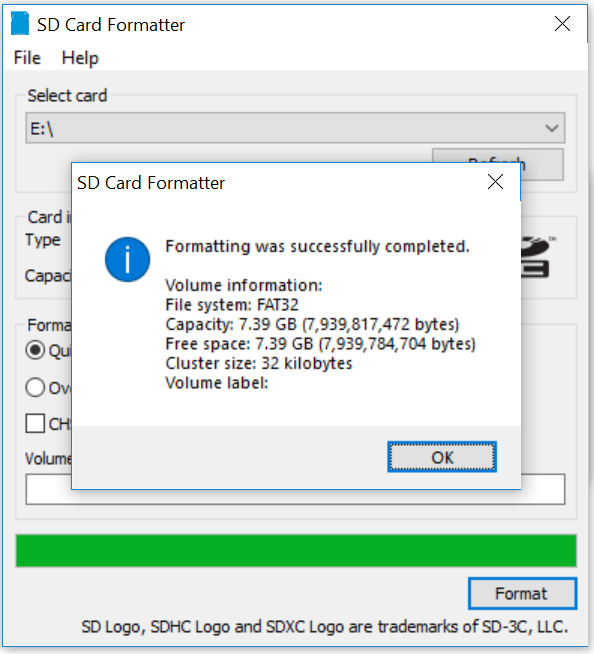
- Press Yes to continue formatting. Formatting the SD Card will erase existing data from SD Card. Please make sure that you copy the files from your SD card to your PC.
- Click on OK
Write Image File to SD Card using Win32 Disk Imager
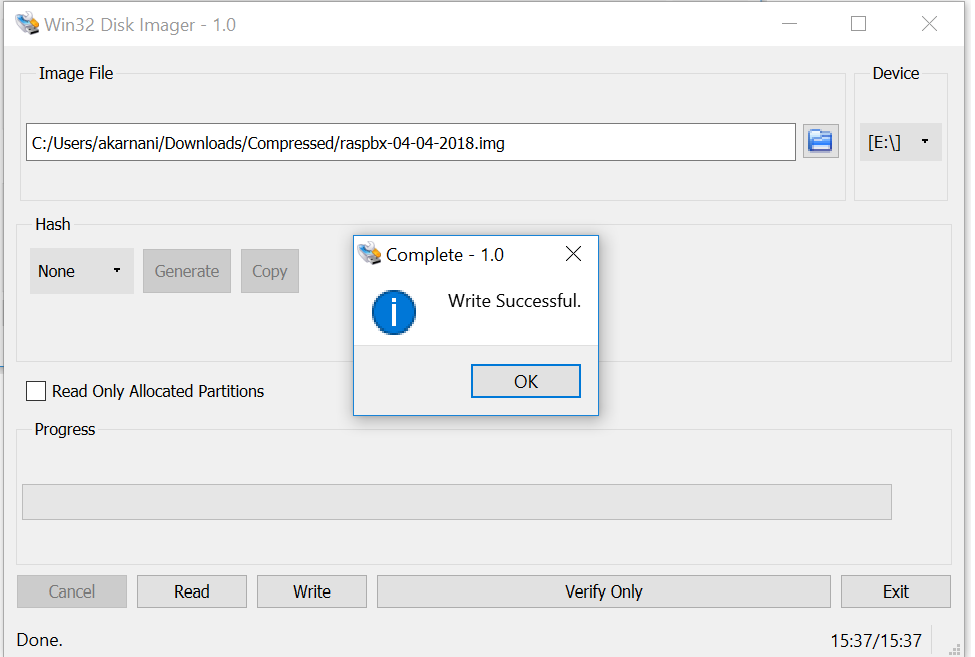
- Launch Win32DiskImager Application
- Click on Browse and select raspbx-04-04-2018.img file which you extracted from the downloaded asterisk zip file. (I downloaded raspbx-04-04-2018.img file but there are chances that you may get a different version in case there is a new version available in the official website.)
- Click on Write
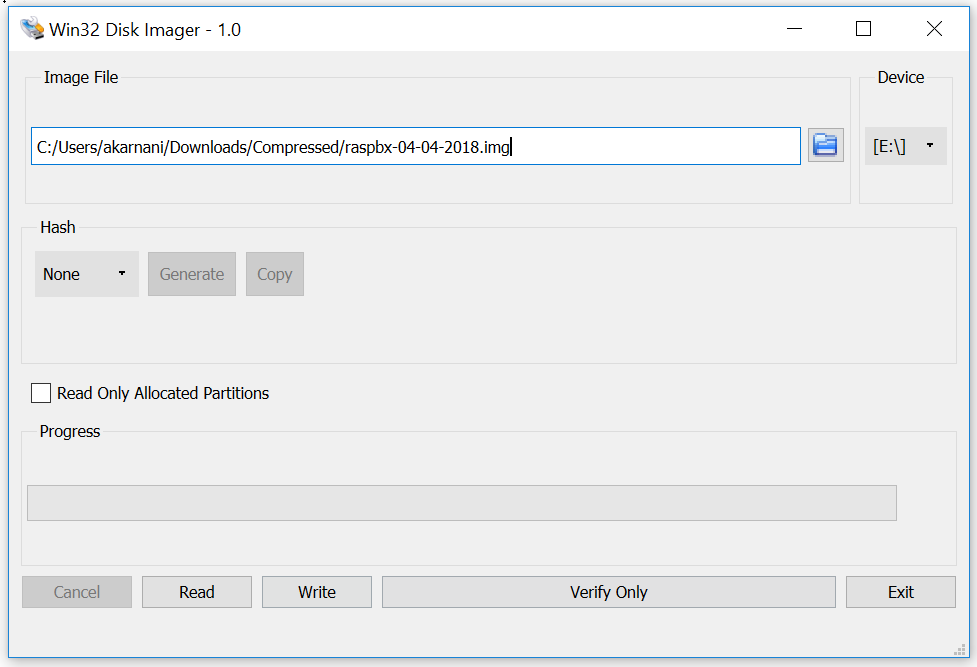
- Press Yes to confirm overwrite.
- It will take around 8-15 minutes to write the image file to your SD Card depending on the read and write speed of your SD card.
- Once the files are successfully written, you will get a message as “Write Successful”.
It’s time to configure Asterisk on your Raspberry Pi
- Remove the SD Card from your SD Card Reader
- Insert it in the back side of your Raspberry Pi (Micro SD Card written on the board)
- Connect HDMI cable from your Raspberry PI to TV/Monitor
- Connect USB Keyboard to your Raspberry PI
- Connect Mobile Charger to your Raspberry Pi
- You will see the Raspberry Pi to be turned on and you will see some output on your TV/Monitor screen.

- Once you see the login prompt, enter the username as “root” and the password as “raspberry“
- It’s time to configure IP Address for your Asterisk. You can connect your Asterisk to the network using LAN and WiFi. In our tutorial, we will use WiFi to connect to the network.
- Enter the following command in order to configure WiFi.
Configuring IP Address for Asterisk
sudo nano /etc/network/interfaces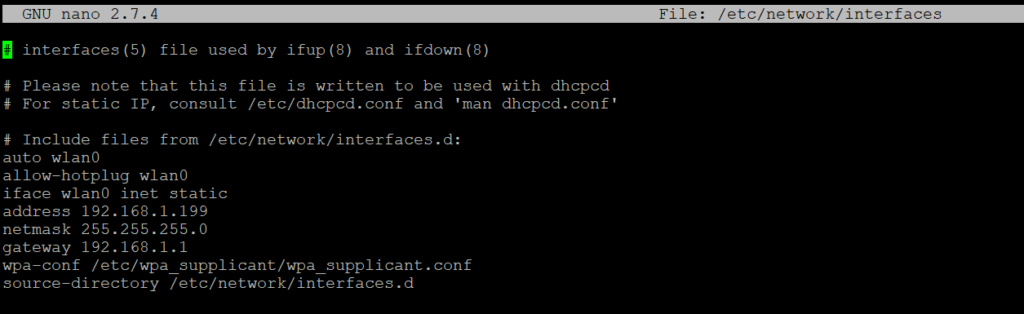
auto wlan0
allow-hotplug wlan0
iface wlan0 inet static
address 192.168.1.199
netmask 255.255.255.0
gateway 192.168.1.1
wpa-conf /etc/wpa_supplicant/wpa_supplicant.conf- Ctrl-X, then type Y to quit and save
- Enter the following command :
sudo nano /etc/wpa_supplicant/wpa_supplicant.conf
network={
ssid="YOUR_NETWORK_NAME"
psk="YOUR_NETWORK_PASSWORD"
proto=RSN
key_mgmt=WPA-PSK
pairwise=CCMP
auth_alg=OPEN
}- Ctrl-X, then type Y to quit and save
- Type reboot and hit enter to reboot raspberry pi
- Enter the following command to see if your WLAN0 has been assigned with an IP Address and is up.
ifconfig wlan0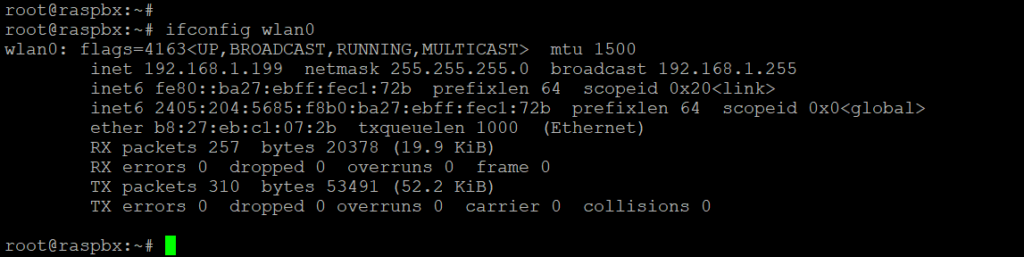
Hurray! You have set the IP Address for your Asterisk.
Configuring Core Credentials to Administer Asterisk
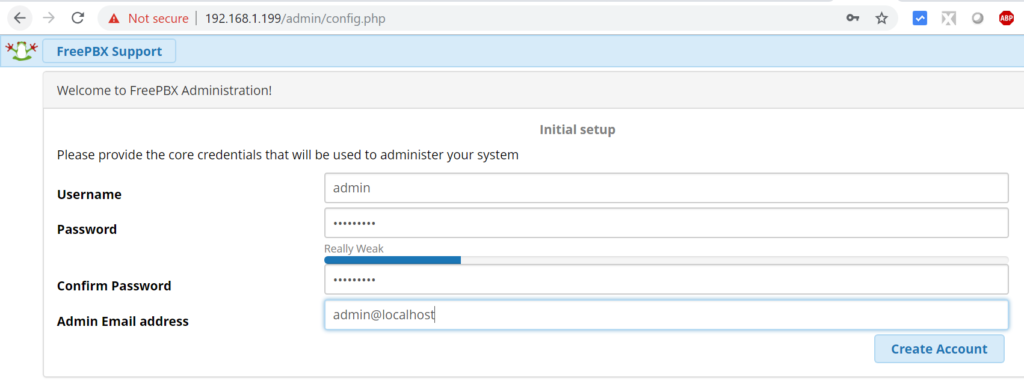
- Launch your favorite browser and enter Asterisk URL which you configured in above step. As per your scenario it is “192.168.1.199”
- Enter a Username:
- Enter a Password:
- Enter a Confirm Password:
- Enter Admin Email Address:
- Click on Create Account:
- Click on FreePBX Administration

- Enter Username and Password that you created in above step
- Click on Continue

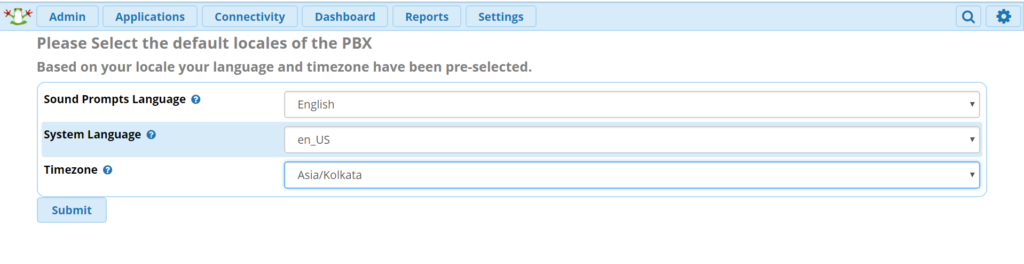
- Sound Prompt Language – Select your prompt language from drop down menu
- System Language – Select your system language from drop down menu
- Timezone – Select appropriate timezone
- Click on Submit
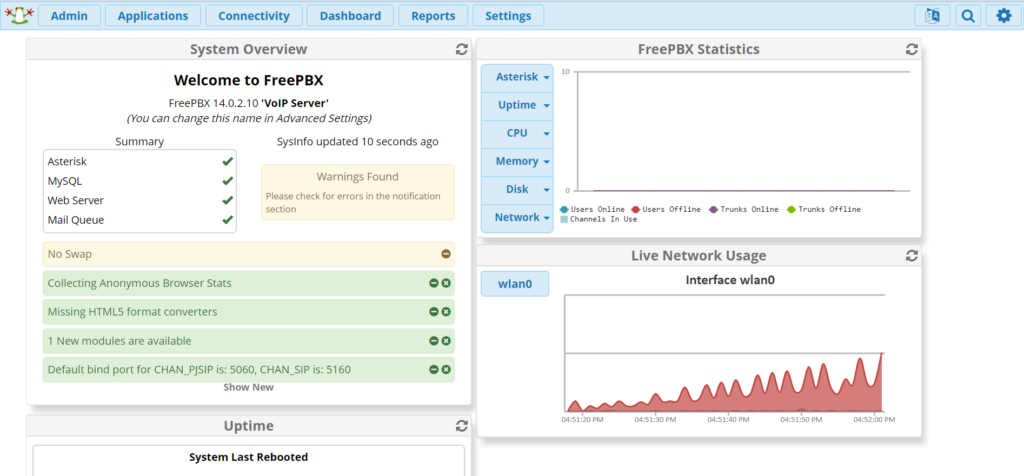
Your Asterisk / FreePBX is ready for use
Hurray! Now you don’t necessary need HDMI cable and Keyboard connected to your Raspberry PI.
You can remotely access the console via SSH to your Asterisk IP Address. Username and Password would be “root” and “raspberry” respectively
If you want to access GUI page remotely, enter Asterisk IP Address on your browser and you can access the page.
Hope this helps!

I am working in an IT company and having 10+ years of experience into Cisco IP Telephony and Contact Center. I have worked on products like CUCM, CUC, UCCX, CME/CUE, IM&P, Voice Gateways, VG224, Gatekeepers, Attendant Console, Expressway, Mediasense, Asterisk, Microsoft Teams, Zoom etc. I am not an expert but i keep exploring whenever and wherever i can and share whatever i know. You can visit my LinkedIn profile by clicking on the icon below.
“Everyone you will ever meet knows something you don’t.” ― Bill Nye

Pingback: PSTN/GSM calls via Asterisk Raspberry Pi
I can’t connect to the page 192.168.1.199 with different browsers. I checked with “Ifconfig wlan0” and everything looks good there.
Tryed with “Putty” ,tryed with “IP scanner” and I can’t find any adress to the rpipbx.
Mu usb WiFi dongle is lit, but not flashing, and i can’t find any WiFi signal when i try to scan the WiFi network.
My RPI 2b and my RPI3 (Change the card between them) is connected via RJ45 cable to my modem, but no IP adress anywhere. Can’t figure it out where the problem is.
Regards
Peter
This is a really good step-by-step instruction on how to get Asterisk and Free PBX running on a Raspberry Pi. The only thing I might add is a small section on setting up the Wired LAN IP Configuration. That would make it complete.
Thank you for the excellent instructions.
Hello Steven,
Thank you for the feedback, i’ll try to include the small section on setting up the Wired LAN whenever i am hitting Raspberry Pi.
I have tried this about a dozen times. I get as far as starting up the Raspberry Pi and then I get nothing but “This board requires newer software” errors. I can never get any farther. *sigh*