SIP Trunk Integration with CUCM and CUC
Configure or Integrate SIP Trunk with CUCM (Cisco Unified Communication Manager) and CUC (Cisco Unity Connection). A traditional way to integrate Unity Connection with CUCM is using SCCP but in this post, we will use SIP for integration.
MWI (Message Waiting Indicator) and Directory Numbers for Voicemail Ports has to be configured in case of SCCP whereas in SIP, the configuration can be eliminated. Unity Connection uses SIP NOTIFY message to turn ON or OFF MWI.
Configuration in Cisco Unified Communication Manager
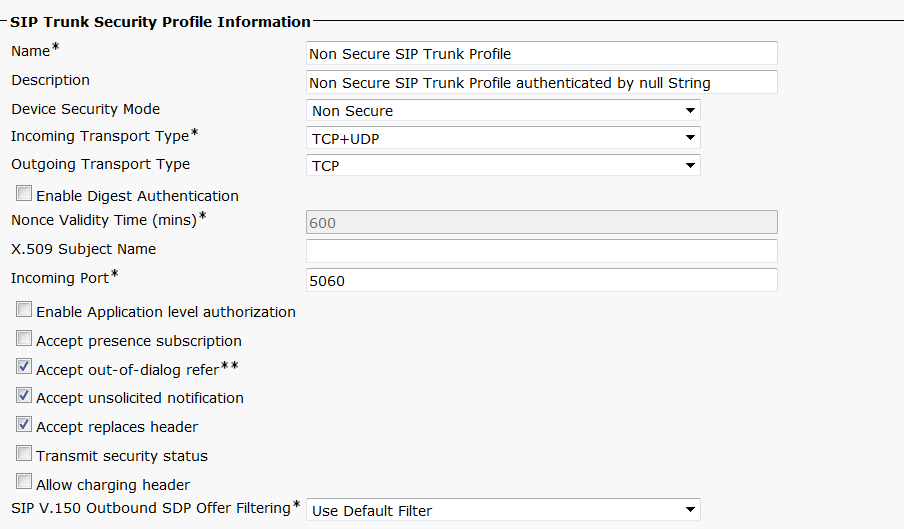
Create a SIP Trunk Security Profile
- Go to System > Security > Either Create a new or Use the Default SIP Trunk Profile. In our case, we will use the Default one i.e., “Non Secure SIP Trunk Profile”
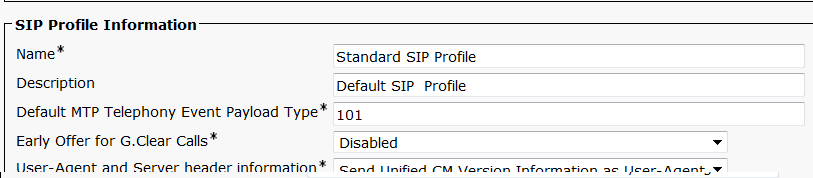
Create a SIP Profile
- Go to Device > Device Settings > SIP Profile > Either Create a new or Use the Default SIP Trunk Profile. In our case, we will use the Default one i.e., “Standard SIP Profile”
Create a SIP Trunk
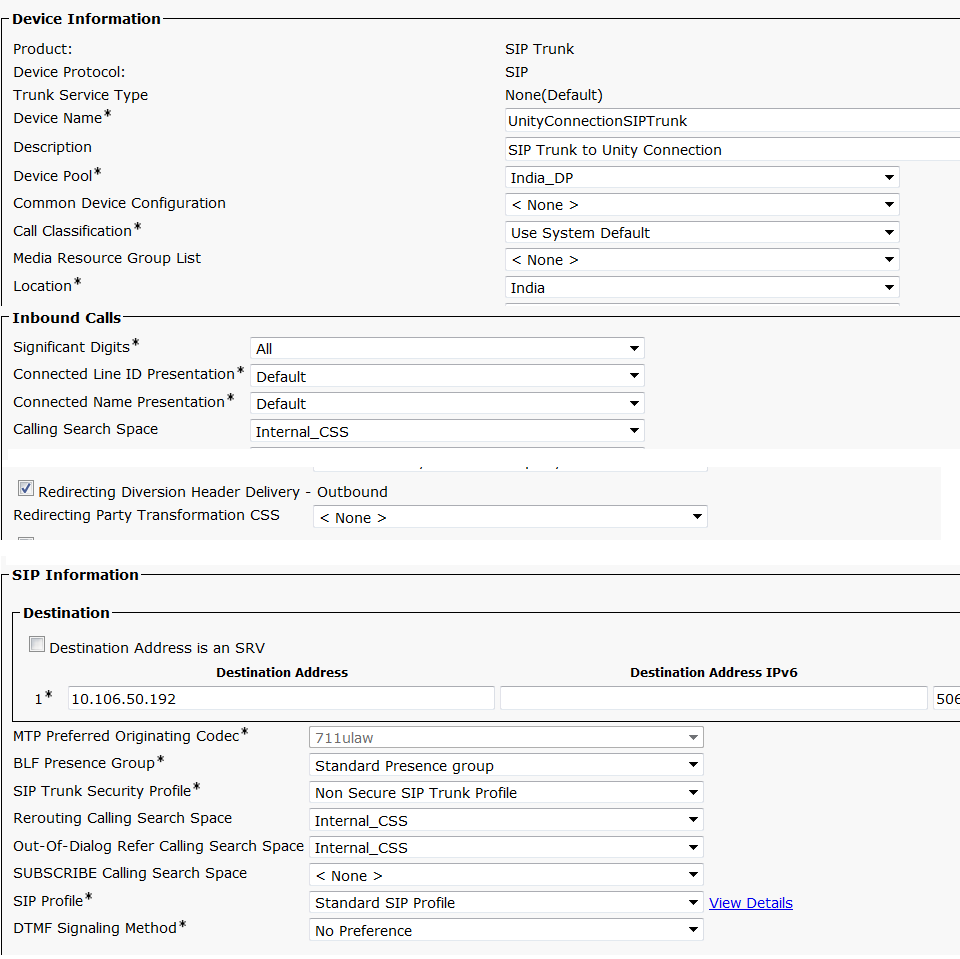
- Go to Device > Trunk > Add New
- Enter SIP Trunk Name, Description, Device Pool, Location
- Check Mark > Redirecting Diversion Header Delivery – Outbound
- Inbound Calls > Select Calling Search Space for Inbound Calls
- Destination Address >Enter the IP Address of Unity Connection
- SIP Trunk Security Profile > Select the one you created or the default one “Non Secure SIP Trunk Profile”
- Rerouting Calling Search Space > Assign appropriate CSS
- Out-Of-Dialog Refer Calling Search Space > Assign appropriate CSS
- SIP Profile > Select the one you created or the default one “Standard SIP Profile”
Create a Route Pattern
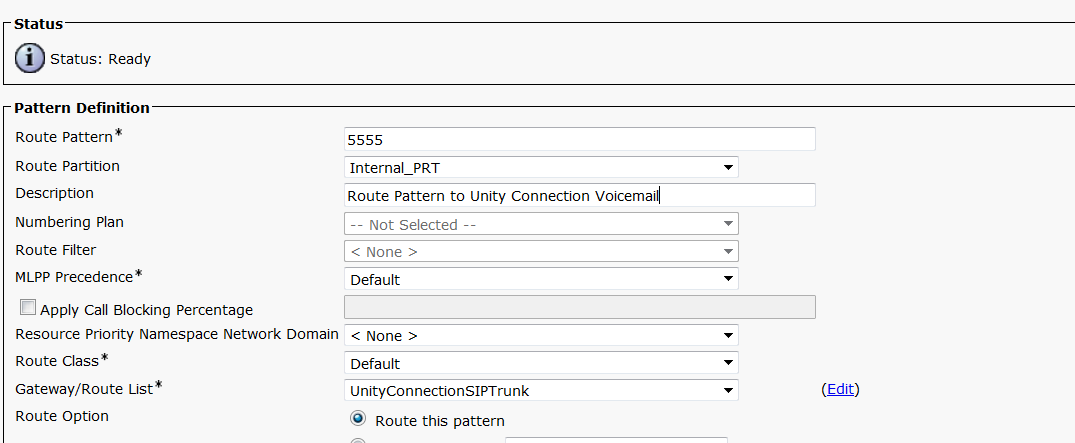
- Go to Call Routing > Route/Hunt > Route Pattern > Add New
- Route Pattern > Enter a Number which will be triggered to Dial into Unity Connection. In our case we will use 5555
- Route Partition > Select appropriate Partition
- Gateway/Route List > Select the Trunk which is create for Unity Connection. In our case, we will select UnityConnectionSIPTrunk

Create a Voicemail Pilot
- Go to Advanced Features > Voicemail > Voicemail Pilot > Add New
- Voice Mail Pilot Number > Enter the Route Pattern Number. In our case, we will use 5555
- Calling Search Space > Assign appropriate CSS
Create Voicemail Profile
- Go to Advanced Features > Voicemail > Voicemail Profile > Add New
- Voice mail Profile Name > VMProfile
- Description > Enter a description
- Voicemail Pilot **> In our case, we will select 5555 from drop down menu
Configuration in Cisco Unity Connection
Creating a Phone System
- Expand Telephony Integration > Phone System > Add New
- Phone System Name >
- Check Mark > Default TRAP Phone System
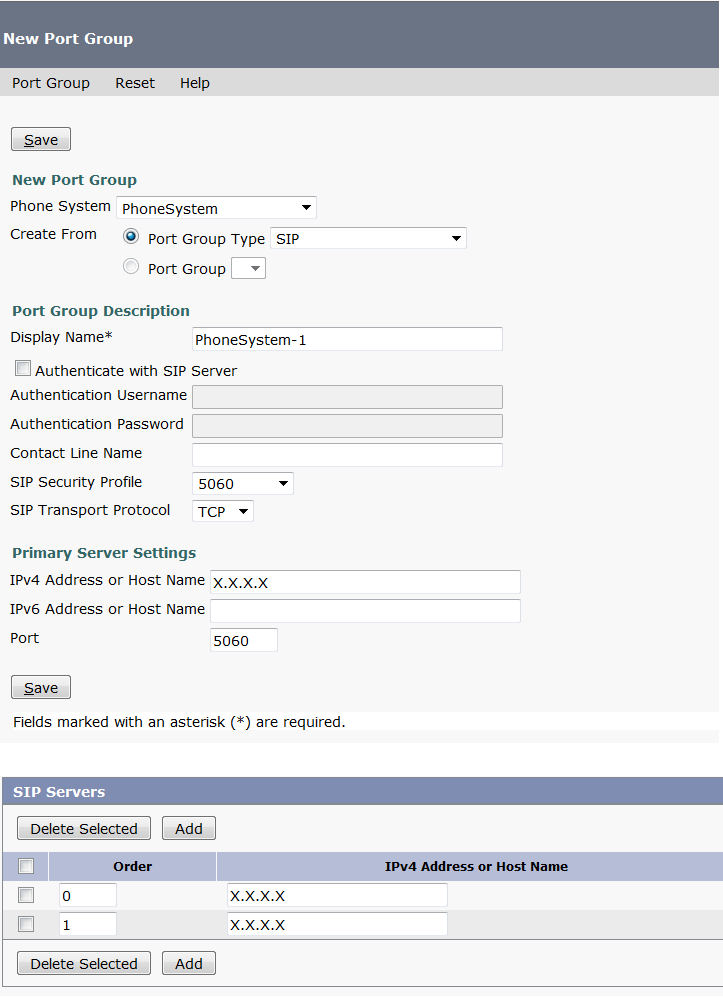
Creating a Port Group
- Expand Telephony Integration > Port Group > Add New
- Phone System > Select the Phone System from Drop Down Menu that was created in the above step
- Create From > Check Mark Port Group Type > SIP
- IPv4 Address or Host Name > Enter the IP Address of Cisco Unified Communication Manager
- Save
- Edit > Servers > Enter the IP Address of Cisco Unified Communication Manager and select the order/priority. For example X.X.X.X (Subscriber 2 ) order 0, X.X.X.X (Subscriber 1) order 1 and X.X.X.X (Publisher) order 2
Note – X.X.X.X has to be replaced with IP Address of Publisher and Subscribers
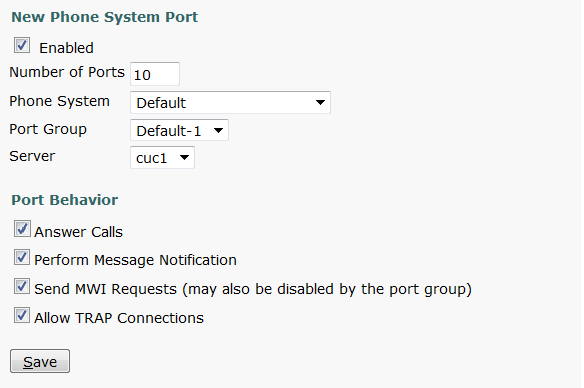
Creating Ports
- On Port Group > Related Links > Select Add Ports from Drop Down Menu and Click on Go
- Check Mark > Enabled
- Number of Ports > Enter the Number of Ports you want to configure
- Phone System > Select Phone System that you have created
- Port Group > Select Port Group that you have created
- Server > Select Server from Drop Down Menu
- Check Mark > Answer Calls
- Check Mark > Perform Message Notification
- Check Mark > Send MWI Requests (may also be disabled by the port group)
- Check Mark > Allow Trap Connections
- Save
We are done with the configuration. Now make call from your IP Phone to the Route Pattern created, in our case 5555 and ensure that the calls are connected to Unity Connection.
Here is the YouTube video on integrating CUCM with Cisco Unity Connection using SIP
Cheers!!

I am working in an IT company and having 10+ years of experience into Cisco IP Telephony and Contact Center. I have worked on products like CUCM, CUC, UCCX, CME/CUE, IM&P, Voice Gateways, VG224, Gatekeepers, Attendant Console, Expressway, Mediasense, Asterisk, Microsoft Teams, Zoom etc. I am not an expert but i keep exploring whenever and wherever i can and share whatever i know. You can visit my LinkedIn profile by clicking on the icon below.
“Everyone you will ever meet knows something you don’t.” ― Bill Nye

Great post…worked for me , thank you
Thank you for following the blog, Mahmouf!!
If we could only teach Cisco to make things so simple. Instead we read the same intro and there is nothing of substance.
Great UC Blog!
Awesome tutorial..Thanks so much!
We need to import users as well….I bellieve. If you can enlist that steps as well. Very good post 🙂
Great Avinash !
Very Informative.
Thanks for helping those who wants to explore their tech skills.
Avinash Karnani excellent contribution very well explained, will you have something similar but doing the integration between CUCM and CUC in an encrypted way?