Route CUCM inter-cluster calls using Audiocodes SBC
In a generic scenario, we use H.323 inter-cluster trunks or SIP trunks (either P2P or leveraging SME) to route the inter-cluster calls. In this article, we will look into configuring Audiocodes SBC and route the CUCM inter-cluster calls using Audiocodes SBC.
 In today’s lab, we have the following infra:
- Call Manager Cluster A – 192.168.1.150. The IP Phone number range is 10XXX.
- Call Manager Cluster B – 192.168.1.155. The IP Phone range is 15XXX.
- Call Manager Cluster C – 192.168.1.160. The IP Phone range is 16XXX .
- Audiocodes SBC – 192.168.1.180.
- 1 softphone registered to each cluster.
Configuration on Audiocodes from scratch:
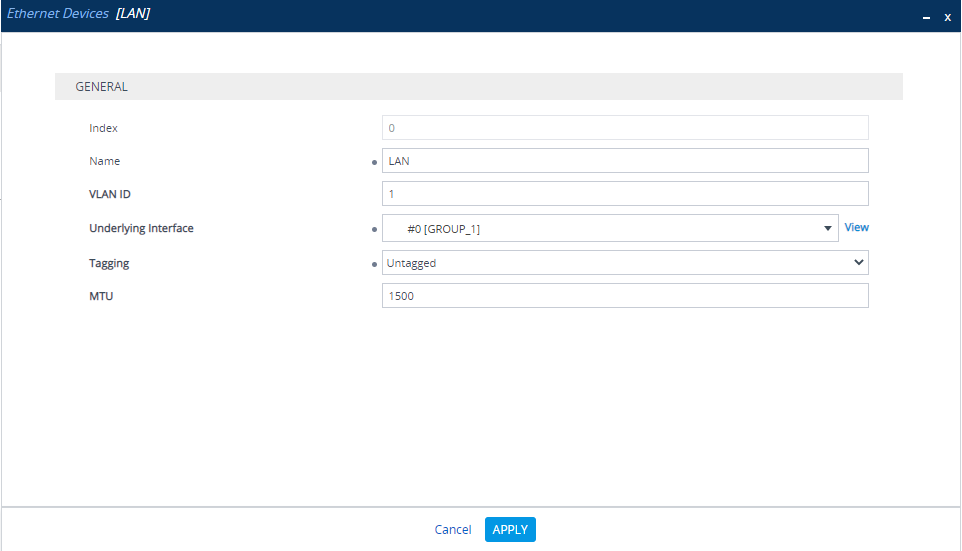
IP Network > Core Entities > Ethernet Devices
- Login to Audiocodes SBC and navigate to IP Network > Ethernet Devices
- Change the Name to LAN
- Click on Apply
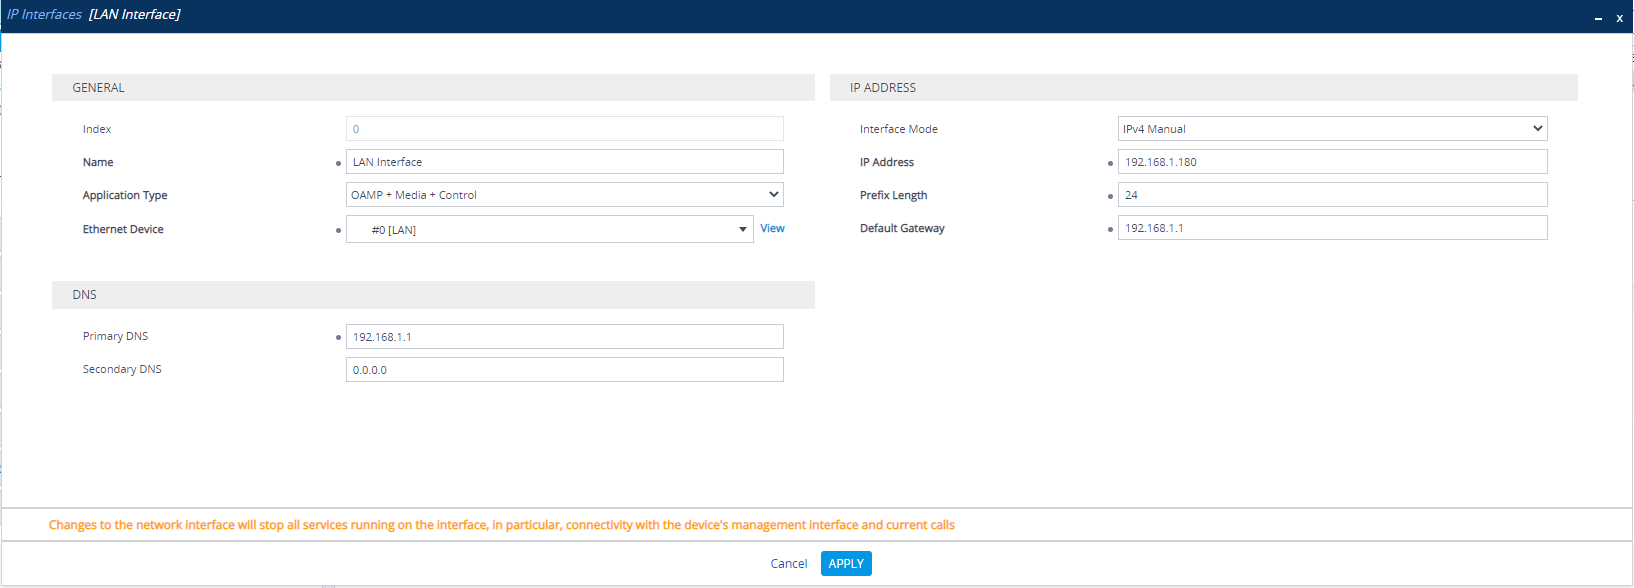
IP Network > Core Entities > IP Interfaces
- Change the name to LAN Interface
- Configure Primary DNS/Secondary DNS and validate other settings like Prefix Length, Default Gateway.
- Click on Apply.
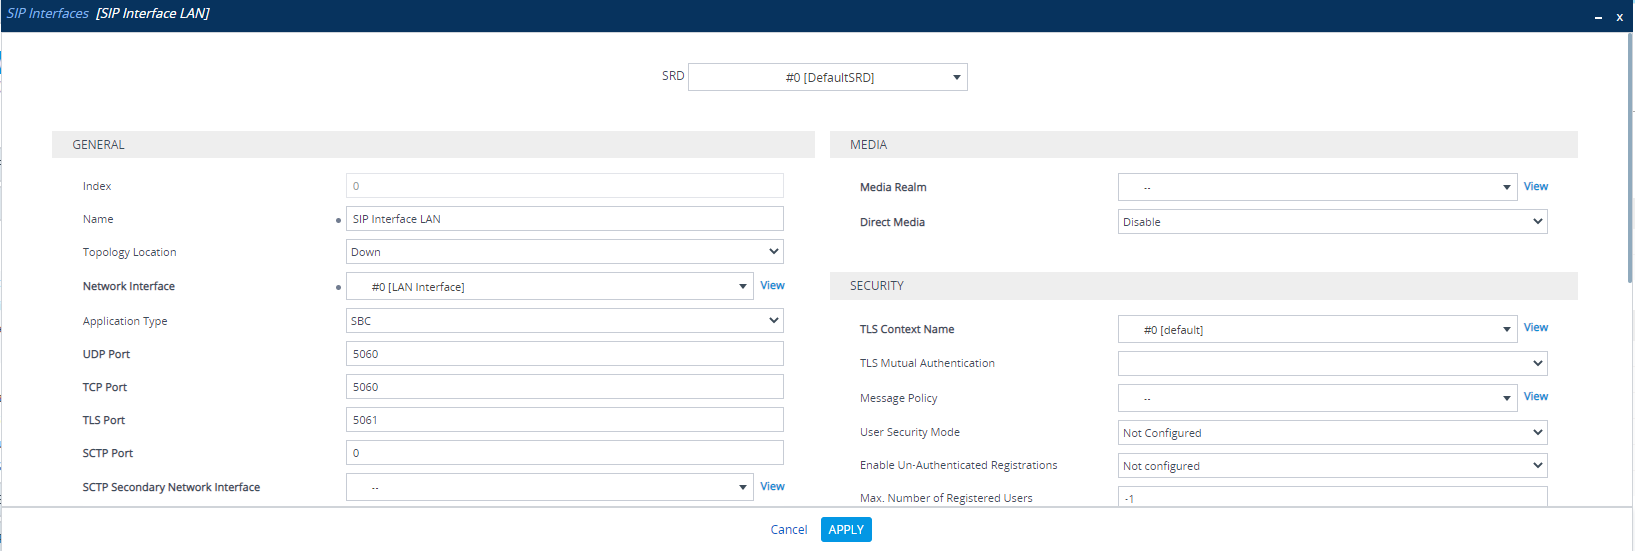
Signaling & Media > Core Entities > SIP Interfaces
- Change the Name to SIP LAN Interface
- In the Network Interface > Select LAN Interface
- Keep all the other settings to default and click on Apply
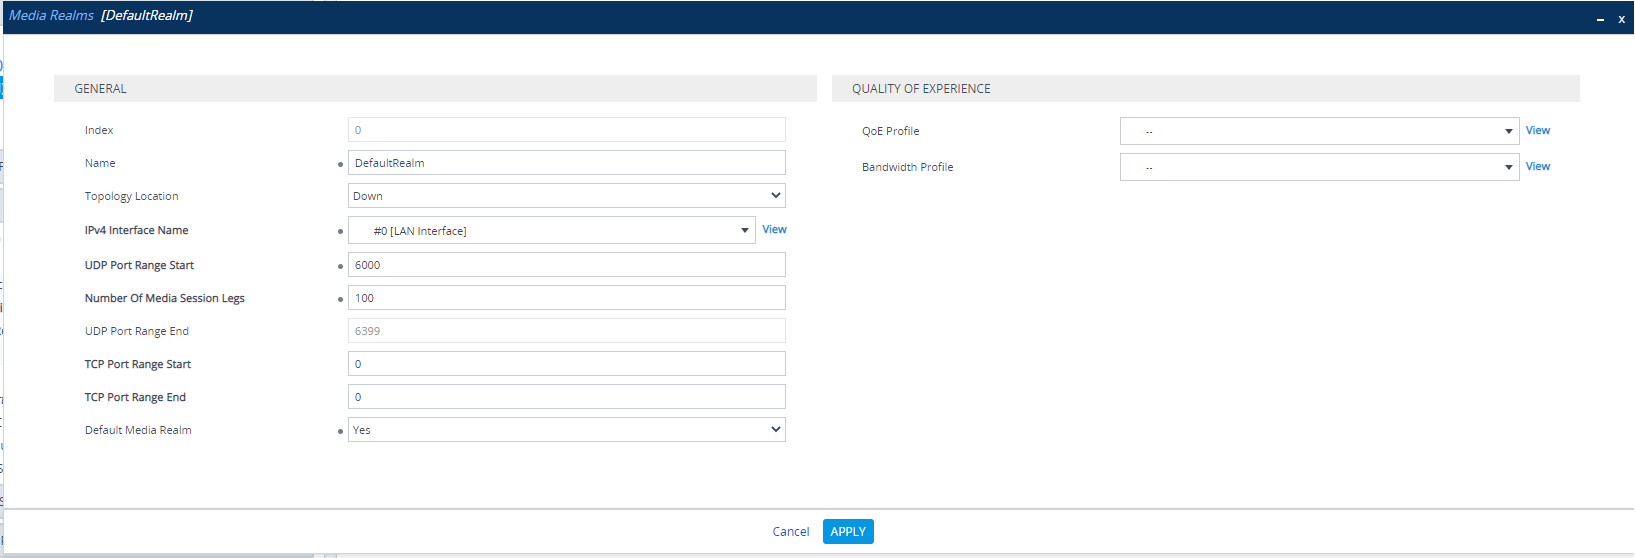
Signaling & Media > Core Entities > Media Realm
- Change the default UDP Port Range Start to > 6000
- Change the number of Media Session Legs as per the requirement > In our case we have set it to 100.
- Click on Apply
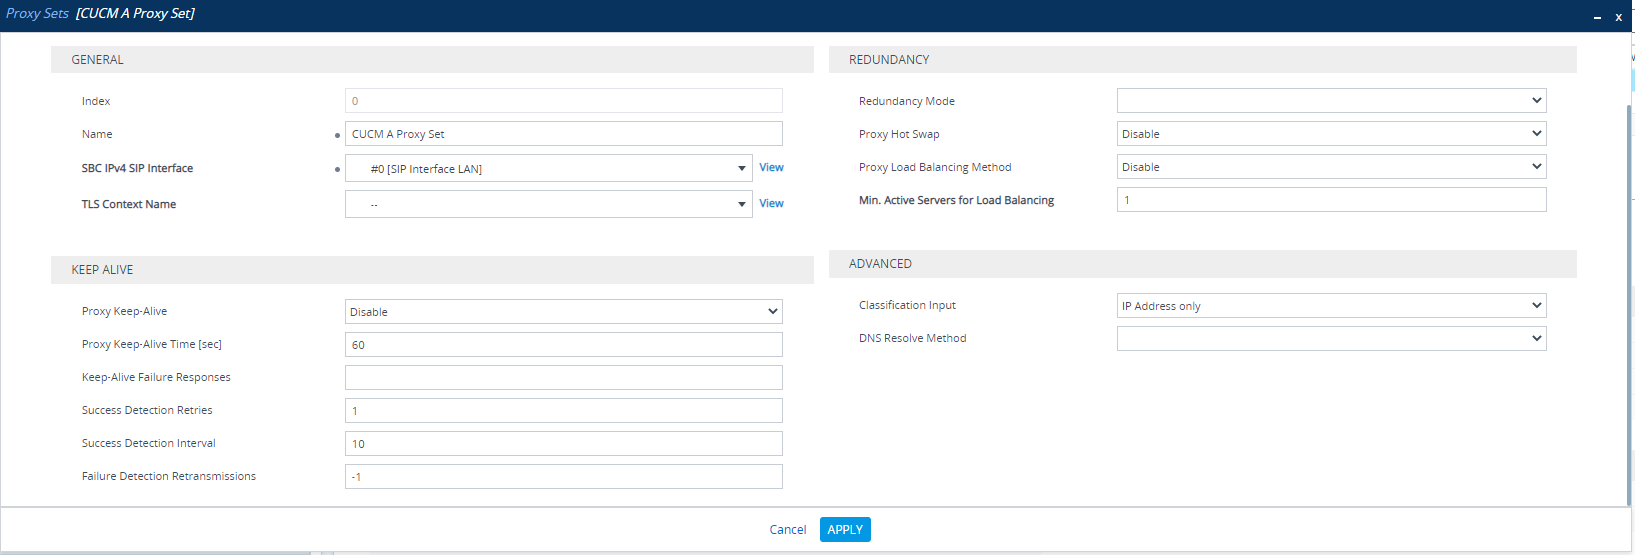
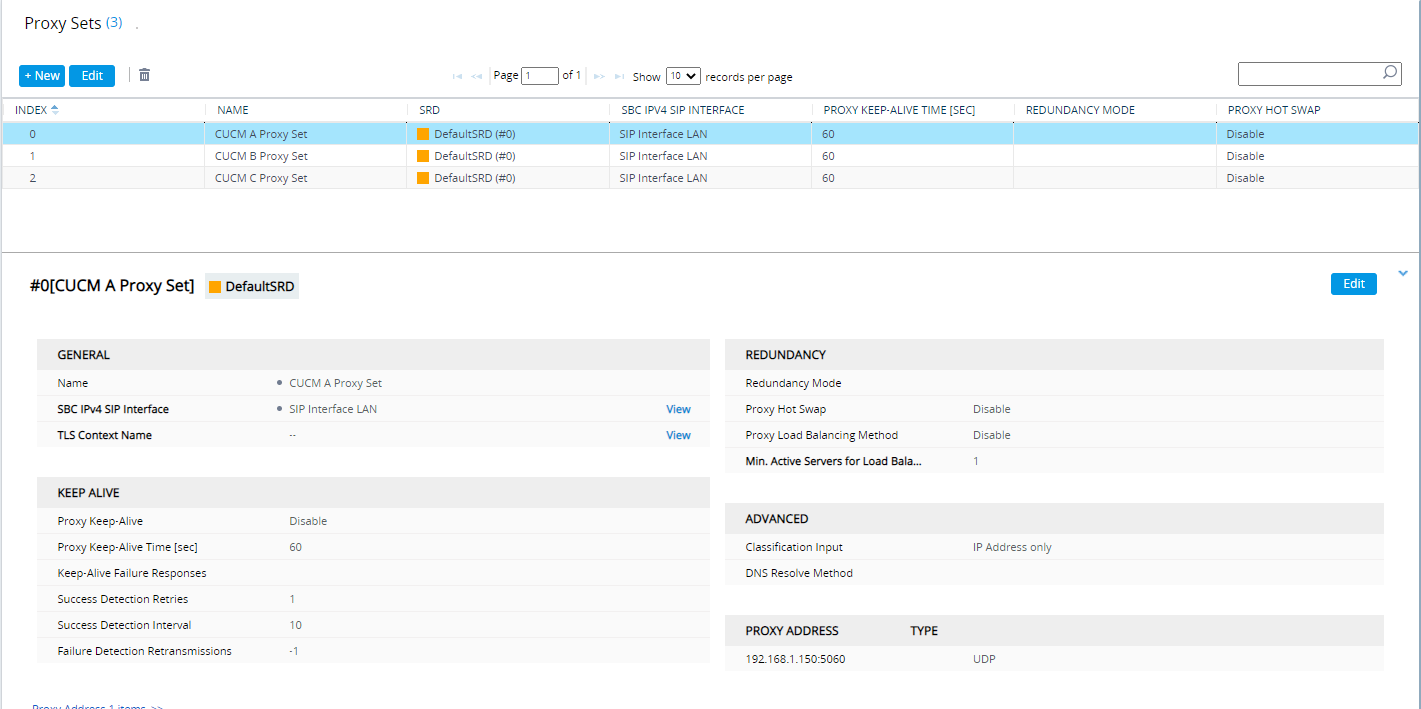
Signaling & Media > Core Entities > Proxy Sets
- We have created 3 Proxy Sets as we are going to integrate Audiocodes with 3 Call Manager cluster. It depends on the number of cluster you would like to integrate, so create your proxy sets accordingly.
- Click on New
- Name > CUCM A Proxy Set
- SBC IPv4 SIP Interface > Select the LAN interface
- Click on Apply
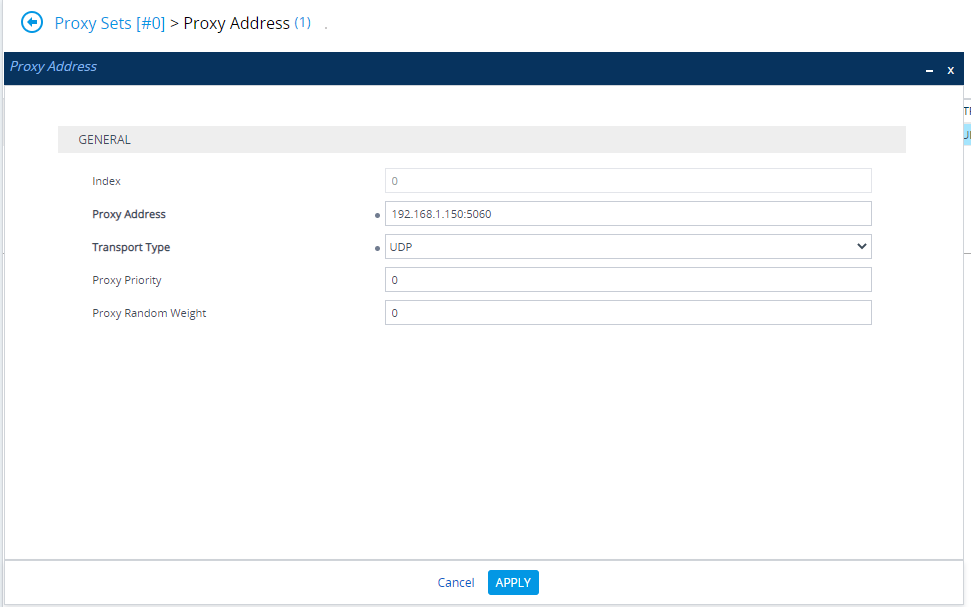
- Click on Proxy Address as shown below
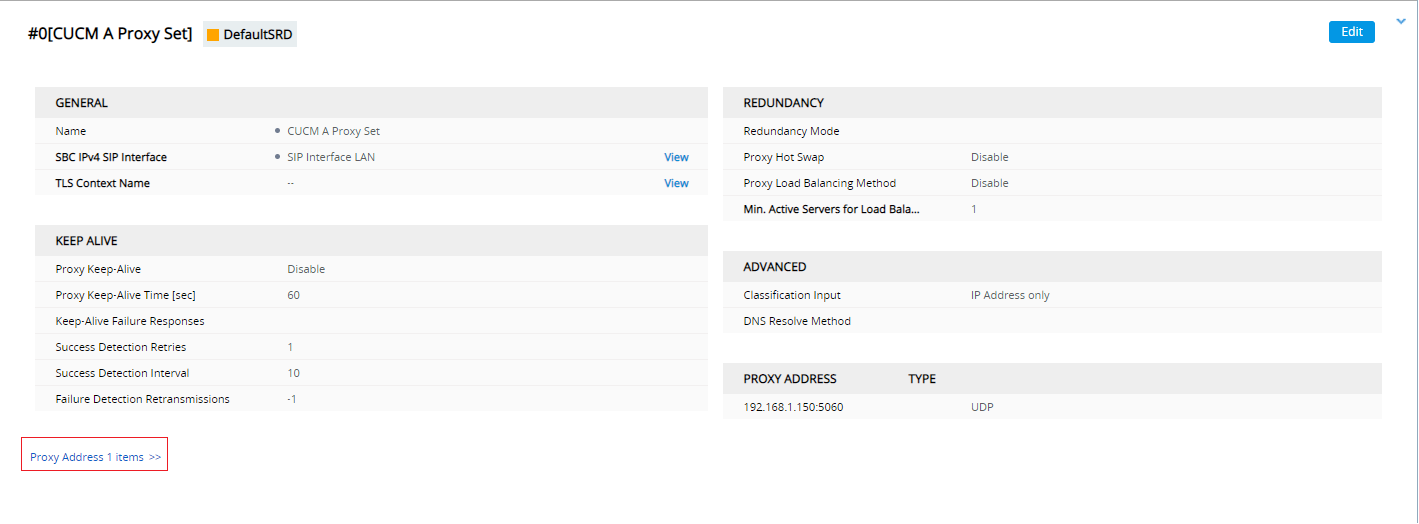
- Click on New
- Proxy Address > Enter the IP Address of CUCM A Cluster and the Port Number. As per our scenario, 192.168.1.150:5060
- Transport Type > Select UDP or TCP based on your requirement and configuration on CUCM.
- Click on Apply
- Likewise configure 2 more proxy sets for CUCM B and CUCM C by following the similar steps as above. Only your CUCM B and CUCM C Proxy IP Address will change. As per our scenario, we will have 3 proxy sets in total.
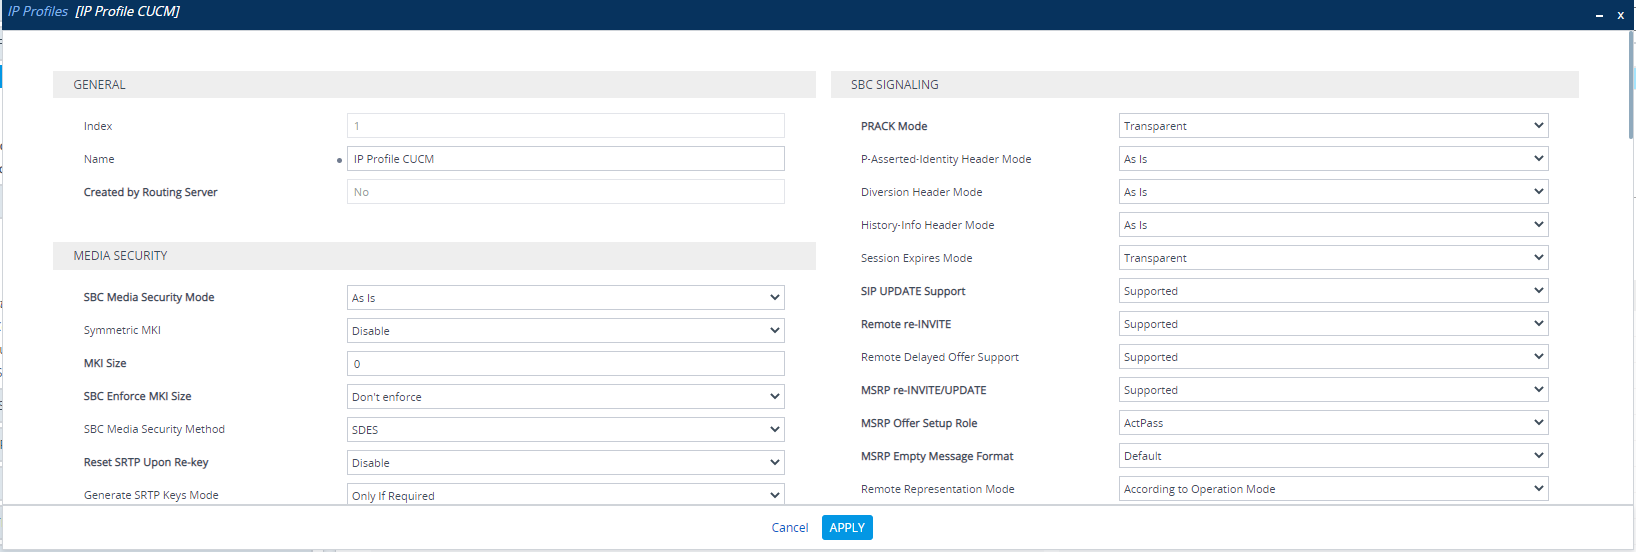
Signaling & Media > Coders & Profiles > IP Profiles
- Click on add New
- Name > Enter the name as IP Profile CUCM
- Extension Coders Group > Select #0 [AudioCodersGroups_0] from the drop down menu
- Leave everything as default
- Click on Apply.
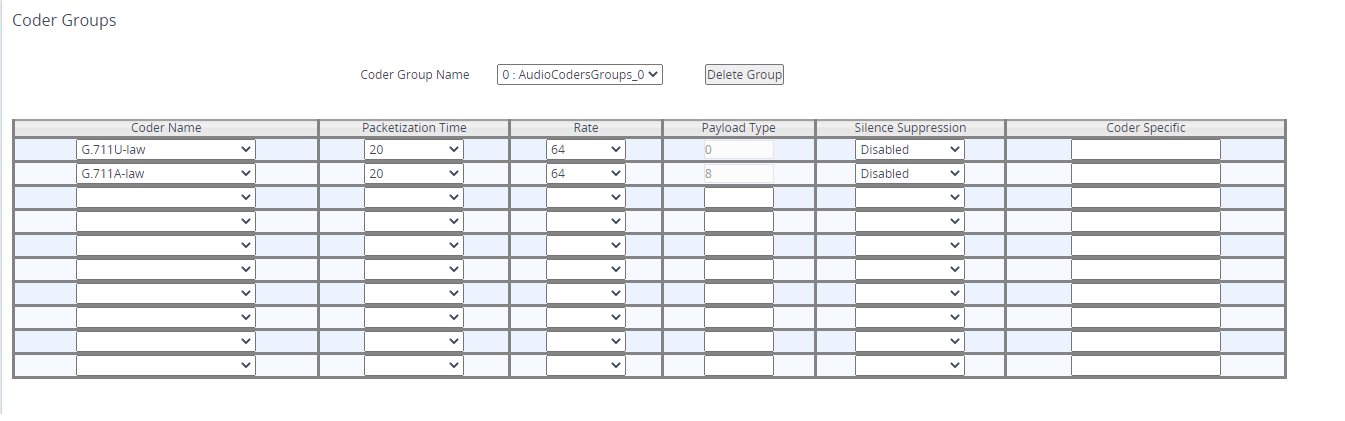
Signaling & Media > Coders & Profiles > Coder Groups
- Add G711U-law and G711A-law in the list.
- Click on Apply
Signaling & Media > SIP Definitions > Dial Plan
- Click on Add New
- Enter the name as “Dial Plan CUCM“
- Click on Apply.
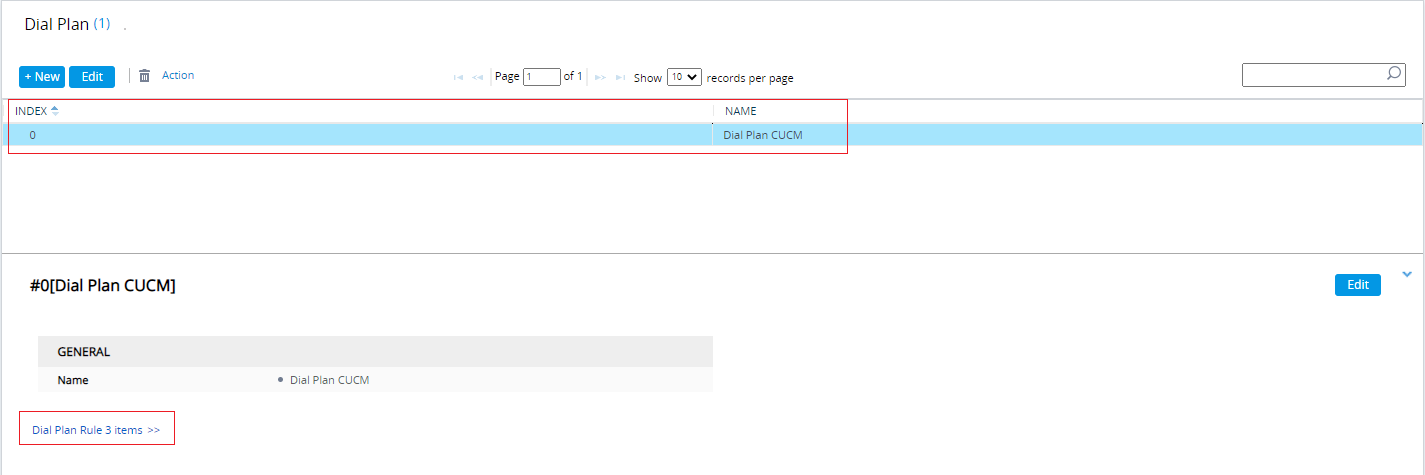
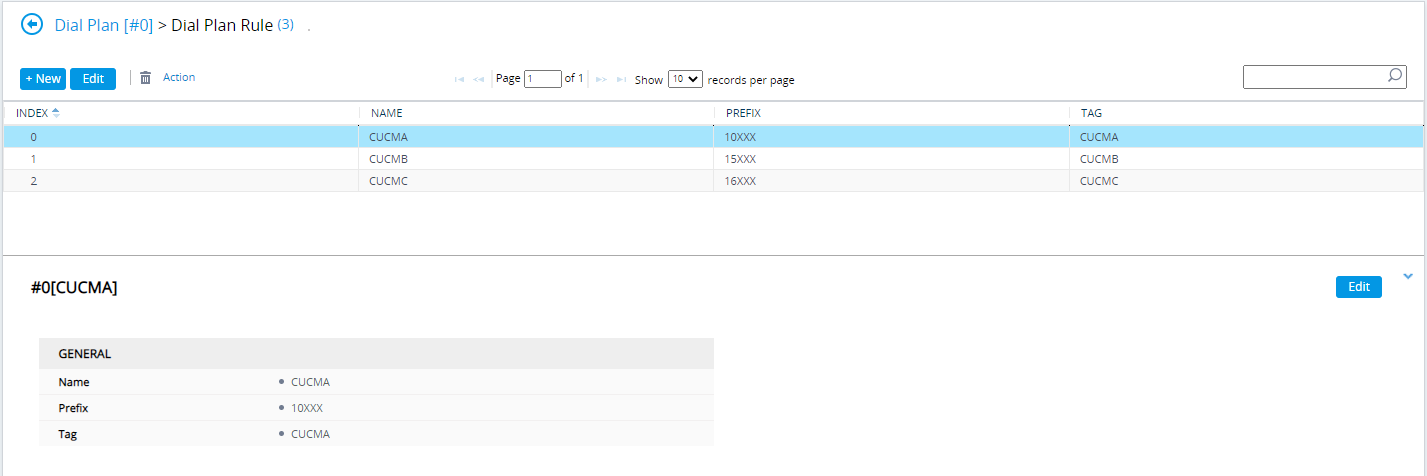
- Click on Dial Plan Rule 0 items
- Click on New
- Let’s add 3 Dial Plan for our Call Manager Cluster. We will be sending calls for 10XXX to CUCM A, 15XXX to CUCM B and 16XXX to CUCM C using tags.
- Name > Enter the name as CUCM A
- Prefix > Enter the prefix as 10XXX
- Tag > Enter the tag as CUCMA
- Click on Apply.
- Likewise, configure 2 more dial plan rule for CUCM B and CUCMC
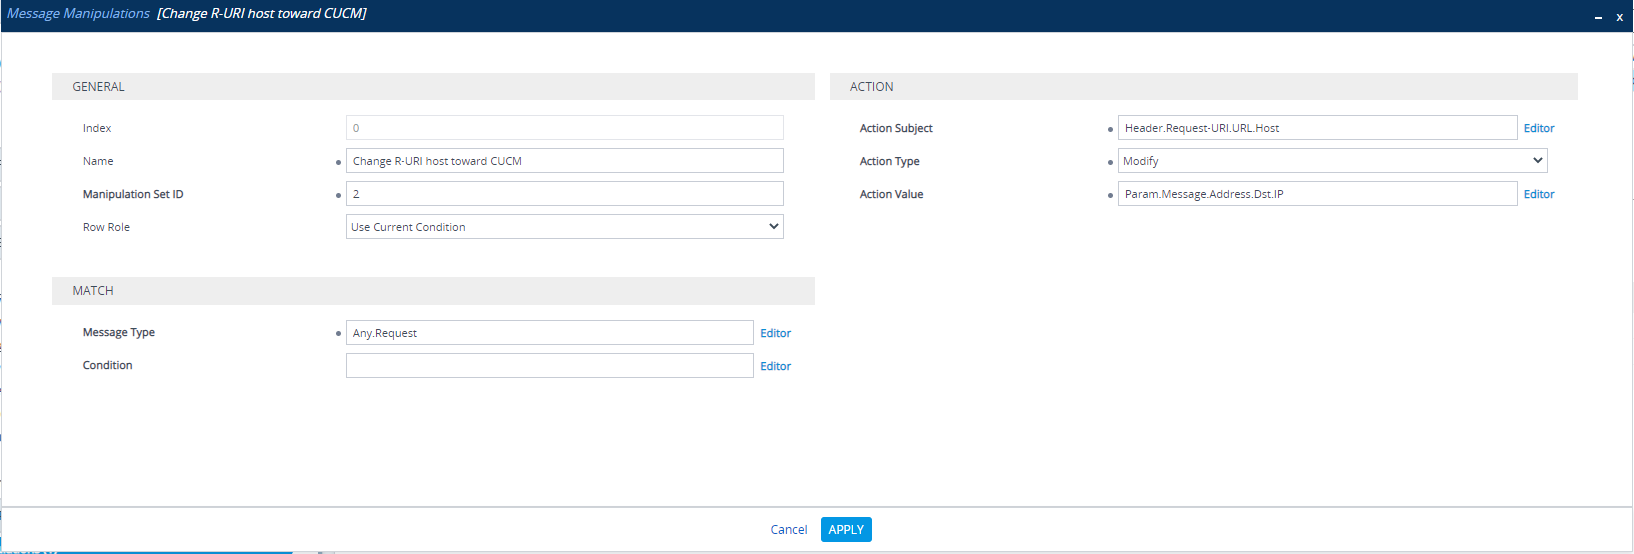
Signaling & Media >Message Manipulation> Message Manipulations
- Click on New
- Enter the Name as > Change R-URI host toward CUCM
- Manipulation Set ID > 2
- Message Type > Any.Request
- Action Subject > Header.Request-URI.URL.Host
- Action Type > Modify
- Action Value > Param.Message.Address.Dst.IP
- Click on Apply
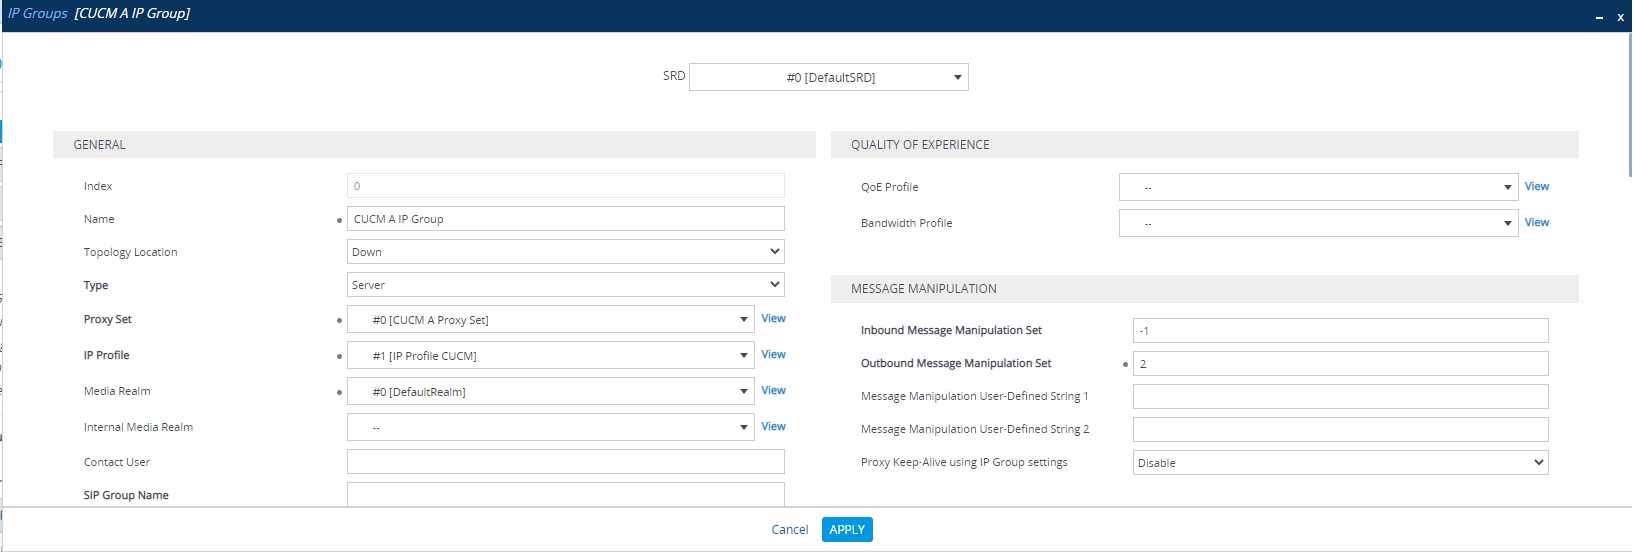
Signaling & Media >Core Entities > IP Groups
- Click on Add New
- Name > Enter the Name as > CUCM A IP Group
- Proxy Set > Select #0 [CUCM A Proxy Set] from drop down menu
- IP Profile > Select #1 [IP Profile CUCM] from drop down menu
- Medial Realm > Select #0 [DefaultRealm] from drop down menu
- Outbound Message Manipulation Set > Enter the value as 2
- Dial Plan > Select the dial plan we created in the above step > #0 [Dial Plan CUCM]
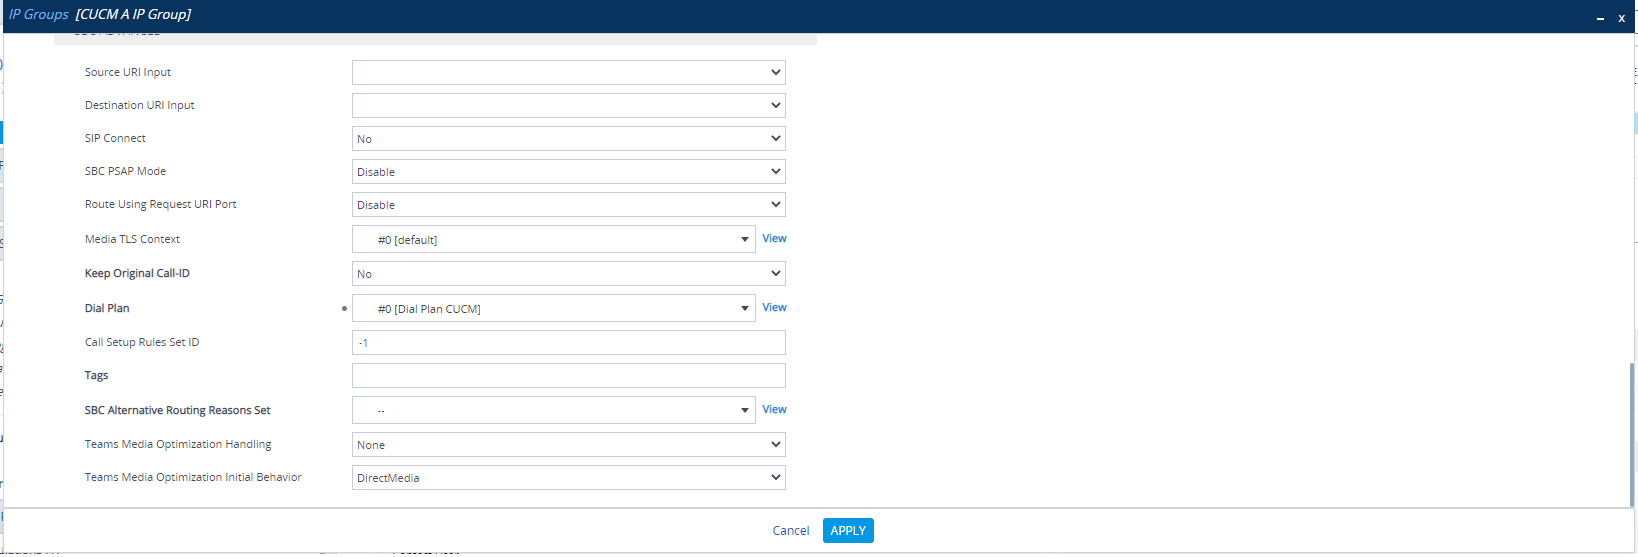
- Leave other configuration as default
- Click on Apply
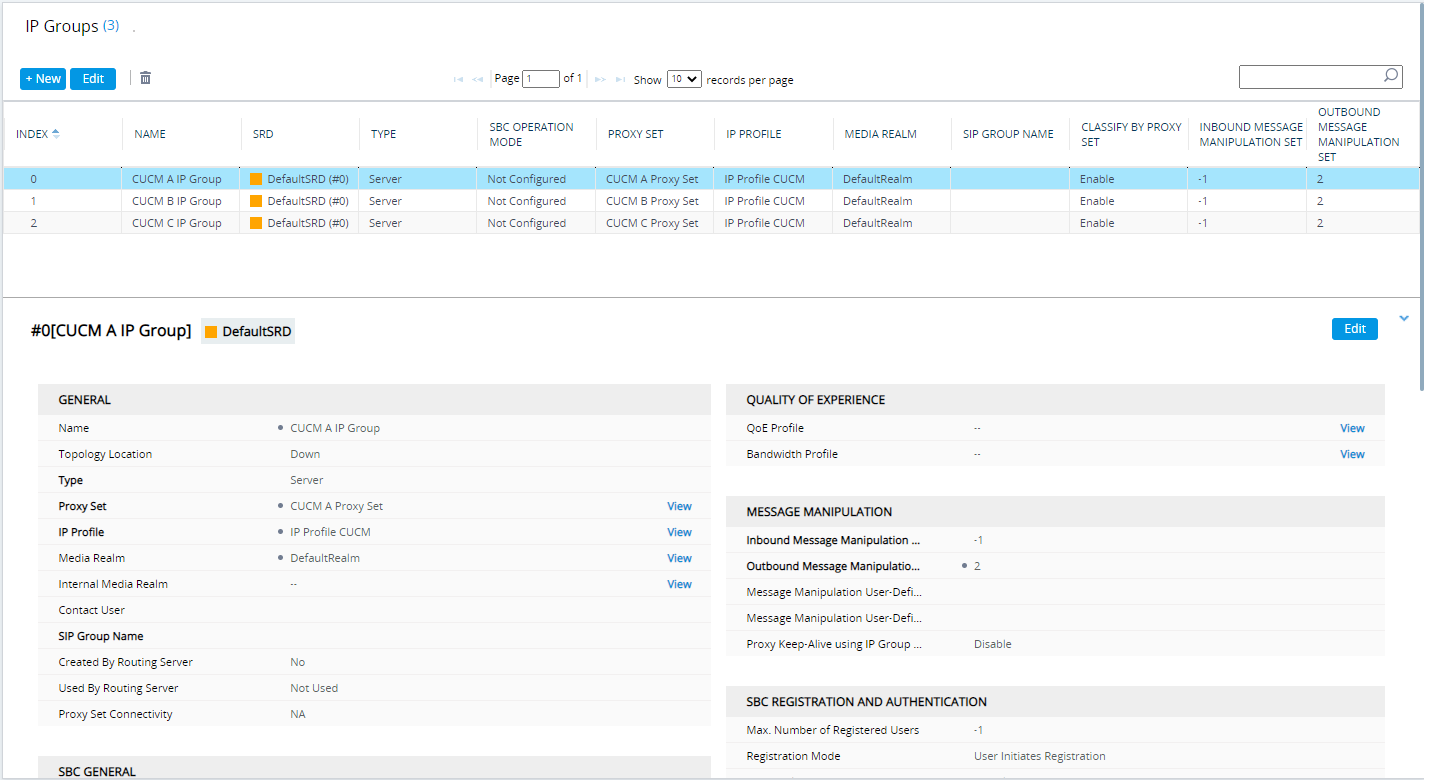
- Likewise, create 2 more profile for CUCM B and CUCM C following similar steps as above.
- So after creating all the 3 IP Groups, it should look like as below:
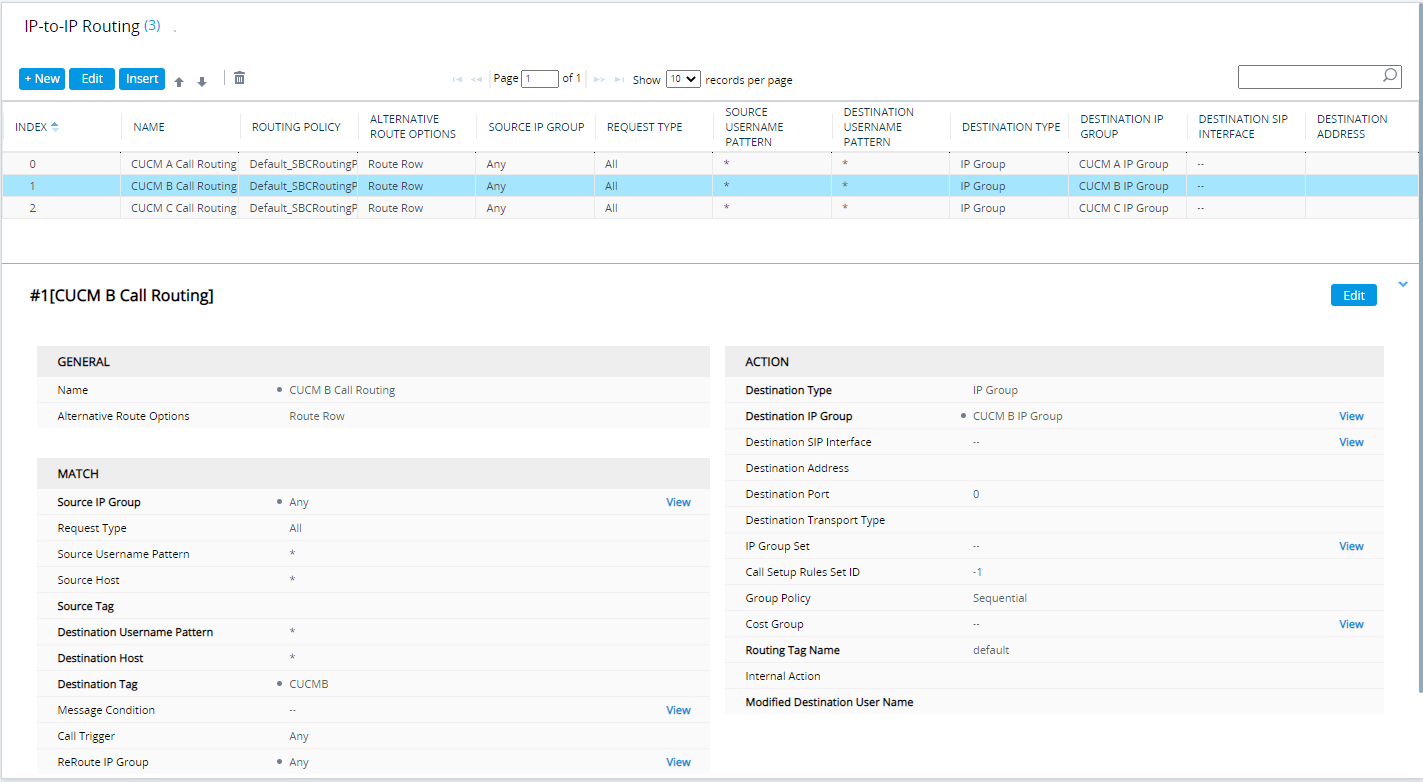
Signaling & Media > SBC > IP-to-IP-Routing
- We need to create 3 IP-to-IP-Routing rule for CUCM A, CUCM B and CUCM C.
- Click on Add New
- Name > Enter the name as CUCM A Call Routing
- Destination Tag > CUCMA
- Destination Type > Select IP Group from drop down menu
- Destination IP Group > Select #0 [CUCM A IP Group] from the drop down menu
- Click on Apply

- Likewise create 2 more IP-to-IP-Routing rule
- Change the destination tag and Destination IP Group accordingly.
We are done with the configuration on Audiocodes, now make sure you have created a SIP trunk towards Audiocodes from your CUCM A, CUCM B and CUCM C.
Make inter-cluster calls from each of these clusters and the calls should work provided you have followed the above steps correctly and your Trunks are up and running with the right configuration on CUCM.
You can also watch this YouTube video where i have recorded the configuration steps.

I am working in an IT company and having 10+ years of experience into Cisco IP Telephony and Contact Center. I have worked on products like CUCM, CUC, UCCX, CME/CUE, IM&P, Voice Gateways, VG224, Gatekeepers, Attendant Console, Expressway, Mediasense, Asterisk, Microsoft Teams, Zoom etc. I am not an expert but i keep exploring whenever and wherever i can and share whatever i know. You can visit my LinkedIn profile by clicking on the icon below.
“Everyone you will ever meet knows something you don’t.” ― Bill Nye
