Get Root Access to CUCM, Cisco Unity Connection, UCCX just like Cisco TAC in less than a minute.
Most of you might know that we can root Cisco Unified Communications Manager (CUCM), Cisco Unity Connection (CUC) or Cisco Unified Contact Center Express (UCCX) using CentOS or Linux OS. That is a long process where you need to shutdown the platform, boot the platform with CentOS or Linux and then root it using some commands and then turn on the platform. This is time consuming and it takes around 15-30 minutes. In case you have not gone through this process, here is the article.
Note: UC Collabing does not recommend to try and apply it on your production server and will not be held for any damages that could occur in your system. In case you perform this on your production servers, you may void Cisco contract. This is only for lab and learning purpose!
Pre-requisite – Download UCOS Password Decrypter from this link.
Here is the step by step process to root your UC Appliance.
- Login to CUCM/UCCX/CUC which you want to get root access using SSH.
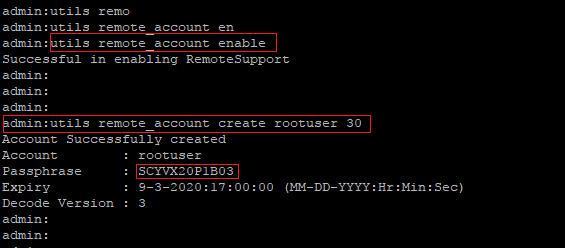
- Enter the command : utils remote_account enable
- You should receive a message as “Successful in enabling RemoteSupport“.
- Enter the command : utils remote_account create rootuser 30 (The remote account name will be “rootuser” and it will be valid for 30 days only)
- You should receive a message as “Account Successfully created“.
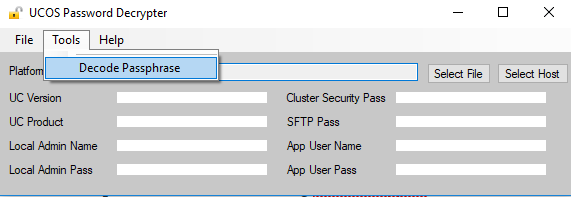
- Launch UCOS Password Decryptor tool.
- Click on Tools > Click on Decode Passphrase
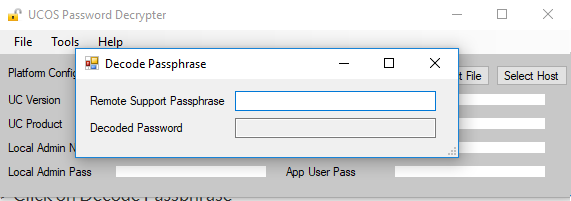
- Now copy the Passphrase which was generated from the CLI and enter it into Remote Support Passphrase.

- Now open a new Putty session and login to the CUCM/CUC/UCCX CLI which you used in the above steps.
- Login with username as “rootuser” and password as generated in he Decoded Password. In our example it is “HP1LPBIFJ4“

After 30 days you can follow the process again and gain access.
HTH

This method will not work, as all passphrase now generated is very long and this decrypter cannot decode it
admin:utils remote_account create rootuser 1
Account Successfully created
Account : rootuser
Passphrase :
—–BEGIN PASSPHRASE—–
oMaJE8oJELDHnx1LLIoPE3/H11aHRQHop4rh34EcxqL7Ev/aUNGYI8dNEuLp4Z1ouiNEDiqgLJ0fUanVOKQk+opfe19Nvk/a6LZC/83nURam6kqFMqVe5sLCKKhHrJE1K1Hr2XK7LAIrEihoxNcJVa6DJbpmiphzy2SqX492nr2KUkvTtsQwTgVRuORKwNH1Lbj+R9Xifp4LI3BdjiJOsByWvPDRG4d6GyEIKI0pHLji5pHzjPCV0z9onWF+YaXyyaLX
—–END PASSPHRASE—–
Version : 2
Expiry : 8-6-2020:12:00:00 (MM-DD-YYYY:Hr:Min:Sec)
Hi Piyush,
I do agree that this is not working with 12.x but it is definitely working with 10.x and might be 11.x (I have not tried that). May be worth trying with the typical method by putting the Cent OS ISO file.
Thanks so much for this information. It is INCREDIBLY helpful in my lab. However, I’ve discovered some oddity in behavior and I’m wondering if you’ve run into it.
I upgraded recently to 11.5.1.22900-28 from 11.5.1.12900-21. The procedure worked prior to the upgrade. When I run the procedure now, it results in a passphrase that is significantly more complicated and encoded in some way.
Example:
Passphrase :
—–BEGIN PASSPHRASE—–
l7EldJ0glCps1suMNwX1noOFQkhG0qnfd83Hcgl1+hlAzfykpk5DifNep7C01LPmniSaUeMUNtThBEvumANH7NYtVtxvkDTooAySdmHeoO6JcPy41Na89REP/PA894p70REDA/WElz/rRTc4m2DOBklxsFHxeQwtlqbybJOzYuo=
—–END PASSPHRASE—–
Expiry : 9-29-2021:13:00:00 (MM-DD-YYYY:Hr:Min:Sec)
(Note that I randomized some of this passphrase for security purposes)
Is this a change of behavior in newer versions? If so, do we know what the decode process is?
Hello, for the CUCM14 version, the password encoding algorithm of rootuser has been changed, how can I login to linux using this account?
Thanks help because I need checked something on linux.
CUCM now generates a passphrase that looks like this, which doesn’t work with the UCOS Decrypter. Is there a solution to this?
—–BEGIN PASSPHRASE—–
U+4/EtULdsRm8ADR5595zaQyKO73OpCYOg36KEiC0KpyV9A06GMmf72ra/d0B+Ae+kkdGnW7vjcMzg36KvCdyv/4KBLrHT5Mj02DNODY9BT1e44oaDlrlv+mv076vcq8JnXQFMmy+zkUMUNrxLupd1aFN0UNaVXaESi2a60YlgJ=
—–END PASSPHRASE—–
I get a long passphrase, is there a way to decrypt this?
—–BEGIN PASSPHRASE—–
h54Y8vWEA5qNPxRF3K+G1EUpD2Jyne3l082g2EHeuG8RvgtlAW7s0Cl0mvBjrXAkXVpwDoCx6DT1QKphVLWLpg54//+ExaeAnl6O+eFjoeN2Zyh6Xzm9Y12UTLBVzTByadOlq0Yx7fb7SkA6+nOYp0qlqSouTWLiCP3GsVzQNdmb9xrQZhwtdCMI0VMEwvWO4DRJQg0S9eJglOo2TcLTK1ryvxs+jJqzp5A6o9Ric13DxTZsZplu6n0oZyM3r1UVRc5TCR8HfigdjU1zjFIIPFnRuGlQMAt97z27zmPhmvEIXpvysN08n8XQiqjQeHpCRPt0QAsuXq4NXNIKsw==
—–END PASSPHRASE—–
With CUCM 14 this no longer works.