Configuring Device Mobility Group CUCM
Cisco Unified Communications Manager helps to identify if a Phone is at it’s Home Location or Roaming Location. This can be identified by using a feature in CUCM which is called as Device Mobility. It helps user to roam between different office locations with their phones and it helps to get site specific settings where CUCM in turn allocate settings for call routing, codec, media resource selection etc. Device mobility settings modify device AAR CSS, AAR Group and CSS.
In our Scenario, we will use two different locations like New Delhi and Bangalore. A user from New Delhi will visit Bangalore and use his Cisco IP Communicator to Login.
(Note: Assuming you already have the Calling Search Space, Partitions, Regions, Locations, Device Pools and MRGL are in place.)
To configure Device Mobility, follow the below steps:
Create Physical Location
- Go to System > Physical Location > Click on Add New
- Name > New_Delhi_Physical_Loc
- Description > Physical Location for New Delhi
- Click on Save
- Name > Bangalore_Physical_Loc
- Description > Physical Location for New Delhi
- Click on Save
Create Device Mobility Group
- Go to System > Device Mobility > Device Mobility Group > Click on Add New
- Name > New_Delhi_DMG
- Description > New Delhi Device Mobility Group
- Click on Save
- Name > Bangalore_DMG
- Description > Bangalore Device Mobility Group
- Click on Save
Create Device Mobility Infos
- Go to System > Device Mobility > Device Mobility Infos > Click on Add New
- Name > New_Delhi_DMI
- Subnet* > 10.1.1.0 (Enter the IP Address range from New Delhi Office Location)
- Subnet Mask (bits size)* > 255.255.255.0 (Enter Subnet Mask from New Delhi Office Location)
- Selected Device Pools from Available Device Pool > New_Delhi_DP (Enter New Delhi Office Location Device Pool)
- Click on Save
- Name > Bangalore_DMI
- Subnet* > 20.1.1.0 (Enter the IP Address range from Bangalore Office Location)
- Subnet Mask (bits size)* > 255.255.255.0 (Enter Subnet Mask from Bangalore Office Location)
- Selected Device Pools from Available Device Pool > Bangalore_DP (Enter Bangalore Office Location Device Pool)
- Click on Save
Change the Service Parameter for Device Mobility
- Go to System > Service Parameters >
- Server* > Select the Server for which you would like to change the parameter
- Service* > Select Cisco CallManager Service
- Device Mobility Mode > Change the parameter to ON
- Display Device Mobility Location During Phone Registration > Change the parameter to True
- Click on Save
Change the Device Pool configuration
- Go to System > Device Pool > New_Delhi_DP
- Physical Location > New_Delhi_Physical_Loc
- Device Mobility Group > New Delhi Device Mobility Group
- Click on Save
- Click on Reset
- Go to System > Device Pool > Bangalore_DP
- Physical Location > Bangalore_Physical_Loc
- Device Mobility Group > Bangalore Device Mobility Group
- Click on Save
- Click on Reset
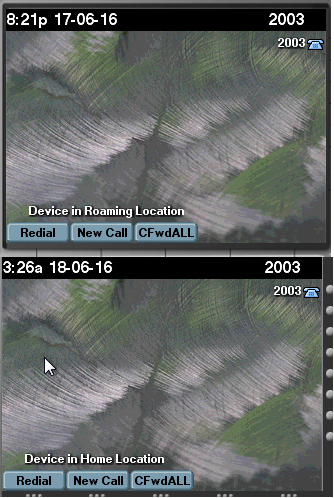
Test Results : When in New Delhi Location and Bangalore Location.
Hope this helps!!

I am working in an IT company and having 10+ years of experience into Cisco IP Telephony and Contact Center. I have worked on products like CUCM, CUC, UCCX, CME/CUE, IM&P, Voice Gateways, VG224, Gatekeepers, Attendant Console, Expressway, Mediasense, Asterisk, Microsoft Teams, Zoom etc. I am not an expert but i keep exploring whenever and wherever i can and share whatever i know. You can visit my LinkedIn profile by clicking on the icon below.
“Everyone you will ever meet knows something you don’t.” ― Bill Nye
