Configure Call Handler Cisco Unity Connection
Call Handlers in Cisco Unity Connection is a feature which provides services like IVR where the calls are handled and routed in an efficient manner. Basically Call Handler serves many purposes like answer the call, greet the caller, provide them information with options, routes the call, take messages and much more.
Example: – Let’s say we have a customer who generally calls us on our Board Number. The customer wants to talk to various departments like Finance, Security, IT department and Customer care on difference occasions. So, when he/she dials the board number, he will be greeted with a welcome greeting, then it will ask the customer if the customer wants to reach to Finance, Security, IT Department or Customer? Upon customer selection on the category he chooses, the call will be routed accordingly.
Call Flow: – Call comes on the gateway ==> Call routed to CUCM ==> Call routed to CUC ==> Checks the schedule if holiday/working/out of business hours ==> Take necessary actions accordingly.
Lets implement it.
Pre-requirements:-
1. Integration between Cisco Unified Communication Manager and Cisco Unity Connection: –
2. You will need 3 Prompts: –
a. Opening Hours Greeting + Menu Greeting in same WAV file.
b. Closed Hours Greetings
c. Holiday Greetings
If you don’t have prompts, you can create prompts from the link here : Text To Speech Free
Configuration in CIsco Unified Communication Manager:
********** Configuration of Line Group **********
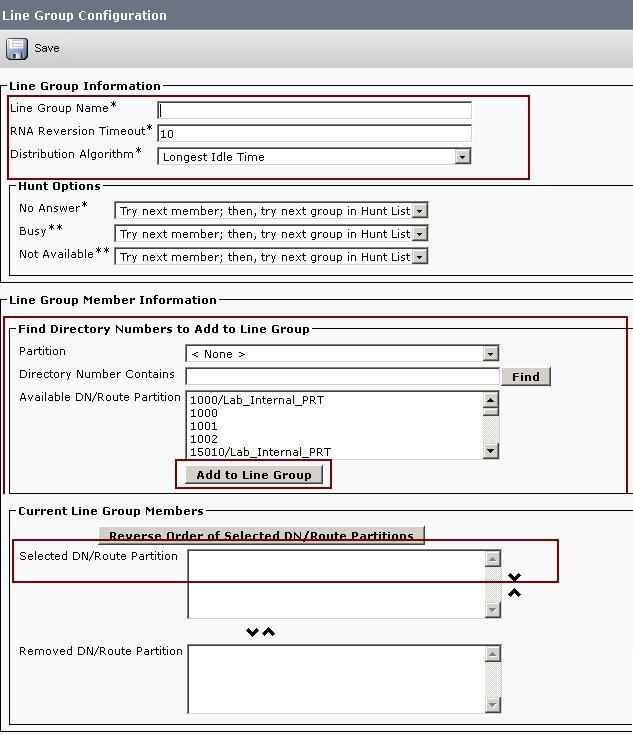
1. Go to Call Routing ==> Route/Hunt ==> Line Group ==> Add New
Line Group Name: – Customer Response Solution LG
RNA:- 10
Distribution Algorithm: – Top Down
Available DN/Route Partition: – Select voicemail ports configured
Click on Save
Click Add Line Group
Line Group* – Select Customer Response Solution LG from Drop Down Menu
Click on Save
Click on Save
********** Configuration of Hunt List **********
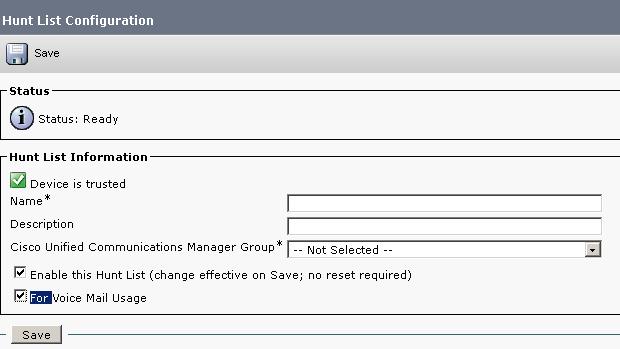
2. Go to Call Routing ==> Route/Hunt ==> Hunt List ==> Add New
Name: – Customer Response Solution HL
Description: – Customer Response Solution Hunt List
CUCM Group: – Select appropriate CUCM from the Drop down list.
Check Mark : – Enable this Hunt List (change effective on Save; no reset required)
Check Mark : – For Voice Mail UsageClick on Save
********** Configuration of Hunt Pilot **********
3. Go to Call Routing ==> Route/Hunt ==> Hunt Pilot ==> Click on Add New
Hunt Pilot ==> Enter the number which should be triggered to Cisco Unity Connection
Route Partition ==> Select appropriate Route Partition based on your Calling Privileges and directory numbers.
Hunt List : – Select Customer Response Solution HL from Drop Down
Click on Save

Configuration in Cisco Unity Connection:
********** Configuration of Holiday Schedule**********
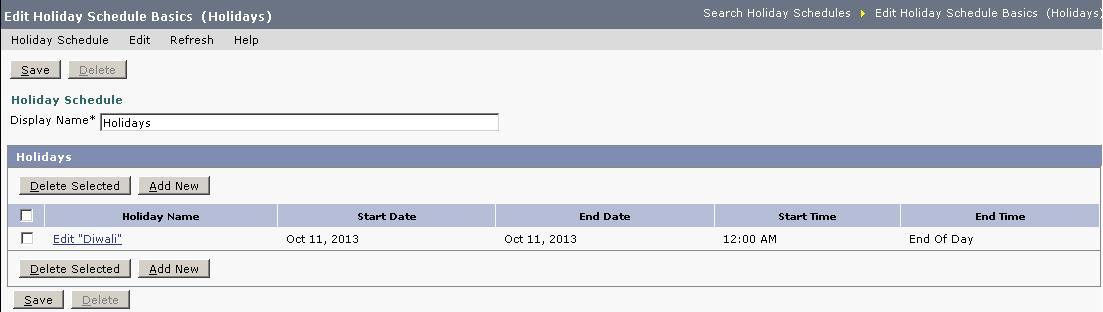
1. Go to System Settings ==> Holiday Schedules ==> Add New
Display Name : – Customer Response Schedule – Holiday Schedule
Click on Add New : –
Holiday Name : – Diwali
Start Date : –
End Date : –
Click on Save
********** Configuration of Schedules like Working Hours / Non Working Hours**********
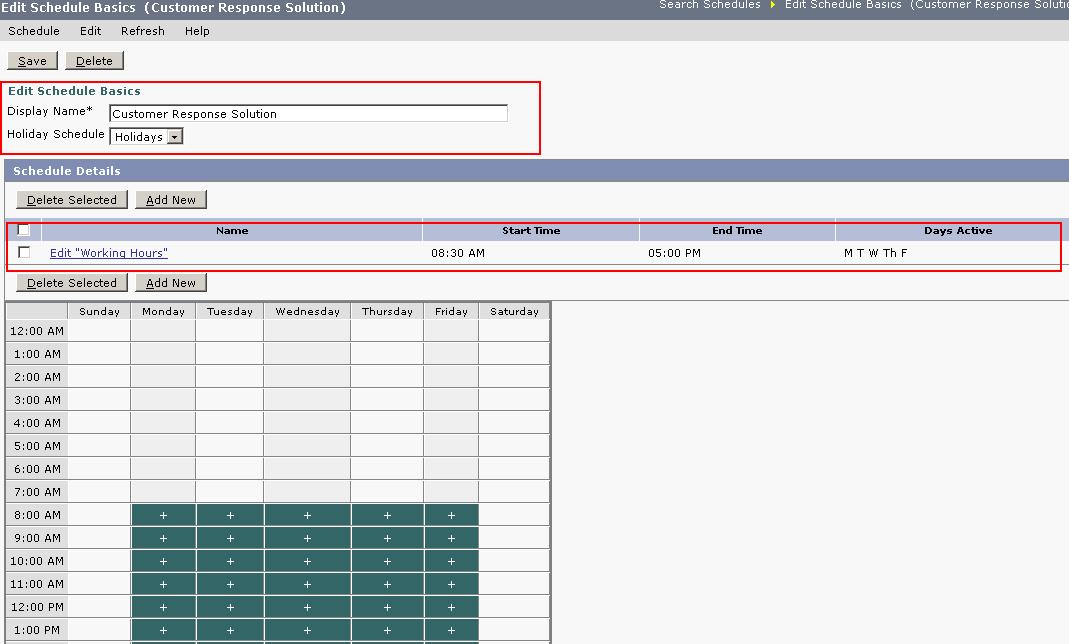
2. Go to System Settings ==> Schedules ==> Add New
Dispaly Name: – Customer Response Solution
Holiday Schedule: – Customer Response Schedule – Holiday Schedule
Click on Save
Add a new Schedule Detail : – Click on Add New
Name : – Working Hours
Start Time : – 8 : 30 : AM
End Time : – 5: 00 : PM
Check Mark : – Active Weekdays
Click on Save
********** Configuration of Call Handlers **********
********** Adding a Call Handler **********
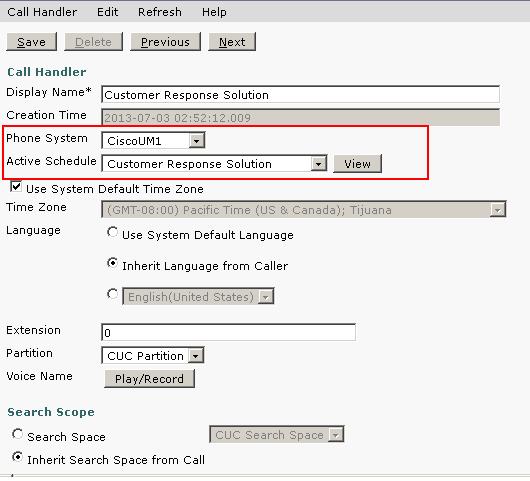
3. Go to Call Management ==> System Call Handlers ==> Add New
Display Name : – Customer Response Solutions
Click on Save
Phone System ==> Make sure that you select you Voicemail Phone System where Ports are associated
Active Schedule ==> Select Customer Response Solution
Click on Save
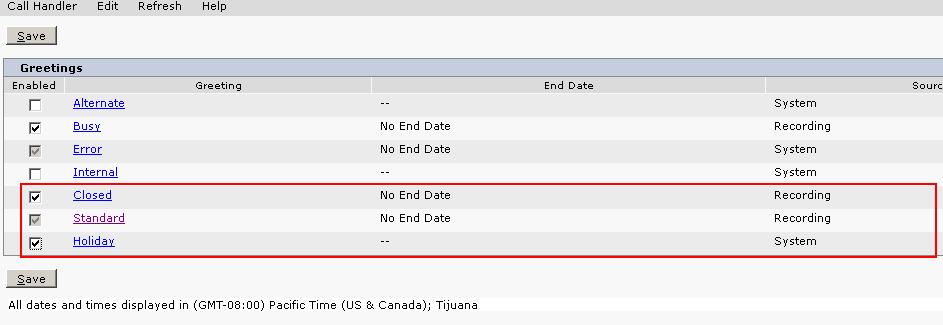
********** Configuration of Welcome Greetings **********
Go to Edit Greeting ==> Check Mark Holiday and Closed and Click on Save
Click on Standard ==>
Radio Check My Personal Greeting
Times to re-prompt caller ==> 3
Delay between re-prompts ==> 5
After Greeting Hang Up
Click on Play/Record and select the appropriate Welcome Greeting by selecting a .wav file
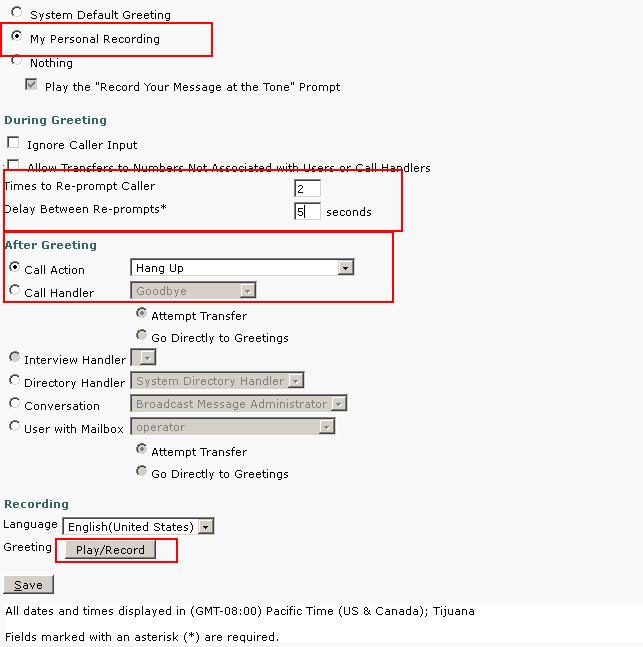
** In my scenario, i have merged Welcome Greeting + Menu options in the save WAV file**
(Welcome to XYZ Company. Press 1 for Finance, Press 2 for Administrator, Press 3 for IT Department and Press 4 for Security)
********** Configuration of Closed Hours Greetings **********
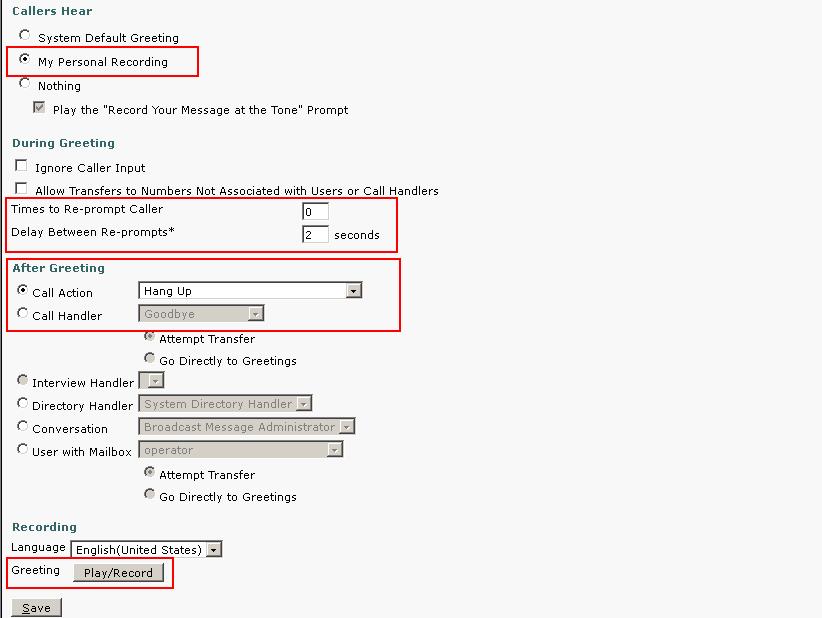
Click on Closed ==>
Radio Check My Personal Greeting
Times to re-prompt caller ==> 0
Delay between re-prompts ==> 0
After Greeting Hang Up
Click on Play/Record and select the appropriate Closed Hours Greeting by selecting a .wav file
********** Configuration of Holiday Greetings **********
Click on Holiday ==>
Radio Check My Personal Greeting
Times to re-prompt caller ==> 0
Delay between re-prompts ==> 0
After Greeting Hang Up
Click on Play/Record and select the appropriate Holiday Greeting by selecting a .wav file
********** Configuration of Menu Selection **********
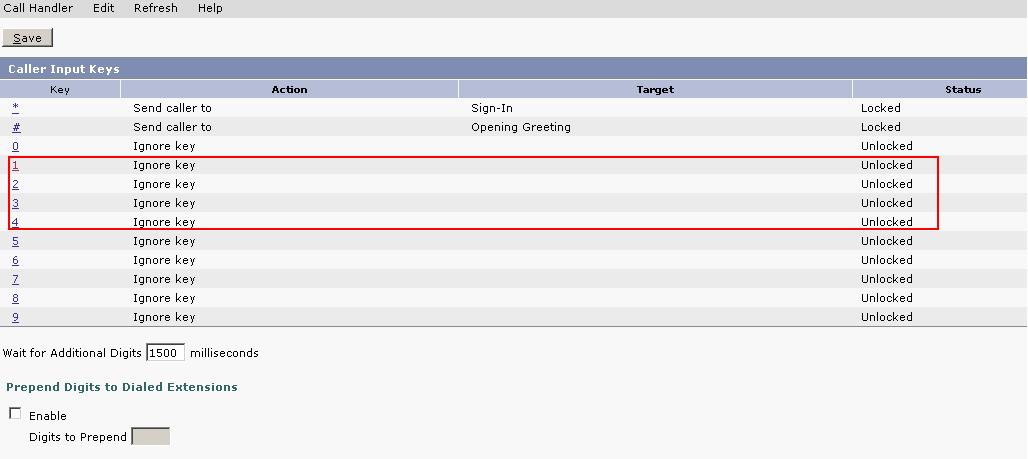
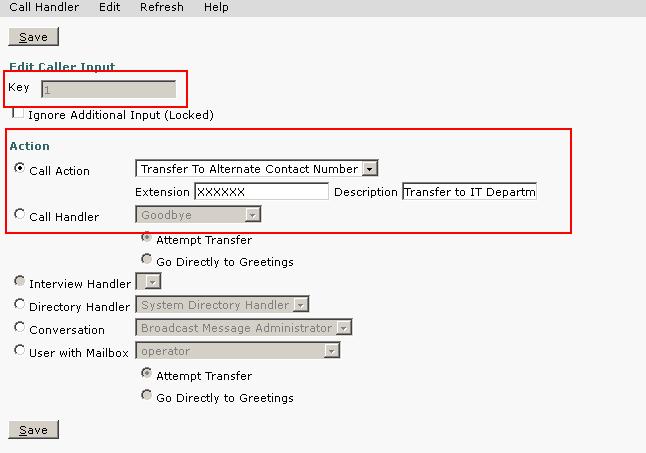
Go to Edit ==> Caller Input ==> Click on 1
Call Action ==> Transfer to Alternate Contact Number
Extension ==> Extension Number for Finance Department
Description ==> Call Transfer to Finance Department
Go to Edit ==> Caller Input ==> Click on 2
Call Action ==> Transfer to Alternate Contact Number
Extension ==> Extension Number for Administrator Department
Description ==> Call Transfer to Administrator Department
Go to Edit ==> Caller Input ==> Click on 3
Call Action ==> Transfer to Alternate Contact Number
Extension ==> Extension Number for IT Department
Description ==> Call Transfer to IT Department
Go to Edit ==> Caller Input ==> Click on 4
Call Action ==> Transfer to Alternate Contact Number
Extension ==> Extension Number for Security
Description ==> Call Transfer to Security
********** Configuration of Direct Routing Rule**********
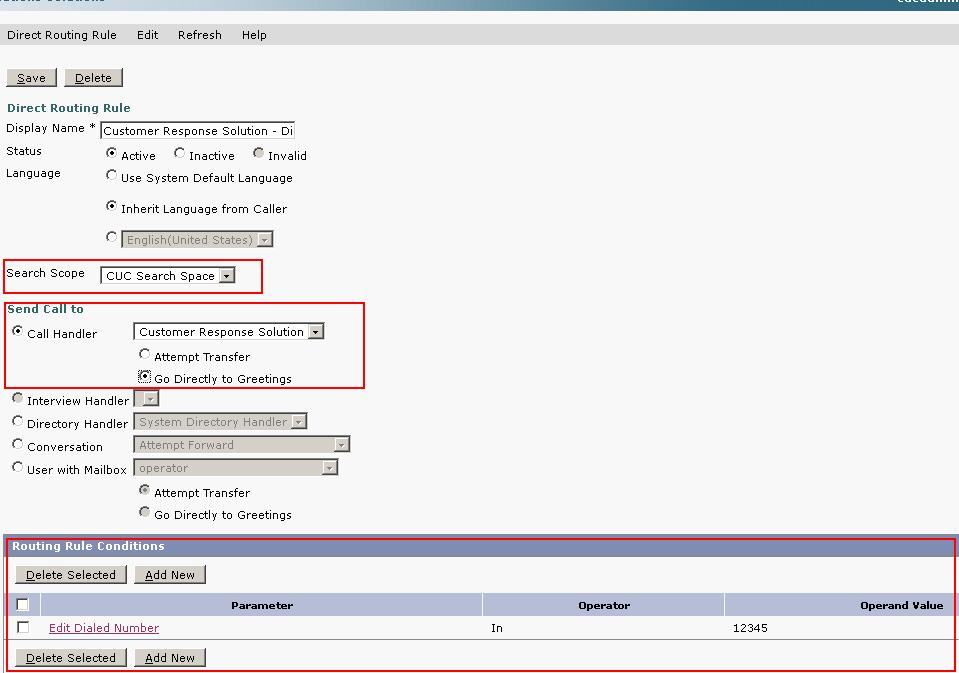
4. Go to Call Management ==> Call Routing ==> Direct Routing Rules ==> Click on Add New
Display Name : – Customer Response Solution – Direct Routing Rule
Radio Check : – Send call to : Call Hander : Customer Response Solutions
Click on Save
Add New Routing Rule Condition
Radio Check : Dialed in number = in XXXXXX (The Hunt Pilot configured in CUCM)
Click on Save
********** ********** ********** End of Configuration ********** ********** **********
You are done with the Call Handler setup and now ready to receive calls. There are various ways to achieve customer’s requirement in Cisco Unity Connection and do necessary modifications as per your requirement.
Here is the YouTube video on configuring Cisco call handlers
If you are looking for Text to Speech Converter that converts to an Audio WAV file into the recommended format, follow below link:
Convert Text to Speech Online Free
Hope this helps!

I am working in an IT company and having 10+ years of experience into Cisco IP Telephony and Contact Center. I have worked on products like CUCM, CUC, UCCX, CME/CUE, IM&P, Voice Gateways, VG224, Gatekeepers, Attendant Console, Expressway, Mediasense, Asterisk, Microsoft Teams, Zoom etc. I am not an expert but i keep exploring whenever and wherever i can and share whatever i know. You can visit my LinkedIn profile by clicking on the icon below.
“Everyone you will ever meet knows something you don’t.” ― Bill Nye

Hello Friends,
I did the procedure, but it didn´t work. Could you give me a cloud?
What did not work? Can you please clarify?
When I dial the hunt pilot the call goes to voicemail instead of the announce. I think the problem is when you set the Unity´s ports into group of lines on UCM. I´d like to send somes screenshots about it.
Sure. Send it across [email protected]. If you would like to have a team viewer session, let me know.
Great Post !
You explaination is very well. You helped me to solve my specific problem by online session. My audio file had the wrong format. The right format is: CCITT, 8000 KHz, 8bits, mono.
Thanks a lot !
Hello Friend,
I want to set two different messages with the same number in differents hours. How can I do that if i call at the the same number? I tried to do it, but I couldn´t.
Hello Claudio,
You can achieve that using the same number. You need to create schedule with different hours as per your requirement.
Schedule
For Example – Create 5 Schedules
Schedule Name – CR_BH1 – 8:00 AM – 12:PM – Plays Business Hours Greeting and the route to the Group or extension as per your requirement
Schedule Name – CR_LH1 – 12:00 PM – 1:00 PM – Plays Lunch Hours Greeting, Either Leave a VM or direct it to Receptionist
Schedule Name – CR_BH2 – 1:00 PM – 6:00 PM – Plays Business Hours Greeting and the route to the Group or extension as per your requirement
Schedule Name – CR_OOH1 – 6:00 PM – 12:00 PM – Plays Outside Business Hours Greeting – Either Leave a VM or Disconnect the call
Schedule Name – CR_OOH2 – 12:00 PM – 8:00 AM – Plays Outside Business Hours Greeting. Either Leave a VM or Disconnect the call
Call Handler
For Example – Create 3 Call Handler –
Call Handler Name – Customer Response_OOH – Upload Appropriate Greeting and route it accordingly
Call Handler Name – Customer Response_Business Hours — Upload Appropriate Greeting and route it accordingly
Call Handler Name – Customer Response_Lunch Hours — Upload Appropriate Greeting and route it accordingly
Direct Routing Rule
For Example – Create 3 Direct Routing Rule
Customer Response -> Dialed In Number – 12345 – Schedule OOH1 and OOH2 –> Send Call to Call Handler -> Customer Response_OOH
Customer Response -> Dialed In Number – 12345 – Schedule CR_BH1 and CR_BH2 –> Send Call to Call Handler -> Customer Response_Business Hours
Customer Response -> Dialed In Number – 12345 – Schedule CR_LH1 –> Send Call to Call Handler –>Customer Response_Lunch Hours
Hope this helps!!
If you want to set 3 different Call Handler. Should you check Standard, Holiday and Close each box in all greetings of each Call Handler? or Should you check Standard, Holiday and Close box separately for each customer Call Handler?
When you set the Direct Routing Rule Condition with dialed in number and you also check the Schedule? Will both condition work properly?
No, you don’t need to check box the Alternate, Holiday or Close Messages. On all the 3 Call Handlers, you need to upload the prompt at Standard and treat the call accordingly.
In DRL, you need to add both the conditions, Dialed in Number and Schedule and i am sure it will work properly. I have done this configuration 3 years back. If this does not work, let me know i will check the configuration and will troubleshoot further if required. I am available till 12:00 AM IST.
I was watching the DRL and you can only add one condition into it (DRL Condition >Edit Routing Rule Condition).
You can set dialed number or schedule. You can´t add both. I´m working with Unity Connection 9.1.2ES20.11015-20. I am available till 5:00 PM (UTC-3).
I agree with you. You can’t select both the condition in the same Routing Rule Condition as it is not a checkbox, it is a Radio Button. What i meant to say you is, you first add the Direct Routing Rule and then Under Routing Rules Condition you need to add Dialed In Number and Schedule..
For Example – Lets say Our Direct Routing Rule Name is Business Hours. So create Business Hours DRL
Business Hours – DRL
Add Routing Rule Condition
————–> Add Dialed in Number and Save the configuration
Add Second Routing Rule Condition
————–> Add Schedule 1 and Save the configuration
Add Third Routing Rule Condition
————–> Add Schedule 2 and Save the configuration
Save the Business Hours – DRL and check the Call Flow.
The above configuration should work, if it does not work, we might need to tweak the configuration a bit, but the concept would remain the same.
Let me know if you are available for a Team Viewer Session. I am available for next 30 minutes from now i.e., 00:15 AM IST.
Great Post!…..You helped me once again. I´d like to share our last online session.
1) Setting on Call Handler
Active Schedule > All Hours
Language > Use System Default Language
2) Setting on Direct Routing Rule
Status > Active
Language > Use System Default Language
3) Setting on Send Call to
Attempt Transfer
4) Setting on Routing Rule Conditions (in this order)
First: Dialed Number In 9620
Second: Schedule Equals habil
PD: I want to suggest you publish about System Distribution Lists
Hi, Avinash. Can I send my query in email to you?
Hi Salman, i have received your query. I will respond you soon.
Nice post. I was checking constantly this weblog and I am inspired! Very useful info specially the final part 🙂 I deal with such information a lot. I was looking for this certain info for a long time. Thank you and good luck.
Thank you Rolland!!
Thank you so much . Its working perfectly .But I have a doubt . How will I map the hunt pilot number to the DID .
Do I need to create a translation pattern ?
Hi Swathy,
Thanks for the confirmation!
If you want incoming calls to hit to Hunt Pilot, you need to either create a Hunt Pilot in CUCM with the DID number or else you can create a translation pattern and redirect to the hunt pilot number using Called Party Transform Mask.
Hope this helps!
Hi ,
Tried translation both in gateway and CUCM, but no luck. verified that Translation Pattern has a CSS assigned to it and the Hunt Pilot exist in a Partition included in the CSS chosen.
Hi Swathy,
First do a debug on your gateway and see what is the digit being received on the gateway for the called party. Lets say the number that comes on the gateway as 1234.
Assuming that you are not manipulating the number and it is being sent to CUCM without any modification.
Configure 1234 as a Translation Pattern and also configure Transformation Mask with your Hint Pilot Number. Assuming that your HP is 9999, you need to configure 9999 as Transformation Mask. Also your Translation Pattern should have appropriate CSS to route the call to Hunt Pilot.
Configure Hunt Pilot as 9999 and route the call to Unity Connection.
HTH
Hi Avinash your posts are very helpful.
I want to configure corporate directory in cucm 12.X. can you please make a post for corporate directory in cucm 12.0 ver